本文整合了 Maven 构建生命周期、插件配置、依赖管理、全局配置 settings.xml、FatJar 打包、测试与覆盖率等全部知识点,是一份系统性的 Maven 参考指南。
maven-生命周期.xmind
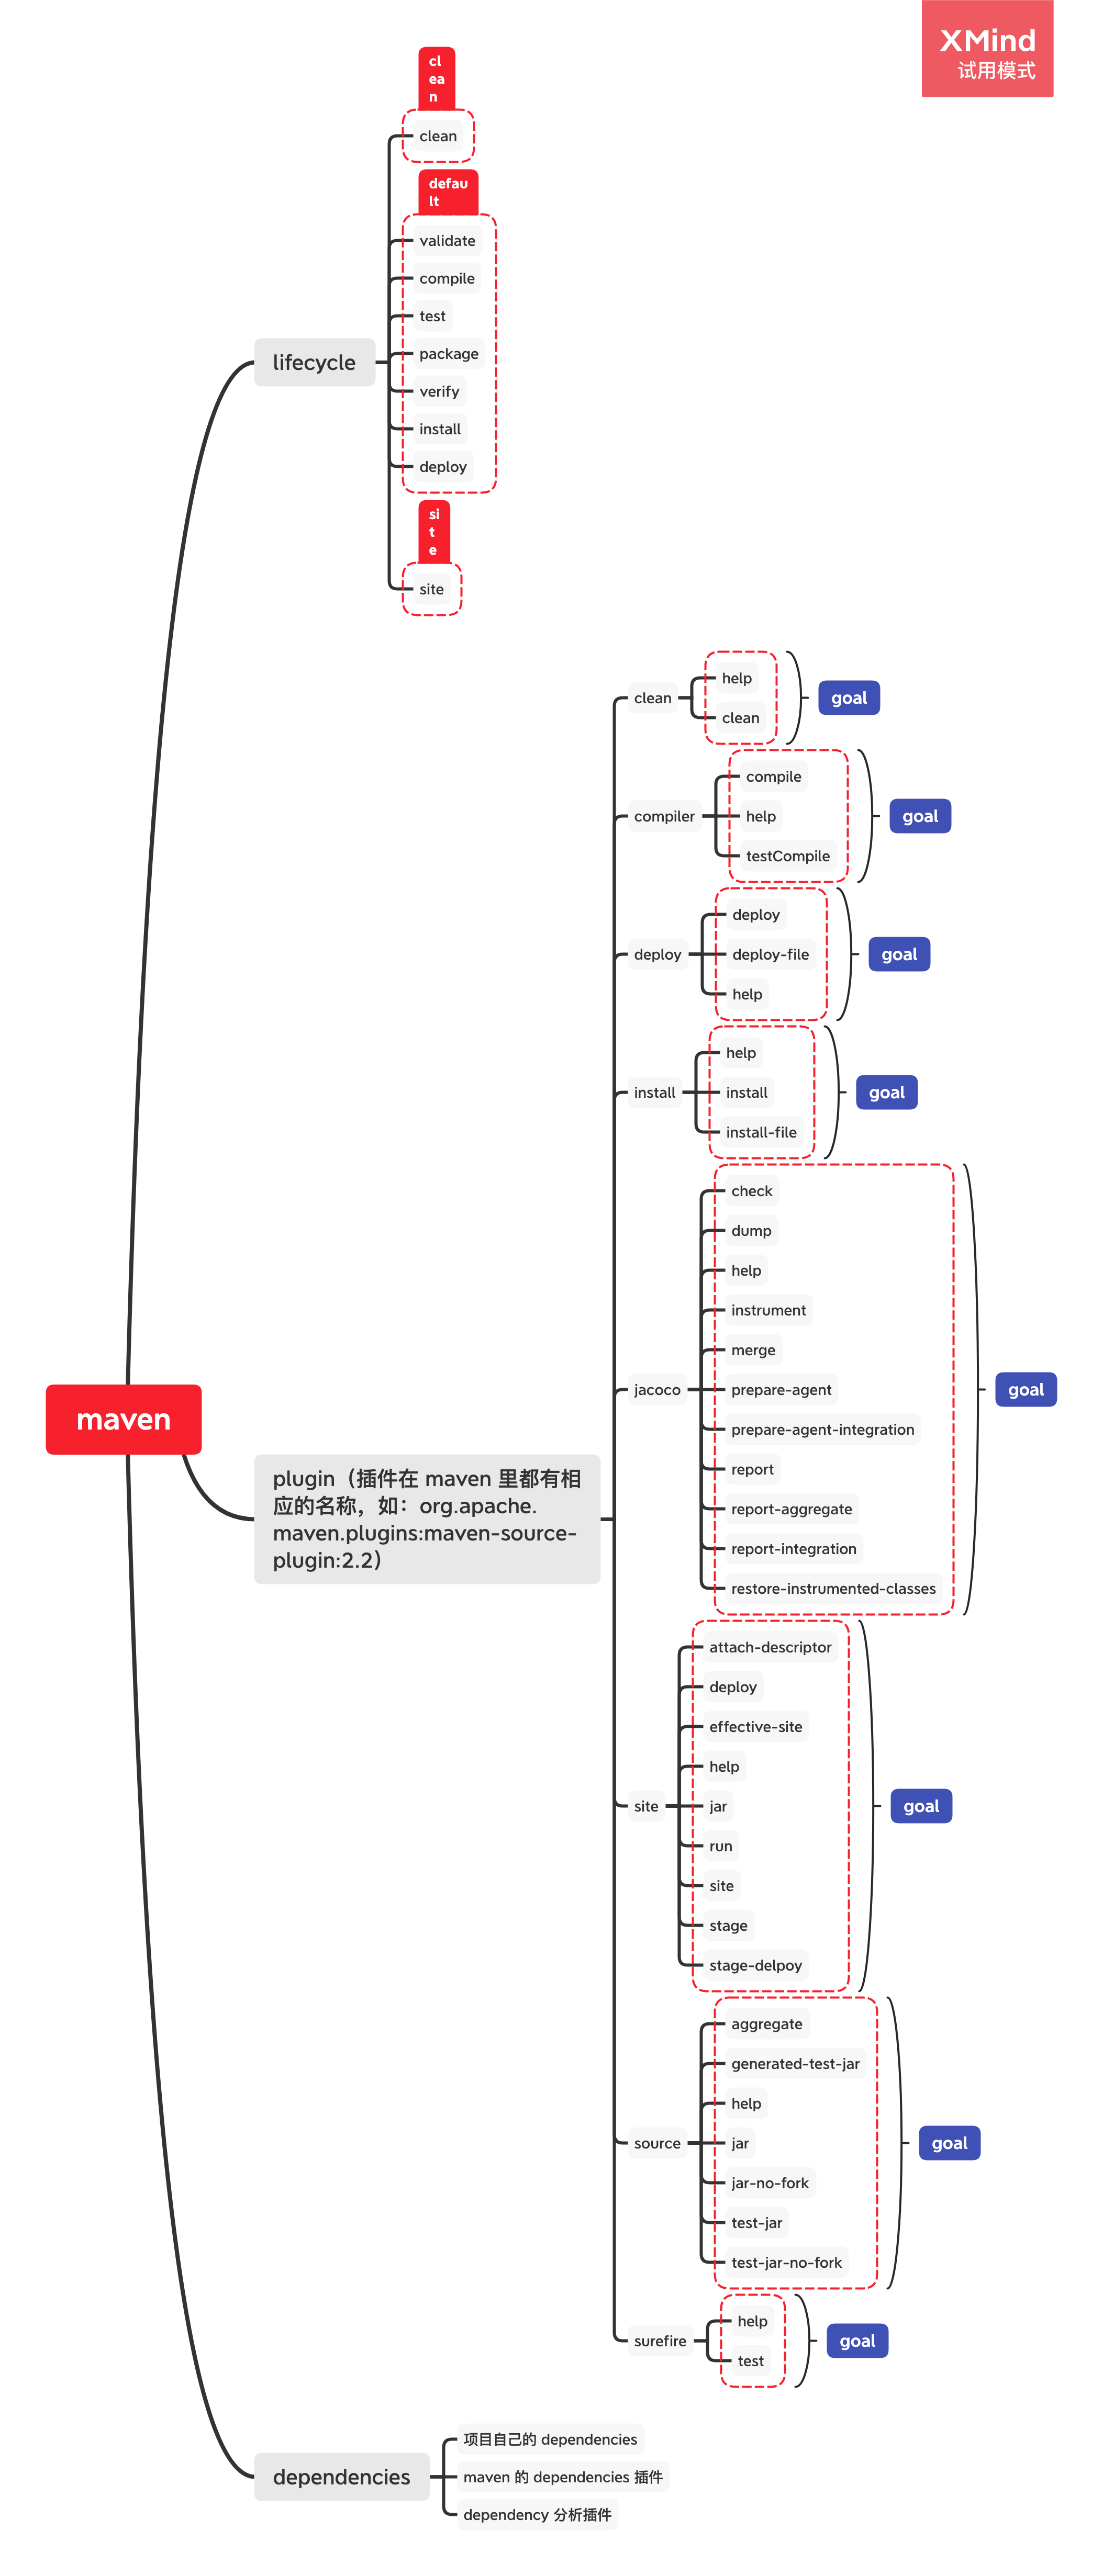
构建生命周期
构建生命周期的基础知识
Maven 基于一个"构建生命周期"的中心概念,也就意味着构建和发布一个特定的工件(也就是工程)的过程已经被清晰地定义了。
有三种内置的生命周期:default,clean 和 site。default 生命周期处理项目部署,clean 生命周期处理项目清理,site 生命周期处理项目的站点(site)文档的创建。
graph TD
    subgraph Clean生命周期
        A1[pre-clean] --> A2[clean]
        A2 --> A3[post-clean]
    end

    subgraph Default生命周期
        B1[validate] --> B2[initialize]
        B2 --> B3[generate-sources]
        B3 --> B4[process-sources]
        B4 --> B5[generate-resources]
        B5 --> B6[process-resources]
        B6 --> B7[compile]
        B7 --> B8[process-classes]
        B8 --> B9[generate-test-sources]
        B9 --> B10[process-test-sources]
        B10 --> B11[generate-test-resources]
        B11 --> B12[process-test-resources]
        B12 --> B13[test-compile]
        B13 --> B14[process-test-classes]
        B14 --> B15[test]
        B15 --> B16[prepare-package]
        B16 --> B17[package]
        B17 --> B18[pre-integration-test]
        B18 --> B19[integration-test]
        B19 --> B20[post-integration-test]
        B20 --> B21[verify]
        B21 --> B22[install]
        B22 --> B23[deploy]
    end

    subgraph Site生命周期
        C1[pre-site] --> C2[site]
        C2 --> C3[post-site]
        C3 --> C4[site-deploy]
    end
实际上这些 lifecycle 只是在(比如 idea 里)对 phase 归类的时候特别有用,我们平时使用 mvn 命令的时候是无法指定这几个生命周期的。
一个构建生命周期是由多个阶段组成的
上面每个生命周期是由不同的 phase 列表组成的。一个 phase 表示生命周期中的一个执行阶段或步骤。
default 里 phases 的顺序是 validate -> compile -> test -> package -> verify -> install -> deploy。
使用命令行
如果我们使用命令:
实际上到 install 为止所有的 phases 都会执行,所以我们通常只要指定执行某一个生命周期的最后一个 phase 就行了。
如果我们使用命令:
maven 会先进行清理,然后再进行部署。如果这是一个多 module 的项目(即有多个子项目),则会遍历每个项目以执行 clean 和 deploy。
如果我们使用命令:
1 mvn clean install -Dmaven.test.skip=true
则执行清理、安装且跳过测试 phase。
每一个构建 phase 是由构建 goal 组成的
phase 下面还可以再细分,细分的单元就是 plugin goal。
plugin goal 其实是一个执行的任务(比 phase 更细粒度)一个 goal 可以和一个或者多个 phase 绑定,甚至在生命周期之外通过直接 invocation 运行。
1 mvn clean dependency:copy-dependencies package
mvn 是一级命令。
clean 和 package 是二级命令,也就是 phase。
dependency 是三级命令,也就是 plugin。
copy-dependencies差不多可以说是参数,也就是 plugin goal。
上面的命令就是执行 clean 及其前面所有的 phases 的所有 goal,单独执行 dependency 插件的 copy-dependencies goal,然后再执行 package 的所有 goal。
一个 goal 被绑定到(bound 是 bind 的过去分词形式)多个 phase,这个 goal 会被执行多遍。
设置你的项目来使用构建生命周期
如何把任务分配到构建 phases 里?
packaging
第一个方法是使用 packaging,它对应的 POM 元素是<packaging>。它的有效值分别是:jar、war、ear 和 pom(pom 也是一个 packaging 值,证明这个项目是 purely meta data)。默认值就是 jar。
packaging 有不同的值,插件的 goal 对各个 phases 的绑定就不同。
jar 的插件绑定如下:
1 2 3 4 5 6 7 8 9 10 11 12 13 14 15 16 17 18 19 20 21 22 23 24 25 26 <phases > <process-resources > </process-resources > <compile > </compile > <process-test-resources > </process-test-resources > <test-compile > </test-compile > <test > </test > <package > </package > <install > </install > <deploy > </deploy > </phases >
其他 phases 见这个《Plugin Bindings for default Lifecycle Reference》 。
如何控制构建的语言版本
在 Maven 中控制 Java 编译版本有多种方式,推荐使用以下方式之一:
方式一:使用 properties(推荐)
1 2 3 4 <properties > <maven.compiler.source > 11</maven.compiler.source > <maven.compiler.target > 11</maven.compiler.target > </properties >
方式二:在 compiler plugin 中配置
1 2 3 4 5 6 7 8 9 <plugin > <groupId > org.apache.maven.plugins</groupId > <artifactId > maven-compiler-plugin</artifactId > <version > 3.8.0</version > <configuration > <source > 11</source > <target > 11</target > </configuration > </plugin >
方式三:使用 release(Java 9+)
1 2 3 4 5 6 7 8 <plugin > <groupId > org.apache.maven.plugins</groupId > <artifactId > maven-compiler-plugin</artifactId > <version > 3.8.0</version > <configuration > <release > 11</release > </configuration > </plugin >
注意 :release 参数会同时设置 source 和 target,并且会启用跨编译检查,确保代码兼容目标版本。不能同时使用 release 和 source/target 参数。
plugins
插件是向 maven 提供 goal 的 artifact,即插件虽然自己包含很多 mojo,但它是以 artifact 的形式向外发布自己的能力(capability)的。例如,compile插件提供两个 goal:compile和testCompile(注意看,没有中间的连字符,所以不是 phase)。
在添加插件的时候要注意,不是只是加入一个 plugin 就万事大吉了,我们需要指定我们想要在构建的时候运行的 goal。
因为 packaging 本身也含有对插件和 goal 的绑定,所以我们要当心混合使用的时候的顺序问题。我们可以使用<execution/>来进行顺序的控制,如:
1 2 3 4 5 6 7 8 9 10 11 12 13 14 15 16 17 18 19 <plugin > <groupId > org.codehaus.modello</groupId > <artifactId > modello-maven-plugin</artifactId > <version > 1.8.1</version > <executions > <execution > <configuration > <models > <model > src/main/mdo/maven.mdo</model > </models > <version > 4.0.0</version > </configuration > <goals > <goal > java</goal > </goals > </execution > </executions > </plugin >
execution 里还可以指定 phases:
1 2 3 4 5 6 7 8 9 10 11 12 13 14 <plugin > <groupId > com.mycompany.example</groupId > <artifactId > display-maven-plugin</artifactId > <version > 1.0</version > <executions > <execution > <phase > process-test-resources</phase > <goals > <goal > time</goal > </goals > </execution > </executions > </plugin >
Maven Wrapper
Maven Wrapper 是 Maven 的一个重要特性,它允许项目在没有预装 Maven 的环境中构建。Wrapper 会下载并使用指定版本的 Maven。
使用 Maven Wrapper
1
2
3
4
5
6
7
Maven Wrapper 的优势
版本一致性 :确保所有开发者和 CI 环境使用相同版本的 Maven零安装 :新成员只需检出代码即可构建,无需手动安装 Maven可移植性 :项目自带构建环境,不依赖系统 Maven
配置 Maven 版本
在 .mvn/wrapper/maven-wrapper.properties 文件中配置:
1 distributionUrl =https://repo.maven.apache.org/maven2/org/apache/maven/apache-maven/3.8.6/apache-maven-3.8.6-bin.zip
多模块项目中的生命周期执行
在多模块项目中,Maven 会按照模块间的依赖关系顺序执行生命周期。
执行顺序
Maven 首先解析模块间的依赖关系,构建反应堆(Reactor)
按照依赖顺序执行:被依赖的模块先执行
如果模块 A 依赖模块 B,则先构建 B,再构建 A
graph LR
    subgraph 多模块项目
        Parent[父POM] --> Child1[common模块]
        Parent --> Child2[service模块]
        Parent --> Child3[web模块]

        Child3 -->|依赖| Child2
        Child2 -->|依赖| Child1
    end

    subgraph 构建顺序
        Step1[1. common] --> Step2[2. service]
        Step2 --> Step3[3. web]
    end

    style Child1 fill:#90EE90
    style Child2 fill:#87CEEB
    style Child3 fill:#DDA0DD
示例
假设有三个模块:common、service、web,依赖关系为 web -> service -> common:
执行顺序为:common -> service -> web
控制构建范围
1
2
3
4
5
6
7
8
9
10
11
Profile 与生命周期的关系
Profile 允许根据不同的环境或条件使用不同的构建配置。
定义 Profile
1 2 3 4 5 6 7 8 9 10 11 12 13 14 <profiles > <profile > <id > dev</id > <properties > <env > dev</env > </properties > </profile > <profile > <id > prod</id > <properties > <env > prod</env > </properties > </profile > </profiles >
激活 Profile
1
2
3
4
5
6
7
Profile 中的插件配置
Profile 可以覆盖或扩展插件配置:
1 2 3 4 5 6 7 8 9 10 11 12 13 14 15 16 <profile > <id > prod</id > <build > <plugins > <plugin > <groupId > org.apache.maven.plugins</groupId > <artifactId > maven-compiler-plugin</artifactId > <configuration > <release > 11</release > <debug > false</debug > <optimize > true</optimize > </configuration > </plugin > </plugins > </build > </profile >
跳过测试的多种方式
方式一:使用 maven.test.skip
1 mvn clean install -Dmaven.test.skip=true
这种方式会完全跳过测试编译和执行,测试代码不会被编译。
方式二:使用 skipTests
1 mvn clean install -DskipTests
这种方式会编译测试代码,但不执行测试。推荐使用这种方式,因为它可以提前发现测试代码的编译错误。
方式三:使用 surefire 插件配置
1 2 3 4 5 6 7 8 <plugin > <groupId > org.apache.maven.plugins</groupId > <artifactId > maven-surefire-plugin</artifactId > <version > 3.0.0-M7</version > <configuration > <skipTests > true</skipTests > </configuration > </plugin >
Maven 3.x 与 Maven 4.x 的差异
截至 2024 年,Maven 4.x 仍在开发中,主要的改进方向包括:
性能优化
更快的构建速度
改进的并行构建能力
更好的增量构建支持
依赖管理
用户界面
兼容性
Maven 4.x 将向后兼容 Maven 3.x 的 POM 文件
但某些废弃的特性将被移除
注意 :目前生产环境仍推荐使用 Maven 3.8.x 或 3.9.x 稳定版本。
生命周期参考
clean 生命周期的 phases
phase
含义
pre-clean
在实际的项目清理以前,需要被执行的处理过程(processes)
clean
移走前一个 build 生成的所有文件
post-clean
执行所有需要用来终结项目清理的过程
default 的 phases
phase
含义
validate
验证项目是正确的,且所有必须信息是可用的(实际上就是整个 pom 文件是 valid 的)
initialize
初始化构建状态,即设置 properties 或创建目录。也就是 properties 要在这个阶段被 inject
generate-sources
为任何编译中的inclusion(包含)生成源代码。
process-sources
处理源代码,比如过滤某些值
generate-resources
为打包的时候需要的inclusion(包含)生成资源。也就是中间资源(resources/assets)生成。
process-resources
拷贝和处理资源到目标文件夹里,为打包做准备。也就是静态资源准备完毕
compile
编译项目的源代码
process-classes
后处理编译生成的文件,比如对 Java 类进行字节码增强。比如使用 AOP 框架进行字节码织入
generate-test-sources
为编译中的inclusion(包含)生成测试用源代码
process-test-sources
处理测试源代码,比如过滤某些值
generate-test-resources
为测试创建资源。
process-test-resources
复制和处理资源到测试目标目录
test-compile
编译测试源代码到测试目标目录
process-test-classes
对测试编译的结果进行后处理,比如进行字节码增强,需要 Maven 2.0.5 和以上版本。
test
用测试框架中合适的单元运行测试,这些测试不能要求类被打包和部署
prepare-package
进行任何实际打包前必须的准备操作
package
把编译过的代码装进一个可发布格式,比如 JAR
pre-integration-test
进行集成测试前需要的活动,比如设置一个合适的环境
integration-test
处理和部署一个包到集成测试环境,运行集成测试
post-integration-test
执行集成测试后需要执行的活动,比如清理环境
verify
跑一些校验,来验证包是有效的,而且满足质量标准的
install
把当前的包安装到本地仓库,这样可以作为其他项目的本地依赖
deploy
在集成或者发布环境中执行,把包拷贝到一个远程的仓库,给其他开发者和项目共享
site 的 phases
phase
含义
pre-site
执行需要在站点生成(generation)之前执行的流程
site
生成项目的站点文档
post-site
执行需要被用来终结站点生成的操作,来为站点部署做准备
site-deploy
部署站点文档到特定的 web server 里(而不是仓库里)
插件配置
本章主要参考了《Guide to Configuring Plug-ins》 。
maven 实际上有两种插件:
构建插件,需要在<build/>元素里配置。如<build><pluginManagement/></build>,当然也有<build><plugins/></build>。
报告插件,会在"site generation"里被执行,应该在<reporting/>里配置。如<reporting><plugins/></reporting>。
要引用插件至少要有三个元素:groupId,artifactId, version。
mojo 是什么
根据《What is MOJO in Maven?》 ,mojo 是 Maven plain Old Java Object 的意思。实际上是可执行的 goal。
通用配置
一个插件通常包含一个以上的mojo,当一个 mojo 被映射到 goal 的时候,则包含多个 mojo(即一个插件可能有多个 goal)。maven 通过 元素来配置 maven 插件, 的子元素,就会映射到 mojo 的字段,或者 setter 里。
假设有一个mojo:
1 2 3 4 5 6 7 8 9 10 11 12 13 14 15 16 17 18 19 20 21 22 23 24 25 26 27 public class MyQueryMojo extends AbstractMojo private String url;private int timeout;private String[] options;public void execute () throws MojoExecutionException
生成的 xml 就如下:
1 2 3 4 5 6 7 8 9 10 11 12 13 14 15 16 17 18 19 20 21 <project > <build > <plugins > <plugin > <artifactId > maven-myquery-plugin</artifactId > <version > 1.0</version > <configuration > <url > http://www.foobar.com/query</url > <timeout > 10</timeout > <options > <option > one</option > <option > two</option > <option > three</option > </options > </configuration > </plugin > </plugins > </build > </project >
可以看到<configuration/>确实是 schemaless 的。
而且这些 field 上的注释可以注明缺省值,以及与命令行参数一起使用时的表达式:
1
2
查看帮助
通常插件都带有一个help的 goal,通常可以用以下的方法查看(自行替换插件名称):
1 mvn javadoc:help -Ddetail -Dgoal=javadoc
配置参数
普通类型
基本类型的映射,就使用字面量配置<configuration/>元素:
1 2 3 4 5 6 7 8 <configuration > <myString > a string</myString > <myBoolean > true</myBoolean > <myInteger > 10</myInteger > <myDouble > 1.0</myDouble > <myFile > c:\temp</myFile > <myURL > http://maven.apache.org</myURL > </configuration >
复杂类型
如果有复杂(complex not compoud)类型映射的需要:
1 2 3 4 5 6 <configuration > <person > <firstName > Jason</firstName > <lastName > van Zyl</lastName > </person > </configuration >
maven 会以大写首字母的方式,在 mojo 本身存在的包里寻找 person 类,否则,就要指定包名:
1 2 3 4 5 6 <configuration > <person implementation ="com.mycompany.mojo.query.SuperPerson" > <firstName > Jason</firstName > <lastName > van Zyl</lastName > </person > </configuration >
列表类型
同数组不同,列表类型在 maven 的xml 语法里不是强类型的(换言之,数组是):
1
2
3
4
5
6
7
8
9
10
11
12
13
14
public class MyAnimalMojo extends AbstractMojo private List animals;public void execute () throws MojoExecutionException
1 2 3 4 5 6 7 8 9 10 11 12 13 14 15 16 17 18 19 <project > <build > <plugins > <plugin > <artifactId > maven-myanimal-plugin</artifactId > <version > 1.0</version > <configuration > <animals > <animal > cat</animal > <animal > dog</animal > <animal > aardvark</animal > </animals > </configuration > </plugin > </plugins > </build > </project >
其映射规则是:
If the XML element contains an implementation hint attribute, that is used
If the XML tag contains a ., try that as a fully qualified class name
Try the XML tag (with capitalized first letter) as a class in the same package as the mojo/object being configured
If the element has no children, assume its type is String. Otherwise, the configuration will fail.
map 类型
1 2 3 4 5 6 7 8 ...<configuration > <myMap > <key1 > value1</key1 > <key2 > value2</key2 > </myMap > </configuration >
Properties 类型
和 map 表达嵌套的方式恰好又不一样了,更加工整:
1 2 3 4 5 6 private Properties myProperties;
1 2 3 4 5 6 7 8 9 10 11 12 <configuration > <myProperties > <property > <name > propertyName1</name > <value > propertyValue1</value > <property > <property > <name > propertyName2</name > <value > propertyValue2</value > <property > </myProperties > </configuration >
配置构建插件
使用<executions>标签
1 2 3 4 5 6 7 8 9 10 11 12 13 14 15 16 17 18 19 20 21 22 23 24 25 26 27 28 29 30 31 32 33 34 35 36 37 38 39 40 41 42 43 44 45 46 47 48 49 50 <project > <build > <plugins > <plugin > <artifactId > maven-myquery-plugin</artifactId > <version > 1.0</version > <executions > <execution > <id > execution1</id > <phase > test</phase > <configuration > <url > http://www.foo.com/query</url > <timeout > 10</timeout > <options > <option > one</option > <option > two</option > <option > three</option > </options > </configuration > <goals > <goal > query</goal > </goals > </execution > <execution > <id > execution2</id > <configuration > <url > http://www.bar.com/query</url > <timeout > 15</timeout > <options > <option > four</option > <option > five</option > <option > six</option > </options > </configuration > <goals > <goal > query</goal > </goals > </execution > </executions > </plugin > </plugins > </build > </project >
注意,在一个 POM 的一个插件里,execution id 必须是唯一的。
一个 plugin 在多个 phase 多次被执行的例子:
1 2 3 4 5 6 7 8 9 10 11 12 13 14 15 16 17 18 19 20 21 22 23 24 25 26 27 28 29 30 31 32 33 34 <project > <build > <plugins > <plugin > <executions > <execution > <id > execution1</id > <phase > test</phase > </execution > <execution > <id > execution2</id > <phase > install</phase > <configuration > <url > http://www.bar.com/query</url > <timeout > 15</timeout > <options > <option > four</option > <option > five</option > <option > six</option > </options > </configuration > <goals > <goal > query</goal > </goals > </execution > </executions > </plugin > </plugins > </build > </project >
下面这个 mojo,用注释标明了这个 plugin/goal 的默认 phase:
1 2 3 4 5 6 7 8 9 10 11 12 13 14 15 16 17 18 19 20 21 22 23 24 25 26 27 28 public class MyBindedQueryMojo extends AbstractMojo private String url;private int timeout;private String[] options;public void execute () throws MojoExecutionException
我们可以使用 xml 配置来覆盖初始配置:
1 2 3 4 5 6 7 8 9 10 11 12 13 14 15 16 17 18 19 20 21 22 23 24 25 26 27 28 29 30 <project > <build > <plugins > <plugin > <artifactId > maven-myquery-plugin</artifactId > <version > 1.0</version > <executions > <execution > <id > execution1</id > <phase > install</phase > <configuration > <url > http://www.bar.com/query</url > <timeout > 15</timeout > <options > <option > four</option > <option > five</option > <option > six</option > </options > </configuration > <goals > <goal > query</goal > </goals > </execution > </executions > </plugin > </plugins > </build > </project >
曾经,maven 插件的如果处于内部,则无法被命令行 invocation 调用,因为它必须到指定生命周期 phase 才可以被使用。但自 Maven 3.3.1 以后,我们可以直接这样做:
1 2
使用<dependencies>标签
插件自己也有自己的默认 dependency,我们可以在插件内部自己使用<dependencies>来更换它的依赖。如 Maven Antrun Plugin version 1.2 使用的 Ant version 1.6.5,我们可以这样更新依赖(兼容性自己保证):
1 2 3 4 5 6 7 8 9 10 11 12 13 14 15 16 17 18 19 20 21 22 23 24 25 26 <project > <build > <plugins > <plugin > <groupId > org.apache.maven.plugins</groupId > <artifactId > maven-antrun-plugin</artifactId > <version > 1.2</version > <dependencies > <dependency > <groupId > org.apache.ant</groupId > <artifactId > ant</artifactId > <version > 1.7.1</version > </dependency > <dependency > <groupId > org.apache.ant</groupId > <artifactId > ant-launcher</artifactId > <version > 1.7.1</version > </dependency > </dependencies > </plugin > </plugins > </build > </project >
在构建插件里使用<inherited>标签
默认的插件配置是会被传播(propagated)到子 pom 里的,所以可以显式地设置<inherited>为 false 来打破这种属性
1 2 3 4 5 6 7 8 9 10 11 12 13 14 15 16 <project > <build > <plugins > <plugin > <groupId > org.apache.maven.plugins</groupId > <artifactId > maven-antrun-plugin</artifactId > <version > 1.2</version > <inherited > false</inherited > </plugin > </plugins > </build > </project >
配置 reporting 插件
使用 <reporting> Tag VS <build> Tag
<build> 标签里也可以配置 reporting 插件,但大部分情况下<reporting>里的配置都优先被使用。具体细则见 maven 原文档 。
使用<reportSets>标签
如果我们想要选择性地生成报告,我们可以使用<reportSets>标签,只有被它包括的报告,才被选中生成:
1 2 3 4 5 6 7 8 9 10 11 12 13 14 15 16 17 18 19 20 <project > <reporting > <plugins > <plugin > <groupId > org.apache.maven.plugins</groupId > <artifactId > maven-project-info-reports-plugin</artifactId > <version > 2.1.2</version > <reportSets > <reportSet > <reports > <report > project-team</report > </reports > </reportSet > </reportSets > </plugin > </plugins > </reporting > </project >
推而广之,一份报告都不生成的时候,我们可以这样做:
1 2 3 4 5 <reportSets > <reportSet > <reports /> </reportSet > </reportSets >
在报告插件中使用<inherited>标签
同构建插件差不多
1 2 3 4 5 6 7 8 9 10 11 12 13 14 <project > <reporting > <plugins > <plugin > <groupId > org.apache.maven.plugins</groupId > <artifactId > maven-project-info-reports-plugin</artifactId > <version > 2.1.2</version > <inherited > false</inherited > </plugin > </plugins > </reporting > </project >
依赖管理
Maven 的配置和依赖是单根继承的
Maven 的模块继承是无法进行多继承的,只能使用单根继承。
dependencies 与 dependencyManagement 的区别
dependencies 即使在子项目中不写该依赖项,那么子项目仍然会从父项目中继承该依赖项(全部继承)
dependencyManagement 里只是声明依赖和它们的版本,并不实现引入,因此子项目需要显示的声明需要用的依赖。如果不在子项目中声明依赖,是不会从父项目中继承下来的;只有在子项目中写了该依赖项,并且没有指定具体版本,才会从父项目中继承该项,并且 version 和 scope 都读取自父 pom; 另外如果子项目中指定了版本号,那么会使用子项目中指定的jar版本。
有效 pom
1 2 3 mvn help :effective-pom > effective-pom.xml
下载依赖中的源码和文档
在 maven 里,resolve 有特别的含义:仲裁。
1 2 3 4 5 6 7 8 9 10 11 12 13 14 true
在 .m2 中这样配置:
1 2 3 4 5 6 7 8 9 10 11 12 13 14 15 16 <settings > <profiles > <profile > <id > downloadSources</id > <properties > <downloadSources > true</downloadSources > <downloadJavadocs > true</downloadJavadocs > </properties > </profile > </profiles > <activeProfiles > <activeProfile > downloadSources</activeProfile > </activeProfiles > </settings >
在项目中这样主动配置:
1 2 3 4 5 6 7 8 9 10 11 12 13 14 15 16 17 18 19 20 <build > <plugins > <plugin > <groupId > org.apache.maven.plugins</groupId > <artifactId > maven-dependency-plugin</artifactId > <version > 3.1.2</version > <executions > <execution > <goals > <goal > sources</goal > <goal > resolve</goal > </goals > <configuration > <classifier > javadoc</classifier > </configuration > </execution > </executions > </plugin > </plugins > </build >
附赠一个批量构建脚本:
1 2 3 4 5 6 7 8 9 10 11 12 13 14 15 16 17 18 19 20 21 22 23 24 25 26 27 28 29 30 31 32 33 34 35 36 #!/bin/bash function traverseAllProjects for f in *; do if [ -d "$f " ]; then echo "coming into a folder $f " cd $f echo "current path:" pwd if test -f "$POM_FILE " ; then echo "$POM_FILE exists." time mvn clean install -Dmaven.test.skip=true time mvn dependency:sources dependency:resolve -Dclassifier=javadoc\ntime mvn clean install -Dmaven.test.skip=true fi if test -f "$GRADLE_FILE " ; then echo "$GRADLE_FILE exists." time ./gradlew clean build -x test fi echo "coming out a folder $f " cd ..echo "current path:" pwd fi done time traverseAllProjects
在 idea中这样配置 Preference > Build, Execution, Deployment > Build Tools > Maven > importing。
BOM(Bill of Material)
BOM定义
BOM(Bill of Material),物料清单。将某一个领域相应的jar统一称之为XXX-BOM予以管理(例如inf-bom、spring-framework-bom),并不是Maven的规定,只是一种约定俗成(convention over configuration)。Gradle 也采用了这样的思路 。
为什么要使用bom
(1)避免开发同学需要关心各个API的版本关系:BOM这种方式在 dependencyManagement 指定了各个依赖的版本,并不会使得这些依赖并被真正引入(仅做版本管理使用)。在dependency中还要按需引入、但省去了需要制定version的麻烦。
(2)便于历史版本API的收归。
(3)可以说逐渐使用 bom 来统一管理某个团队(领域)的 API 版本已成为一种趋势。
scope 的含义
scope元素的作用:控制 dependency 元素的使用范围。通俗的讲,就是控制 Jar 包在哪些范围被加载和使用。
compile(默认)
含义:compile 是默认值,如果没有指定 scope 值,该元素的默认值为 compile。被依赖项目需要参与到当前项目的编译,测试,打包,运行等阶段。打包的时候通常会包含被依赖项目。
provided
含义:被依赖项目理论上可以参与编译、测试、运行等阶段,相当于compile,但是再打包阶段做了exclude的动作。
runtime
含义:表示被依赖项目无需参与项目的编译,但是会参与到项目的测试和运行。与compile相比,被依赖项目无需参与项目的编译。
test
含义: 表示被依赖项目仅仅参与测试相关的工作,包括测试代码的编译,执行。
system
含义:system 元素与 provided 元素类似,但是被依赖项不会从 maven 仓库中查找,而是从本地系统中获取,systemPath 元素用于制定本地系统中 jar 文件的路径。例如:
1 2 3 4 5 6 7 <dependency > <groupId > org.open</groupId > <artifactId > open-core</artifactId > <version > 1.5</version > <scope > system</scope > <systemPath > ${basedir}/WebContent/WEB-INF/lib/open-core.jar</systemPath > </dependency >
import
它只使用在中,表示从其它的pom中导入dependency的配置,例如 (B项目导入A项目中的包配置):
想必大家在做SpringBoot应用的时候,都会有如下代码:
1 2 3 4 5 <parent > <groupId > org.springframework.boot</groupId > <artifactId > spring-boot-starter-parent</artifactId > <version > 1.3.3.RELEASE</version > </parent >
继承一个父模块,然后再引入相应的依赖。
我们知道Maven的继承和Java的继承一样,是无法实现多重继承的,如果10个、20个甚至更多模块继承自同一个模块,那么按照我们之前的做法,这个父模块的dependencyManagement会包含大量的依赖。如果你想把这些依赖分类以更清晰的管理,那就不可能了,import scope依赖能解决这个问题。你可以把 dependencyManagement 放到单独的专门用来管理依赖的pom中,然后在需要使用依赖的模块中通过import scope依赖,就可以引入 dependencyManagement。例如可以写这样一个用于依赖管理的pom:
1 2 3 4 5 6 7 8 9 10 11 12 13 14 15 16 17 18 19 20 21 <project > <modelVersion > 4.0.0</modelVersion > <groupId > com.test.sample</groupId > <artifactId > base-parent1</artifactId > <packaging > pom</packaging > <version > 1.0.0-SNAPSHOT</version > <dependencyManagement > <dependencies > <dependency > <groupId > junit</groupId > <artifactid > junit</artifactId > <version > 4.8.2</version > </dependency > <dependency > <groupId > log4j</groupId > <artifactid > log4j</artifactId > <version > 1.2.16</version > </dependency > </dependencies > </dependencyManagement > </project >
然后我就可以通过非继承的方式来引入这段依赖管理配置
1 2 3 4 5 6 7 8 9 10 11 12 13 14 15 16 17 18 19 20 <dependencyManagement > <dependencies > <dependency > <groupId > com.test.sample</groupId > <artifactid > base-parent1</artifactId > <version > 1.0.0-SNAPSHOT</version > <type > pom</type > <scope > import</scope > </dependency > </dependencies > </dependencyManagement > <dependency > <groupId > junit</groupId > <artifactid > junit</artifactId > </dependency > <dependency > <groupId > log4j</groupId > <artifactid > log4j</artifactId > </dependency >
注意:import scope只能用在 dependencyManagement 里面。这么多的 scope 里面,import 也因此是最危险的,因为 import 会把依赖直接展开,而不是用间接传递的方式在新应用中体现,会覆盖 parent 和 dependency(因为寻根路径最短,链接器会最先被链接上),而且无法被 exclude 排除 。
这样,父模块的pom就会非常干净,由专门的packaging为pom来管理依赖,也契合的面向对象设计中的单一职责原则。此外,我们还能够创建多个这样的依赖管理pom,以更细化的方式管理依赖。这种做法与面向对象设计中使用组合而非继承也有点相似的味道。
那么,如何用这个方法来解决SpringBoot的那个继承问题呢?
配置如下:
1 2 3 4 5 6 7 8 9 10 11 12 13 14 15 16 17 18 <dependencyManagement > <dependencies > <dependency > <groupId > org.springframework.boot</groupId > <artifactId > spring-boot-dependencies</artifactId > <version > 1.3.3.RELEASE</version > <type > pom</type > <scope > import</scope > </dependency > </dependencies > </dependencyManagement > <dependencies > <dependency > <groupId > org.springframework.boot</groupId > <artifactId > spring-boot-starter-web</artifactId > </dependency > </dependencies >
这样配置的话,自己的项目里面就不需要继承SpringBoot的module了,而可以继承自己项目的module了。
scope的依赖传递
A–>B–>C。当前项目为A,A依赖于B,B依赖于C。知道B在A项目中的scope,那么怎么知道C在A中的scope呢?答案是:
graph LR
A[项目A] -->|依赖 scope: compile| B[项目B]
B -->|依赖 scope: compile| C[项目C]
A -->|依赖 scope: test| T[项目T]
T -->|依赖 scope: compile| U[项目U]
style C fill:#90EE90
style U fill:#FFB6C1
classDef green fill:#90EE90,stroke:#333,stroke-width:2px
classDef red fill:#FFB6C1,stroke:#333,stroke-width:2px
class C green
class U red依赖传递规则 :
B的scope
C的scope
C在A中的结果
compile
compile
compile
compile
test
✗ 被丢弃
compile
provided
✗ 被丢弃
test
compile
✗ 被丢弃
provided
compile
provided
runtime
compile
runtime
依赖矩阵表格见:《Introduction to the Dependency Mechanism》
scope 与 optional 的区别
maven的 scope 决定依赖的包是否加入本工程的classpath下。- 某些 scope 连本项目的 classpath 都会被影响。使用本项目的项目无论如何都不能绕过 scope 的影响,scope 才是最彻底的对传播的隔离(比如 provided)。
optional仅限制依赖包的传递性,不影响依赖包的classpath。- 不影响本项目生成的 jar,影响使用本项目的项目。
scope 与 optional 都可以用重新声明依赖的方式来引入缺失依赖。
比如一个工程中
A->B, B->C(scope:compile, optional:true),B的编译/运行/测试classpath都有C,A中的编译/运行/测试classpath都不存在C(尽管C的scope声明为compile),A调用B哪些依赖C的方法就会出错。
A->B, B->C(scope:provided), B的编译/测试classpath有C,A中的编译/运行/测试classpath都不存在C,但是A使用B(需要依赖C)的接口时就会出现找不到C的错误,此时,要么是手动加入C的依赖,即A->C,否则需要容器提供C的依赖包到运行时classpath。
对于纯粹作为 lib 来用的 jar,rovided over optional。因为出了 test 这个 phase,连 jar 都不能独立 run 起来。optional 本身是一个可以自己在各种 phase run,但被依赖的时候则会去除打包配置,依然会影响 classpath。
optional 是大项目无法被切割成小的子模块的无奈选择,如果项目要使用被依赖模块的可选功能,必须显式地再声明一遍可选依赖,否则会产生调用出错。optional 阻断了传递依赖。
1 2 3 4 5 6 7 8 9 10 11 12 13 <project > <dependencies > <dependency > <groupId > sample.ProjectA</groupId > <artifactId > Project-A</artifactId > <version > 1.0</version > <scope > compile</scope > <optional > true</optional > </dependency > </dependencies > </project >
Project-A -> Project-B Project-X -> Project-A
A 的类路径里有 B,而 X 的类路径里无 B。
依赖排除与 debug 技巧
在子工程里显式地指定某个依赖版本看是否能够消除错误。
使用 ide 的依赖分析工具,如 mvn dependency 插件(这个分析工具只是运行时分析,有误导性)或者 idea 的 dependency analyzer。
显式地消除依赖:
1 2 3 4 5 6 <exclusions > <exclusion > <groupId > org.springframework</groupId > <artifactId > spring-context-support</artifactId > </exclusion > </exclusions >
maven-enforcer-plugin 解决包冲突
执行时机
生命周期validate环节。
dependencyConvergence执行逻辑
通过访问maven dependency tree生成的依赖树,存入map中,key是groupid和artifactId组合,value是依赖对象list,通过判断每个list里的版本号是否相同来判断所有依赖是否为同一个版本。
配置实例
1 2 3 4 5 6 7 8 9 10 11 12 13 14 15 16 17 18 19 20 21 22 23 24 25 26 27 28 <build > <plugins > <plugin > <groupId > org.apache.maven.plugins</groupId > <artifactId > maven-enforcer-plugin</artifactId > <version > 3.0.0-M3</version > <executions > <execution > <id > enforce</id > <goals > <goal > enforce</goal > </goals > <configuration > <rules > <bannedDependencies > <excludes > <exclude > com.alibaba:fastjson:(,1.2.60)</exclude > <exclude > org.hibernate:hibernate-validator</exclude > </excludes > </bannedDependencies > </rules > <fail > true</fail > </configuration > </execution > </executions > </plugin > </plugins > </build >
快速检验
在自己分支开发完成后,执行mvn validate命令即可查看冲突信息
移除冲突jar
登陆线上机器确认冲突jar的版本,移除不是对应版本的jar,方法:Dependency Analyzer 中搜索冲突jar名,右键选择移除即可自动生成exclude内容。
versions-maven-plugin 版本管理
参考:《Use the Latest Version of a Dependency in Maven》
Maven2 also provided two special metaversion values to achieve the
但这两个值已经过期了。
1 2 3 4 5 6 7 8 9 10 11 12 13 14 <build > <plugins > <plugin > <groupId > org.codehaus.mojo</groupId > <artifactId > versions-maven-plugin</artifactId > <version > 2.7</version > <configuration > <excludes > <exclude > org.apache.commons:commons-collections4</exclude > </excludes > </configuration > </plugin > </plugins > </build >
1 2 3 4 5 6 7 8 9 10
1 2 3 4 5 6 7 8 9 <plugin > <groupId > org.codehaus.mojo</groupId > <artifactId > versions-maven-plugin</artifactId > <version > 2.7</version > <configuration > <rulesUri > http://www.mycompany.com/maven-version-rules.xml</rulesUri > </configuration > </plugin >
1 2 3 4 5 6 7 8 9 10 11 12 13 14 15 16 17 18 19 20 21 22 23 24 <ruleset comparisonMethod ="maven" xmlns ="http://mojo.codehaus.org/versions-maven-plugin/rule/2.0.0" xmlns:xsi ="http://www.w3.org/2001/XMLSchema-instance" xsi:schemaLocation ="http://mojo.codehaus.org/versions-maven-plugin/rule/2.0.0 http://mojo.codehaus.org/versions-maven-plugin/xsd/rule-2.0.0.xsd" ><ignoreVersions > <ignoreVersion type ="regex" > .*-beta</ignoreVersion > </ignoreVersions > </ruleset > <ruleset comparisonMethod ="maven" xmlns ="http://mojo.codehaus.org/versions-maven-plugin/rule/2.0.0" xmlns:xsi ="http://www.w3.org/2001/XMLSchema-instance" xsi:schemaLocation ="http://mojo.codehaus.org/versions-maven-plugin/rule/2.0.0 http://mojo.codehaus.org/versions-maven-plugin/xsd/rule-2.0.0.xsd" ><rules > <rule groupId ="com.mycompany.maven" comparisonMethod ="maven" > <ignoreVersions > <ignoreVersion type ="regex" > .*-RELEASE</ignoreVersion > <ignoreVersion > 2.1.0</ignoreVersion > </ignoreVersions > </rule > </rules > </ruleset >
全局配置 settings.xml
文件结构与顶层元素
settings.xml 对于 maven 来说相当于全局性的配置,用于所有的项目。在 Maven2 中存在两个 settings.xml,一个位于 maven2 的安装目录 conf 下面,作为全局性配置。对于团队设置,保持一致的定义是关键,所以 maven2/conf 下面的 settings.xml 就作为团队共同的配置文件。而对于每个成员,如果有特殊的需求,则可以在 ~/.m2/settings.xml 中进行设置。
settings.xml 基本结构如下:
1 2 3 4 5 6 7 8 9 10 11 12 13 14 15 <settings xmlns ="http://maven.apache.org/SETTINGS/1.0.0" xmlns:xsi ="http://www.w3.org/2001/XMLSchema-instance" xsi:schemaLocation ="http://maven.apache.org/SETTINGS/1.0.0 https://maven.apache.org/xsd/settings-1.0.0.xsd" ><localRepository /> <interactiveMode /> <usePluginRegistry /> <offline /> <pluginGroups /> <servers /> <mirrors /> <proxies /> <profiles /> <activeProfiles /> </settings >
LocalRepository
作用:该值表示构建系统本地仓库的路径。其默认值:~/.m2/repository。
1 <localRepository > ${user.home}/.m2/repository</localRepository >
InteractiveMode
作用:表示maven是否需要和用户交互以获得输入。如果maven需要和用户交互以获得输入,则设置成true,反之则应为false。默认为true。
1 <interactiveMode > true</interactiveMode >
Offline
作用:表示maven是否需要在离线模式下运行。如果构建系统需要在离线模式下运行,则为true,默认为false。当由于网络设置原因或者安全因素,构建服务器不能连接远程仓库的时候,该配置就十分有用。
1 <offline > false</offline >
PluginGroups
作用:当插件的组织id(groupId)没有显式提供时,供搜寻插件组织Id(groupId)的列表。该元素包含一个pluginGroup元素列表,每个子元素包含了一个组织Id(groupId)。当我们使用某个插件,并且没有在命令行为其提供组织Id(groupId)的时候,Maven就会使用该列表。默认情况下该列表包含了 org.apache.maven.plugins 和 org.codehaus.mojo。
1 2 3 4 <pluginGroups > <pluginGroup > org.codehaus.mojo</pluginGroup > </pluginGroups >
Servers
作用:一般,仓库的下载和部署是在pom.xml文件中的repositories和distributionManagement元素中定义的。然而,一般类似用户名、密码(有些仓库访问是需要安全认证的)等信息不应该在pom.xml文件中配置,这些信息可以配置在 settings.xml 中。
1 2 3 4 5 6 7 8 9 10 11 12 13 14 15 16 17 18 19 20 <servers > <server > <id > server001</id > <username > my_login</username > <password > my_password</password > <privateKey > ${usr.home}/.ssh/id_dsa</privateKey > <passphrase > some_passphrase</passphrase > <filePermissions > 664</filePermissions > <directoryPermissions > 775</directoryPermissions > <configuration > </configuration > </server > </servers >
Mirrors
作用:为仓库列表配置的下载镜像列表。
1 2 3 4 5 6 7 8 9 10 11 12 13 14 15 16 17 18 <settings > <mirrors > <mirror > <id > planetmirror.com</id > <name > PlanetMirror Australia</name > <url > http://downloads.planetmirror.com/pub/maven2</url > <mirrorOf > central</mirrorOf > <blocked > false</blocked > </mirror > </mirrors > </settings >
两个例子。现在的主流仓库都是https了,如果使用http可能遇到 301 报错。
1 2 3 4 5 6 7 8 9 10 11 12 13 14 15 16 17 <mirrors > <mirror > <id > nexus-aliyun</id > <mirrorOf > central</mirrorOf > <name > Nexus aliyun</name > <url > https://maven.aliyun.com/nexus/content/groups/public</url > </mirror > </mirrors > <mirrors > <mirror > <id > repo1</id > <mirrorOf > central</mirrorOf > <name > maven repo1</name > <url > https://repo1.maven.org/maven2/</url > </mirror > </mirrors >
Proxies
作用:用来配置不同的代理。
1 2 3 4 5 6 7 8 9 10 11 12 13 14 15 16 17 18 19 20 21 22 23 24 25 26 27 28 29 30 31 32 33 34 35 36 37 38 39 40 41 42 43 44 <settings xmlns ="http://maven.apache.org/SETTINGS/1.0.0" xmlns:xsi ="http://www.w3.org/2001/XMLSchema-instance" xsi:schemaLocation ="http://maven.apache.org/SETTINGS/1.0.0 https://maven.apache.org/xsd/settings-1.0.0.xsd" ><proxies > <proxy > <id > myproxy</id > <active > true</active > <protocol > http</protocol > <host > proxy.somewhere.com</host > <port > 8080</port > <username > proxyuser</username > <password > somepassword</password > <nonProxyHosts > *.google.com|ibiblio.org|192.168.58.*|10.*|mirrors.xxx.com</nonProxyHosts > <sslHostConfig > <all > true</all > <sslProtocol > all</sslProtocol > <sslEnabled > true</sslEnabled > <sslProtocols > TLSv1.2</sslProtocols > <ignoreCertificates > true</ignoreCertificates > <trustSelfSigned > true</trustSelfSigned > <allowAllCerts > true</allowAllCerts > </sslHostConfig > </proxy > </proxies > </settings >
Profiles(settings.xml 版)
作用:根据环境参数来调整构建配置的列表。
1 2 3 4 5 6 7 8 9 10 11 12 13 14 15 16 17 18 19 20 <settings xmlns ="http://maven.apache.org/SETTINGS/1.0.0" xmlns:xsi ="http://www.w3.org/2001/XMLSchema-instance" xsi:schemaLocation ="http://maven.apache.org/SETTINGS/1.0.0 https://maven.apache.org/xsd/settings-1.0.0.xsd" ><profiles > <profile > <id > test</id > <activation /> <properties /> <repositories /> <pluginRepositories /> </profile > </profiles > </settings >
快照与发布
我们考虑这种问题要分清楚:
我们是使用者还是开发者?这决定了我们使用 repository/pluginRepository,还是 distributionManagement。
我们如果是使用者,我们要分清我们是使用第一方还是第三方,然后我们要分清我们要使用快照还是发布。
当我们选择快照和发布的时候,我们还要分清 updatePolicy。
对于 Maven 来说,snapshot 和 release 仓库的设置有以下区别:
仓库的用途不同 :
snapshot 仓库用于存储开发过程中的不稳定版本,这些版本的构件可能会频繁更新。
release 仓库用于存储稳定的发布版本,这些版本的构件不会再进行修改。
版本号的约定不同 :
snapshot 版本的版本号以 “-SNAPSHOT” 结尾,如 “1.0-SNAPSHOT”。
release 版本的版本号不包含 “-SNAPSHOT” 后缀,如 “1.0”。
更新策略不同 :
对于 snapshot 版本,Maven 每次构建时都会自动检查远程仓库是否有更新,并下载最新的构件。
对于 release 版本,Maven 默认不会检查更新,而是直接使用本地仓库中的构件。
部署策略不同 :
snapshot 版本通常会频繁部署到 snapshot 仓库中,以供其他开发者使用。
release 版本通常只会在稳定后部署一次到 release 仓库中,不再进行修改。
这种 snapshot 和 release 的区分确实是一种约定高于配置的设计。Maven 通过版本号的约定来区分构件的稳定性,并根据约定自动选择适当的仓库和更新策略。这种约定简化了配置,提高了构建的可重复性和可靠性。
其他构建工具也有类似的约定:
Gradle 使用 “-SNAPSHOT” 后缀来标识 snapshot 版本,并支持配置不同的 snapshot 和 release 仓库。
Ivy 使用 “latest.integration” 和 “latest.release” 来区分 snapshot 和 release 版本,并支持配置不同的仓库。
sbt (Scala 构建工具)使用 “-SNAPSHOT” 后缀来标识 snapshot 版本,并支持配置不同的 snapshot 和 release 仓库。
一个完整的远程仓库,需要配置至少如下四类 repo 来管理 jar:
release
snapshot
thirdParty-release
thirdParty-snapshot
其中
标准的用法里,首先从仓库名称标识出仓库的性质,然后使用属性进一步区分快照和发布:
对于 release 仓库:releases enabled 为 true,snapshots enabled 为 false;
对于 snapshot 仓库:releases enabled 为 false,snapshots enabled 为 true。
对于 maven central 或者它的镜像,选项都是 true。
后两者其实并不是特别的类型,而是在 id 的名字上有所区别。如设计 <id>thirdparty</id>或者<id>thirdparty-snapshots</id>的<repository>。这也就意味着还可以有二方的仓库和四方的仓库,只要你能够从 id 里区分开这些仓库 。
这四种仓库在 Maven 中有不同的用途和约定:
release 仓库 : 用于存储和管理项目自己的稳定发布版本的构件。这些构件的版本号不包含 “-SNAPSHOT” 后缀,表示它们是经过测试和验证的稳定版本。snapshot 仓库 : 用于存储和管理项目自己的开发版本的构件。这些构件的版本号以 “-SNAPSHOT” 结尾,表示它们是不稳定的开发版本。thirdParty-release 仓库 : 用于存储和管理第三方的稳定发布版本的构件。将第三方的 release 构件单独存储,可以与项目自己的 release 构件分开管理。thirdParty-snapshot 仓库 : 用于存储和管理第三方的开发版本的构件。将第三方的 snapshot 构件单独存储,可以与项目自己的 snapshot 构件分开管理。
两个具体的例子:
1 2 3 4 5 6 7 8 9 10 11 12 13 14 15 16 17 18 19 20 21 22 23 24 25 26 27 28 29 30 31 32 33 34 35 36 37 38 39 40 41 42 43 44 45 46 47 48 49 50 51 52 53 54 55 <repositories > <repository > <id > some-company-releases</id > <name > Repository for releases artifacts</name > <url > http://pixel.some-company.com/repository/group-releases</url > <snapshots > <enabled > false</enabled > </snapshots > <releases > <enabled > true</enabled > <updatePolicy > always</updatePolicy > </releases > </repository > <repository > <id > some-company-snapshots</id > <name > Repository for snapshots artifacts</name > <url > http://pixel.some-company.com/repository/group-snapshots</url > <snapshots > <enabled > true</enabled > <updatePolicy > always</updatePolicy > </snapshots > <releases > <enabled > false</enabled > </releases > </repository > </repositories > <pluginRepositories > <pluginRepository > <id > some-company-releases-plugin</id > <name > Repository for plugin releases artifacts</name > <url > http://pixel.some-company.com/repository/group-releases</url > <snapshots > <enabled > false</enabled > </snapshots > <releases > <enabled > true</enabled > <updatePolicy > always</updatePolicy > <checksumPolicy > ignore</checksumPolicy > </releases > </pluginRepository > <pluginRepository > <id > some-company-snapshots-plugin</id > <name > Repository for plugin snapshots artifacts</name > <url > http://pixel.some-company.com/repository/group-snapshots</url > <snapshots > <enabled > true</enabled > <updatePolicy > always</updatePolicy > <checksumPolicy > ignore</checksumPolicy > </snapshots > <releases > <enabled > false</enabled > </releases > </pluginRepository > </pluginRepositories >
Activation
作用:自动触发profile的条件逻辑。
1 2 3 4 5 6 7 8 9 10 11 12 13 14 15 16 17 18 19 20 21 22 23 24 25 26 27 28 29 30 31 <activation > <activeByDefault > false</activeByDefault > <jdk > 1.5</jdk > <os > <name > Windows XP</name > <family > Windows</family > <arch > x86</arch > <version > 5.1.2600</version > </os > <property > <name > mavenVersion</name > <value > 2.0.3</value > </property > <file > <exists > ${basedir}/file2.properties</exists > <missing > ${basedir}/file1.properties</missing > </file > </activation >
注:在maven工程的pom.xml所在目录下执行mvn help:active-profiles命令可以查看中央仓储的profile是否在工程中生效。
Properties
作用:对应profile的扩展属性列表。
env.X : 在一个变量前加上"env."的前缀,会返回一个shell环境变量。例如,"env.PATH"指代了$path环境变量(在Windows上是%PATH%)。project.x :指代了POM中对应的元素值。例如: <project><version>1.0</version></project>通过${project.version}获得version的值。settings.x : 指代了settings.xml中对应元素的值。例如:<settings><offline>false</offline></settings>通过 ${settings.offline}获得offline的值。Java System Properties : 所有可通过java.lang.System.getProperties()访问的属性都能在POM中使用该形式访问,例如 ${java.home}。x : 在<properties/>元素中,或者外部文件中设置,以${someVar}的形式使用。
1 2 3 <properties > <user.install > ${user.home}/our-project</user.install > </properties >
注:如果该profile被激活,则可以在pom.xml中使用${user.install}。
Repositories
作用:远程仓库列表,它是maven用来填充构建系统本地仓库所使用的一组远程仓库。
1 2 3 4 5 6 7 8 9 10 11 12 13 14 15 16 17 18 19 20 21 22 23 24 25 26 27 28 <repositories > <repository > <id > codehausSnapshots</id > <name > Codehaus Snapshots</name > <releases > <enabled > false</enabled > <updatePolicy > always</updatePolicy > <checksumPolicy > warn</checksumPolicy > </releases > <snapshots > <enabled /> <updatePolicy /> <checksumPolicy /> </snapshots > <url > http://snapshots.maven.codehaus.org/maven2</url > <layout > default</layout > </repository > </repositories >
PluginRepositories
作用:发现插件的远程仓库列表。
1 2 3 4 5 6 7 8 9 10 11 12 13 14 15 16 17 18 19 <pluginRepositories > <pluginRepository > <releases > <enabled /> <updatePolicy /> <checksumPolicy /> </releases > <snapshots > <enabled /> <updatePolicy /> <checksumPolicy /> </snapshots > <id /> <name /> <url /> <layout /> </pluginRepository > </pluginRepositories >
ActiveProfiles
作用:手动激活profiles的列表,按照profile被应用的顺序定义activeProfile。
1 2 3 4 5 6 7 8 9 10 <settings xmlns ="http://maven.apache.org/SETTINGS/1.0.0" xmlns:xsi ="http://www.w3.org/2001/XMLSchema-instance" xsi:schemaLocation ="http://maven.apache.org/SETTINGS/1.0.0 https://maven.apache.org/xsd/settings-1.0.0.xsd" ><activeProfiles > <activeProfile > env-test</activeProfile > </activeProfiles > </settings >
打包与 FatJar
什么是 FatJar
FatJar 又叫 uber-jar。uber 不是打车的 uber,而是德语里面的 uber,意思是英语里面的 over-勉强可以翻译为超越。
FatJar 是一个 all-in-one 的 jar,它可以让部署和运行更加便利,它让最终部署和运行的环境不依赖于任何 maven 或者 lib 的 classpath。
FatJar 的三种具体类型
graph TB
subgraph 普通JAR
A1[META-INF]
A2[com/example/*.class]
A3[依赖外部classpath]
end
subgraph Unshaded FatJar
B1[META-INF]
B2[com/example/*.class]
B3[org/apache/commons/*.class]
B4[所有依赖解压平铺]
end
subgraph Shaded FatJar
C1[META-INF]
C2[com/example/*.class]
C3[com/acme/shaded/apachecommons/*.class]
C4[依赖类被重命名]
end
subgraph Spring Boot FatJar
D1[META-INF]
D2[BOOT-INF/classes/*.class]
D3[BOOT-INF/lib/*.jar]
D4[org/springframework/loader/*.class]
end非遮蔽的(Unshaded)—— maven-assembly-plugin
依赖于maven-assembly-plugin 。
1 2 3 4 5 6 7 8 9 10 11 12 13 14 15 16 17 18 19 <plugin > <groupId > org.apache.maven.plugins</groupId > <artifactId > maven-assembly-plugin</artifactId > <version > 3.4.2</version > <configuration > <descriptorRefs > <descriptorRef > jar-with-dependencies</descriptorRef > </descriptorRefs > </configuration > <executions > <execution > <id > assemble-all</id > <phase > package</phase > <goals > <goal > single</goal > </goals > </execution > </executions > </plugin >
descriptorRef 有:
bin 只打包编译结果,并包含 README, LICENSE 和 NOTICE 文件,输出文件格式为 tar.gz, tar.bz2 和 zip。
jar-with-dependencies 打包编译结果,并带上所有的依赖,如果依赖的是 jar 包,jar 包会被解压开,平铺到最终的 uber-jar 里去。输出格式为 jar。
src 打包源码文件。输出格式为 tar.gz, tar.bz2 和 zip。
project 打包整个项目,除了部署输出目录 target 以外的所有文件和目录都会被打包。输出格式为 tar.gz, tar.bz2 和 zip。
所有的 jar 都被 unpack,然后 repack。和 java 的缺省类加载器一起工作。
maven-assembly-plugin 也可以用于创建自定义分发包,将项目打包成 zip、tar.gz 等格式,包含配置文件、脚本等:
1 2 3 4 5 6 7 8 9 10 11 12 13 14 15 16 17 18 19 20 21 22 23 <plugin > <groupId > org.apache.maven.plugins</groupId > <artifactId > maven-assembly-plugin</artifactId > <version > 3.4.2</version > <executions > <execution > <phase > package</phase > <goals > <goal > single</goal > </goals > <configuration > <descriptorRefs > <descriptorRef > jar-with-dependencies</descriptorRef > </descriptorRefs > <archive > <manifest > <mainClass > com.example.Main</mainClass > </manifest > </archive > </configuration > </execution > </executions > </plugin >
遮蔽的(Shaded)—— maven-shade-plugin
依赖于maven-shade-plugin 。
1 2 3 4 5 6 7 8 9 10 11 12 13 14 15 16 17 18 19 20 21 22 23 24 25 26 <plugin > <groupId > org.apache.maven.plugins</groupId > <artifactId > maven-shade-plugin</artifactId > <version > 3.4.1</version > <executions > <execution > <phase > package</phase > <goals > <goal > shade</goal > </goals > <configuration > <relocations > <relocation > <pattern > org.apache.commons</pattern > <shadedPattern > com.acme.shaded.apachecommons</shadedPattern > </relocation > </relocations > <transformers > <transformer implementation ="org.apache.maven.plugins.shade.resource.ManifestResourceTransformer" > <mainClass > com.example.Main</mainClass > </transformer > </transformers > </configuration > </execution > </executions > </plugin >
所有的 jar 都被 unpack,然后 repack,而且被刻意 rename(所以叫 shade) ,以避免 dependency version clashes。这种 rename 会产生字节码级的变动,使得类的 package 变化。
和 java 的缺省类加载器一起工作。
shaded jar 依然有可能导致版本冲突,所以需要依赖 class-relocation 解决类重定位的问题,依赖 Resource Transformers 解决资源重定位的问题。
shaded jar 是为了解决这样的问题:
A 依赖 b/c,b/c依赖于 d 的两个版本。如果不产生 shaded,则 b 和 c 必有一段分支路径运行时失败。如果让 b 使用 shaded 过的 d,产生一个 shaded-b,则这个 shaded-b 本身包含引用了改名的 d,c 依赖于正常的 d,两段执行路径都可要正常运行完。
JAR of JARs
只是把 jar 打包在一起,jar 里有 jar。
我们常见的 maven package 无插件操作打出来的 jar 就是这种 jar。
默认的 fatjar 里不一定包含所有的依赖,所以需要使用插件:
1 2 3 4 5 6 7 8 9 10 11 12 <plugin > <groupId > com.jolira</groupId > <artifactId > onejar-maven-plugin</artifactId > <version > 1.4.4</version > <executions > <execution > <goals > <goal > one-jar</goal > </goals > </execution > </executions > </plugin >
Jar 的分类
Skinny – Contains ONLY the bits you literally type into your code editor, and NOTHING else.Thin – Contains all of the above PLUS the app’s direct dependencies of your app (db drivers, utility libraries, etc).Hollow – The inverse of Thin – Contains only the bits needed to run your app but does NOT contain the app itself. Basically a pre-packaged “app server” to which you can later deploy your app, in the same style as traditional Java EE app servers, but with important differences.Fat/Uber – Contains the bit you literally write yourself PLUS the direct dependencies of your app PLUS the bits needed to run your app “on its own”.
Spring Boot 与 FatJar
实际上 Java 的原生类加载器处理普通的 Jar 里面的嵌套 class 是友好的,但处理嵌套的 jar 是不友好的。
Spring Boot 的 jar 就是 fatjar,这种 fatjar 携带所有依赖,而且有专有的类加载器来处理嵌套 jar 的依赖问题。这种 fatjar 是最简单的,运行起来最友好的。
分析依赖本来要逐层解压这种 jar-of-jars,但很多解析工具只解析一层的话,反而会被其他问题触发。例如,有时候为了解决依赖版本冲突而指定 jar 的版本,而直接在一个多模块的 parent pom 里面短路地指定了一个依赖版本,反而会触发解析工具的检测规则。
1 2 3 4 5 6 7 8 9 10 11 12 13 14 15 16 17 18 19 20 21 22 23 24 25 26 27 <plugin > <groupId > org.springframework.boot</groupId > <artifactId > spring-boot-maven-plugin</artifactId > <version > 1.3.1.RELEASE</version > <executions > <execution > <goals > <goal > repackage</goal > </goals > </execution > </executions > </plugin > <plugin > <groupId > org.springframework.boot</groupId > <artifactId > spring-boot-maven-plugin</artifactId > <configuration > <layout > ZIP</layout > <requiresUnpack > <dependency > <groupId > org.jruby</groupId > <artifactId > jruby-complete</artifactId > </dependency > </requiresUnpack > </configuration > </plugin >
这样会打印出两个 jar,一个 jar 是普通 jar,另一个 jar 是 jar.original。第二个 jar 是原始 jar,而第一个 jar 则是大而全的真正的 fat-jar。
测试与覆盖率
Apache Maven Surefire
Apache Maven Surefire 本身是一个测试框架。Maven Surefire Plugin 和 Maven Failsafe Plugin 都是这个项目的模块。
Surefire 插件
Surefire 是在 maven 的构建生命周期里面,test phase 执行单元测试的插件。
用法
这个插件只有一个 goal,就是 test。
因此,使用它都不需要配置什么 configuration 和 phase。
1 2 3 4 5 6 7 <plugins > <plugin > <groupId > org.apache.maven.plugins</groupId > <artifactId > maven-surefire-plugin</artifactId > <version > 2.22.1</version > </plugin > </plugins >
它默认就会在 test phase 被执行:
不管底层的 test provider 是 JUnit 还是 TestNG,甚至只是一个 pojo,它都可以运行测试。
对于pojo,插件可以自动运行类里面的 public testxxx 方法,也可以使用 JDK 1.4 时代以后使用的断言。
对于 JUnit 之类的 test provider,可以使用以下配置进行并行测试:
1 2 3 4 5 6 7 8 9 10 11 <plugins > <plugin > <groupId > org.apache.maven.plugins</groupId > <artifactId > maven-surefire-plugin</artifactId > <version > 2.22.1</version > <configuration > <parallel > methods</parallel > <threadCount > 10</threadCount > </configuration > </plugin > </plugins >
类路径太长问题
整体而言,就是有些 OS 的命令行不允许太长的类路径。
解决这个问题的思路是,不在命令行内传递类路径,而使用进程内部的参数传递机制。由此诞生的解决方案有:
单独的类加载器 。这样可以通过执行一个伪的 booter 程序来绕开类路径的直接限制,在程序内部再 load 我们的目标程序。这个方法也有缺点。首先,java.class.path 这个系统变量不会包括启动 jar。如果应用程序需要关心这个点,可能会导致问题。其次,程序内部可能会调用Classloader.getSystemClassLoader()而不是使用缺省的类加载器(也就是我们这个 isolated 类加载器)来加载特定的类。
使用一个 Manifest-Only 的 Jar 。这个 Jar 几乎为空,只有一个MANIFEST.MF 文件。JVM 会把这个清单文件里的类路径 honor 起来当做 directive。比如我们可以用一个单独的 Class-Path 的 attribute 来填写我们的很长的类路径。
Failsafe 插件
Failsafe 是在 maven 的构建生命周期里面,test phase 执行集成测试的插件。
与 surefire-plugin 的区别在于:
surefire-plugin :运行单元测试(*Test.java)failsafe-plugin :运行集成测试(*IT.java)
1 2 3 4 5 6 7 8 9 10 11 12 13 <plugin > <groupId > org.apache.maven.plugins</groupId > <artifactId > maven-failsafe-plugin</artifactId > <version > 3.0.0-M7</version > <executions > <execution > <goals > <goal > integration-test</goal > <goal > verify</goal > </goals > </execution > </executions > </plugin >
JaCoCo
JaCoCo 本质上是是一个 java agent,基于 Java 的 Instrumentation API。可以对类文件进行 on-the-fly 的 instrumentation。它是在 class loading 的阶段通过 in memory 字节码增强的形式,进行类型补强。
JaCoCo 本身支持三种数据采集模式:
写入文件系统
作为一个 server 让其他客户端采集
作为一个 client 去连接某个 TCP 端点获取数据
JMX 的接口本身是没有鉴权和授权机制的,所以使用的时候要分清什么是 trusted server。
JaCoCo java agent
JaCoCo 以一个 jar 的形式发布。下载地址 ,注意它的发布包有 osgi bundle的版本。当做 javaagent 使用,我们应该使用jacocoagent.jar,如果使用它的命令行接口,我们应该使用 jacococli.jar。它遵循通常的 Java agent 的启动命令语法:
1 -javaagent:[yourpath/]jacocoagent.jar=[option1]=[value1],[option2]=[value2]
javaagent 可用的 options 见这个表格 。
JaCoCo Maven plugin
要使用 jacoco 的插件,第一步是获取 maven 的的引用:
1 2 3 4 5 <plugin > <groupId > org.jacoco</groupId > <artifactId > jacoco-maven-plugin</artifactId > <version > 0.8.3-SNAPSHOT</version > </plugin >
这个插件自带的 goal 分别是:
help
prepare-agent(最重要的 goal,大部分情况下只使用这个 goal)
prepare-agent-integration
merge
report-aggregate
check
dump
instrument
restore-instrumented-classes
使用这个插件最起码要配的属性:
1 2 3 4 5 6 7 8 9 10 11 <properties > <sonar.core.codeCoveragePlugin > jacoco</sonar.core.codeCoveragePlugin > <sonar.dynamicAnalysis > reuseReports</sonar.dynamicAnalysis > <sonar.jacoco.itReportPath > target/jacoco-it.exec</sonar.jacoco.itReportPath > <sonar.jacoco.reportPath > target/jacoco-ut.exec</sonar.jacoco.reportPath > <jacoco.path > ${project.build.directory}/jacoco-ut.exec</jacoco.path > <jacoco.skip > true</jacoco.skip > </properties >
然后在使用插件的时候,我们引用了这个 path
1 2 3 4 5 6 7 8 9 10 11 12 13 14 15 16 17 18 19 20 21 22 23 24 25 26 27 28 <plugin > <groupId > org.jacoco</groupId > <artifactId > jacoco-maven-plugin</artifactId > <version > 0.6.0.201210061924</version > <configuration > <skip > ${jacoco.skip}</skip > <destFile > ${jacoco.path}</destFile > <dataFile > ${jacoco.path}</dataFile > <sessionId > jacoco_coverage</sessionId > </configuration > <executions > <execution > <id > pre-test</id > <phase > process-classes</phase > <goals > <goal > prepare-agent</goal > </goals > <configuration > <propertyName > coverageAgent</propertyName > </configuration > </execution > </executions > </plugin >
上面这个 goal 的主要用处就是准备一个 maven property,用来给其他插件作为 VM argument。在这个例子里,argLine 是一个专门为 surefire 准备的 maven property。
Surefire 与 JaCoCo 集成
surefire 插件本身就可以把 JaCoCo 生成的 maven property 内插进自己的命令行参数里面:
1 2 3 4 5 6 7 8 9 10 11 12 13 <plugin > <groupId > org.apache.maven.plugins</groupId > <artifactId > maven-surefire-plugin</artifactId > <version > 2.12.4</version > <configuration > <argLine > -Xmx1024m -XX:PermSize=256m -XX:MaxPermSize=256m</argLine > <testFailureIgnore > true</testFailureIgnore > <includes > <include > **/*Test*.java</include > </includes > </configuration > </plugin >
更详细的配置(包含如何写 report)见 Creating Code Coverage Reports for Unit and Integration Tests 。
参考资料