Java 线程池笔记
从执行器到线程池(from executor interface to thread pool implementation)
Pooling is the grouping together of resources (assets, equipment, personnel, effort, etc.) for the purposes of maximizing advantage or minimizing risk to the users. The term is used in finance, computing and equipment management.
——wikipedia“池化”思想不仅仅能应用在计算机领域,在金融、设备、人员管理、工作管理等领域也有相关的应用。
在计算机领域中的表现为:统一管理IT资源,包括服务器、存储、和网络资源等等。通过共享资源,使用户在低投入中获益。除去线程池,还有其他比较典型的几种使用策略包括:
内存池(Memory Pooling):预先申请内存,提升申请内存速度,减少内存碎片。 连接池(Connection
Pooling):预先申请数据库连接,提升申请连接的速度,降低系统的开销。 实例池(Object
Pooling):循环使用对象,减少资源在初始化和释放时的昂贵损耗。
本文模式总览
本文从源码和实践两个维度剖析 Java 线程池,提炼出以下可迁移的设计模式和工程实践模式。读者可先浏览此表建立全局认知,再深入各章节:
| 类别 | 模式 | 章节 |
|---|---|---|
| 工程实践 | 线程池选型三板斧 | ThreadPoolExecutor 监控与调优实践 |
| 有界队列+明确拒绝策略 | 任务缓冲:阻塞队列 | |
| ThreadFactory 命名 | ThreadPoolExecutor 监控与调优实践 | |
| 池隔离原则 | ThreadPoolExecutor 监控与调优实践 | |
| Spring @Scheduled 单线程陷阱 | Spring @Scheduled 的默认陷阱 | |
| 调度策略 | Rate vs Delay | ScheduledThreadPoolExecutor 详解 |
| 周期任务防御性编程 | ScheduledThreadPoolExecutor 详解 | |
| cancel 后清理队列 | ScheduledThreadPoolExecutor 详解 | |
| 并发设计 | CAS + 锁分层 | mainLock:线程池的全局互斥锁 |
| Worker 不可重入锁 | Worker 类定义与锁状态 | |
| FutureTask 状态机 | FutureTask:任务包装的标准实现 | |
| 异步编排 | execute vs submit | 任务提交入口:submit 与 execute |
| CompletableFuture 异步编排 | CompletableFuture | |
| CompletableFuture 完成保证 | 完成保证原则 | |
| shutdown 优雅关闭 | 尝试关闭 ThreadPoolExecutor | |
| 未来方向 | 虚拟线程使用原则 | 虚拟线程的使用原则 |
Doug Lea 对线程池的期待有:
- 改善性能。
- 有界地利用资源(多次强调 bounds)。
- 提供统计。
执行器继承体系
“设计良好的API应该简单、一致、可扩展。”

我们将任务交给执行器,于是有了执行器(executor);我们将执行器内部用 FutureTask 包装任务,于是有了同步转异步,异步转同步的设计,和多种 API(ExecutorService 和 AbstractExecutorService);我们将执行器用线程池来实现,于是我们得到了线程池执行器(ThreadPoolExecutor)。
- Executor:只定义"执行"契约
- ExecutorService:定义生命周期、 多种任务类型(Runnable/Callable)、批量任务契约
这两层都是契约层,方法之间没有明确关联。
- AbstractExecutorService:只提供算法模板-这一层提供了其他执行方法在 execute 之上的实现,把 api 关联起来。但是唯独 execute 的实现空余了。也没有提供工作线程和拥塞队列的实现。
- ThreadPoolExecutor:只实现 execute,并且围绕它搭建了一整套线程池的参考实现:Worker + 状态机 + 队列 + 拒绝策略 + 线程工厂。
- FutureTask:只负责任务包装。但是它的两个父接口让它成为连接了
execute(Runnable)和Future.get()两个世界的桥梁。
classDiagram
    direction TB

    %% ========== 设计原则注释 ==========
    note for ThreadPoolExecutor "普通任务:生产者-消费者模式"
    note for ForkJoinPool "并行计算:工作窃取模式"

    %% ========== 契约层 ==========
    class Executor {
        <<interface>>
        +execute(Runnable command) void
        note: "契约层:只定义'执行'契约"
    }

    class ExecutorService {
        <<interface>>
        +submit(Callable~T~ task) Future~T~
        +invokeAll(Collection~Callable~T~~ tasks) List~Future~T~~
        +invokeAny(Collection~Callable~T~~ tasks) T
        +shutdown() void
        +awaitTermination(long timeout, TimeUnit unit) boolean
        note: "契约层:生命周期+批量任务"
    }

    class ScheduledExecutorService {
        <<interface>>
        +schedule(Runnable command, long delay, TimeUnit unit) ScheduledFuture~?~
        +schedule(Callable~V~ callable, long delay, TimeUnit unit) ScheduledFuture~V~
        +scheduleAtFixedRate(Runnable command, long initialDelay, long period, TimeUnit unit) ScheduledFuture~?~
        +scheduleWithFixedDelay(Runnable command, long initialDelay, long delay, TimeUnit unit) ScheduledFuture~?~
        note: "契约层:延迟和周期任务"
    }

    class Future {
        <<interface>>
        +cancel(boolean mayInterruptIfRunning) boolean
        +isCancelled() boolean
        +isDone() boolean
        +get() V
        +get(long timeout, TimeUnit unit) V
    }

    class RunnableFuture {
        <<interface>>
        note: "标记接口:Runnable+Future"
    }

    class ScheduledFuture {
        <<interface>>
    }

    class RunnableScheduledFuture {
        <<interface>>
        +isPeriodic() boolean
    }

    class RejectedExecutionHandler {
        <<interface>>
        +rejectedExecution(Runnable r, ThreadPoolExecutor executor) void
        note: "策略模式:饱和处理"
    }

    class ThreadFactory {
        <<interface>>
        +newThread(Runnable r) Thread
    }

    %% ========== 模板层 ==========
    class AbstractExecutorService {
        <<abstract>>
        #newTaskFor(Callable~T~ callable) RunnableFuture~T~
        #newTaskFor(Runnable runnable, V value) RunnableFuture~V~
        +submit(Callable~T~ task) Future~T~
        +submit(Runnable task, V result) Future~V~
        +invokeAll(Collection~Callable~T~~ tasks) List~Future~T~~
        +invokeAny(Collection~Callable~T~~ tasks) T
        note: "模板层:默认实现"
    }

    %% ========== 实现层 - ThreadPoolExecutor ==========
    class ThreadPoolExecutor {
        -corePoolSize: int
        -maximumPoolSize: int
        -keepAliveTime: long
        -workQueue: BlockingQueue~Runnable~
        -workers: HashSet~Worker~
        -ctl: AtomicInteger
        -threadFactory: ThreadFactory
        -handler: RejectedExecutionHandler
        +execute(Runnable command) void
        +shutdown() void
        +shutdownNow() List~Runnable~
        +beforeExecute(Thread t, Runnable r) void
        +afterExecute(Runnable r, Throwable t) void
        #terminated() void
        note: "ctl:高3位状态+低29位线程数"
    }

    class Worker {
        -thread: Thread
        -firstTask: Runnable
        -completedTasks: long
        +run() void
        +lock() void
        +unlock() void
        +isLocked() boolean
        +tryLock() boolean
        note: "继承AQS的不可重入锁"
    }

    class FutureTask {
        -callable: Callable~V~
        -outcome: Object
        -state: int
        -runner: Thread
        -waiters: WaitNode
        +run() void
        +get() V
        +get(long timeout, TimeUnit unit) V
        +cancel(boolean mayInterruptIfRunning) boolean
        +isCancelled() boolean
        +isDone() boolean
        -set(V v) boolean
        -setException(Throwable t) void
        -report(int s) V
        note: "状态机:NEW→COMPLETING→NORMAL/EXCEPTIONAL"
    }

    class AbortPolicy {
        +rejectedExecution(Runnable r, ThreadPoolExecutor executor) void
    }

    class CallerRunsPolicy {
        +rejectedExecution(Runnable r, ThreadPoolExecutor executor) void
    }

    class DiscardPolicy {
        +rejectedExecution(Runnable r, ThreadPoolExecutor executor) void
    }

    class DiscardOldestPolicy {
        +rejectedExecution(Runnable r, ThreadPoolExecutor executor) void
    }

    %% ========== 实现层 - ScheduledThreadPoolExecutor ==========
    class ScheduledThreadPoolExecutor {
        -delayedWorkQueue: DelayedWorkQueue
        -removeOnCancel: boolean
        +schedule(Runnable command, long delay, TimeUnit unit) ScheduledFuture~?~
        +schedule(Callable~V~ callable, long delay, TimeUnit unit) ScheduledFuture~V~
        +scheduleAtFixedRate(Runnable command, long initialDelay, long period, TimeUnit unit) ScheduledFuture~?~
        +scheduleWithFixedDelay(Runnable command, long initialDelay, long delay, TimeUnit unit) ScheduledFuture~?~
        +decorateTask(Runnable runnable, RunnableScheduledFuture~?~ task) RunnableScheduledFuture~?~
        +decorateTask(Callable~V~ callable, RunnableScheduledFuture~V~ task) RunnableScheduledFuture~V~
        +setRemoveOnCancelPolicy(boolean removeOnCancel) void
        note: "基于DelayQueue的延迟调度"
    }

    class ScheduledFutureTask {
        -time: long
        -sequenceNumber: long
        -period: long
        -outerTask: RunnableScheduledFuture~V~
        +run() void
        +runAndReset() boolean
        +isPeriodic() boolean
        +getDelay(TimeUnit unit) long
        +compareTo(Delayed other) int
        -setNextRunTime() void
        -reExecutePeriodic(RunnableScheduledFuture~?~ task) void
        note: "period>0:固定频率;period<0:固定延迟"
    }

    class DelayedWorkQueue {
        -queue: RunnableScheduledFuture~?~[]
        -size: int
        -leader: Thread
        -lock: ReentrantLock
        -available: Condition
        +offer(RunnableScheduledFuture~?~ e) boolean
        +take() RunnableScheduledFuture~?~
        +poll() RunnableScheduledFuture~?~
        +poll(long timeout, TimeUnit unit) RunnableScheduledFuture~?~
        +peek() RunnableScheduledFuture~?~
        +size() int
        +clear() void
        note: "堆实现+leader机制"
    }

    class Delayed {
        <<interface>>
        +getDelay(TimeUnit unit) long
    }

    %% ========== 实现层 - ForkJoinPool ==========
    class ForkJoinPool {
        -parallelism: int
        -workQueues: WorkQueue[]
        +execute(ForkJoinTask~?~ task) void
        +submit(ForkJoinTask~T~ task) ForkJoinTask~T~
        +invoke(ForkJoinTask~T~ task) T
        note: "工作窃取:双端队列(LIFO/FIFO)"
    }

    class ForkJoinWorkerThread {
        -pool: ForkJoinPool
        -workQueue: WorkQueue
        +run() void
        +onStart() void
        +onTermination(Throwable exception) void
    }

    class WorkQueue {
        -array: ForkJoinTask~?~[]
        -base: int
        -top: int
        -ctl: int
        -pool: ForkJoinPool
        -owner: ForkJoinWorkerThread
        +push(ForkJoinTask~?~ task) int
        +pop() ForkJoinTask~?~
        +poll() ForkJoinTask~?~
        +tryUnpush(ForkJoinTask~?~ task) boolean
        +growArray() ForkJoinTask~?~[]
        note: "array容量8192起,base/top无锁"
    }

    class ForkJoinTask {
        <<abstract>>
        -status: int
        +fork() ForkJoinTask~T~
        +join() T
        +invoke() T
        +tryUnfork() boolean
        +quietlyComplete() void
        note: "增强Future:fork/join语义+工作窃取支持"
    }

    class RecursiveTask {
        <<abstract>>
        +compute() V
    }

    class RecursiveAction {
        <<abstract>>
        +compute() void
    }

    class CountedCompleter {
        <<abstract>>
        -completer: CountedCompleter~?~
        -pending: int
        +compute() void
        +onCompletion(CountedCompleter~?~ caller) void
        +tryComplete() void
        +propagateCompletion() void
        +addToPendingCount(int delta) void
        note: "JDK8 Stream并行实现的核心载体"
    }

    class Runnable {
        <<interface>>
        +run() void
    }

    %% ========== 继承关系(放在类定义之后)==========
    Executor <|-- ExecutorService
    ExecutorService <|-- ScheduledExecutorService
    ExecutorService <|-- AbstractExecutorService
    AbstractExecutorService <|-- ThreadPoolExecutor
    AbstractExecutorService <|-- ForkJoinPool
    ThreadPoolExecutor <|-- ScheduledThreadPoolExecutor

    Future <|-- RunnableFuture
    RunnableFuture <|.. FutureTask
    Future <|-- ForkJoinTask
    Future <|-- ScheduledFuture
    RunnableScheduledFuture --|> ScheduledFuture
    RunnableScheduledFuture --|> Runnable
    ScheduledFutureTask ..|> RunnableScheduledFuture
    Delayed <|.. ScheduledFutureTask

    ForkJoinTask <|-- RecursiveTask
    ForkJoinTask <|-- RecursiveAction
    ForkJoinTask <|-- CountedCompleter

    RunnableFuture --|> Runnable

    RejectedExecutionHandler <|.. AbortPolicy
    RejectedExecutionHandler <|.. CallerRunsPolicy
    RejectedExecutionHandler <|.. DiscardPolicy
    RejectedExecutionHandler <|.. DiscardOldestPolicy

    %% ========== 组合关系 ==========
    AbstractExecutorService ..> FutureTask : creates
    ThreadPoolExecutor o-- Worker : manages
    ThreadPoolExecutor --> RejectedExecutionHandler : uses
    ThreadPoolExecutor --> ThreadFactory : uses

    ScheduledThreadPoolExecutor o-- ScheduledFutureTask : manages
    ScheduledThreadPoolExecutor --> DelayedWorkQueue : uses

    ForkJoinPool o-- ForkJoinWorkerThread : manages
    ForkJoinWorkerThread --> WorkQueue : owns
    WorkQueue --> ForkJoinTask : stores

    Executors ..> ThreadPoolExecutor : creates
    Executors ..> ScheduledThreadPoolExecutor : creates
    Executors ..> ForkJoinPool : creates

    %% ========== 工具类 ==========
    class Executors {
        <<utility>>
        +newFixedThreadPool(int nThreads) ExecutorService
        +newCachedThreadPool() ExecutorService
        +newSingleThreadExecutor() ExecutorService
        +newScheduledThreadPool(int corePoolSize) ScheduledExecutorService
        +newWorkStealingPool() ExecutorService
        +defaultThreadFactory() ThreadFactory
        note: "工厂方法(已不推荐)"
    }

    class TimeUnit {
        <<enum>>
        NANOSECONDS
        MICROSECONDS
        MILLISECONDS
        SECONDS
        +toNanos(long d) long
        +toMillis(long d) long
        +sleep(long timeout) void
    }
父子孙
从上述类图可提炼出清晰的继承层次:
- ThreadPoolExecutor 与 ForkJoinPool 是兄弟关系,都继承自 AbstractExecutorService
- ScheduledThreadPoolExecutor 是 ThreadPoolExecutor 的子类,是 AbstractExecutorService 的孙子
Executor 接口
将任务提交和任务执行进行解耦(decoupling the execution mechanic)。用户无需关注如何创建线程,如何调度线程(scheduling)来执行任务,用户只需提供 Runnable 对象,将任务的运行逻辑提交到执行器(Executor)中,由 Executor 框架完成线程的调配和任务的执行部分。
JUC 里所有的解耦设计都不一定是异步的,它只是解耦,所以执行器本身也是可以同步执行的:
1 | |
一般而言可以认为,executor 会 spawns a new thread for each task.
ExecutorService 接口
增加了一些能力:
扩充执行任务的能力,补充可以为一个或一批异步任务生成 Future 的方法(),从这里开始执行器开始可以执行异步任务:
1 | |
在上面的方法里,submit 能接收无结果的 Runnable、有结果的 Runnable、能返回结果的 Callable,再加上底层无返回结果的 execute,构成了4个基础的单任务api。
ExecutorService 还提供了管控线程池的方法,比如停止线程池的运行。详见后续章节对 shutdown() 和 shutdownNow() 的详细分析。
线程池的拒绝策略与线程中断机制
线程池通过 拒绝策略(Rejection Policy)和线程中断(Thread Interruption) 两种机制来处理任务提交失败和线程池关闭场景。
拒绝策略触发场景
拒绝策略通过 RejectedExecutionHandler 接口实现,在以下场景触发:
| 触发场景 | 触发时机 | 调用位置 | 说明 |
|---|---|---|---|
| 线程池饱和 | 核心线程数已满 + 队列已满 + 达到最大线程数 | execute() 步骤3失败 |
无法创建新线程处理任务 |
| 线程池关闭后提交 | 调用 shutdown() 或 shutdownNow() 后 |
execute() 步骤1检查 |
状态 >= SHUTDOWN 时拒绝新任务 |
| Worker 创建失败 | ThreadFactory 返回 null 或线程启动失败 | addWorker() 失败后 |
无法创建工作线程 |
代码示例:
1 | |
线程中断触发场景
线程中断用于通知线程检查状态或终止执行,ThreadPoolExecutor 中的线程中断触发场景如下:
| 触发场景 | 方法调用 | 中断范围 | 目的 |
|---|---|---|---|
| 显式关闭(优雅) | shutdown() |
仅空闲线程 | 让空闲线程检查池状态后退出,正在执行的任务不受影响。这一段不需要业务代码响应中断,只要 runWorker 内部的 take/pol 的响应中断机制和对中断异常的处理就透明地处理这些中断,空闲线程自然退出死亡 |
| 显式关闭(强制) | shutdownNow() |
所有线程(包括执行中) | 立即中断所有线程,尝试停止正在执行的任务。需要业务代码能够响应中断。 |
| 传播式关闭 | tryTerminate() |
一个空闲线程 | 终止条件满足但仍有线程时,中断一个空闲线程形成连锁反应 |
| 配置变更 | setCorePoolSize() 等 |
空闲线程 | 参数调小后回收多余的空闲线程 |
| 任务取消 | Future.cancel(true) |
执行该任务的线程 | 用户主动取消任务 |
关键区别:
1 | |
常见误解澄清:
| 误解 | 真相 |
|---|---|
❌ awaitTermination() 超时会中断线程 |
✅ 只是等待方法返回 false,不会触发任何中断 |
| ❌ 周期任务异常会中断线程 | ✅ 任务静默终止,线程继续存活处理其他任务 |
| ❌ 线程池饱和会中断线程 | ✅ 触发拒绝策略,不会中断已存在的线程 |
❌ tryTerminate() 会中断所有线程 |
✅ 只中断一个空闲线程,通过传播式关闭逐步终止 |
最佳实践:
1 | |
AbstractExecutorService
将执行任务的流程串联起来,保证下层实现只需关注 execute() 方法:
- 大部分任务接口在这一层有了实现,最终都调向 execute()
- 生命周期接口留给下层实现
详细实现原理(newTaskFor 工厂方法、任务包装机制、模板方法模式)见 AbstractExecutorService 详解 章节。
ThreadPoolExecutor
实现了 execute,围绕 execute 的批量和异步化给出了一个经典的线程池执行器实现。
将会一方面维护自身的生命周期,另一方面同时管理线程(Thread)和任务(Task,也就是 Runnable),使两者良好的结合从而执行并行任务。
execute 的三段式判断体现了生产者-消费者解耦模型:当 workerCount < corePoolSize 时创建核心线程,任务作为 firstTask 直接传递给 Worker;当队列未满时入队等待,阻塞队列成为生产者与消费者之间的桥梁;当核心线程数已满、队列已满(入队失败)且 workerCount < maximumPoolSize时创建非核心线程,同样以 firstTask 方式传递。无论哪种路径,真正的消费者都是 Worker 线程的 runWorker 循环——它先消费 firstTask,后续通过 getTask() 从队列持续消费。

ScheduledExecutorService 接口
ScheduledExecutorService 扩展了 ExecutorService 接口,专门用于支持延迟执行和周期性执行的任务调度。
1 | |
两种周期模式的时间计算差异:
| 方法 | 时间计算基准 | 任务耗时 > period 时的行为 | 适用场景 |
|---|---|---|---|
scheduleAtFixedRate |
上次开始时间 + period | 等待完成后立即执行下一次(追赶) | 心跳检测、定时采样 |
scheduleWithFixedDelay |
上次完成时间 + delay | 严格保证任务间隔 | 任务队列处理、限流场景 |
1 | |
核心特性:
- 支持一次性延迟执行
- 支持固定频率/固定延迟两种周期模式
- 返回 ScheduledFuture 用于任务控制和结果获取
实现类:
ScheduledThreadPoolExecutor是主要实现- 内部使用
DelayedWorkQueue(基于二叉堆的优先级队列) - 任务通过
ScheduledFutureTask封装,支持时间管理和周期计算
详细说明:关于内部实现机制、核心组件架构、任务调度原理等内容,请参阅第2章《ScheduledThreadPoolExecutor 详解》。
ScheduledThreadPoolExecutor 对 ThreadPoolExecutor 的扩展
ScheduledExecutorService 接口定义了定时调度的契约,而 ScheduledThreadPoolExecutor 是其主要实现。其类声明体现了双重设计:
1 | |
这形成了一个清晰的扩展层次:
- 接口层:ScheduledExecutorService 扩展 ExecutorService,新增定时调度契约
- 实现层:ScheduledThreadPoolExecutor 继承 ThreadPoolExecutor,复用线程池核心能力
核心扩展点:
| 扩展维度 | ThreadPoolExecutor | ScheduledThreadPoolExecutor |
|---|---|---|
| 队列 | 外部传入 BlockingQueue |
强制使用 DelayedWorkQueue(二叉堆) |
| 任务封装 | FutureTask |
ScheduledFutureTask(新增 time/period 字段) |
| execute() | 直接入队执行 | 重写为 schedule(command, 0, NANOSECONDS) |
| submit() | 通过 execute() | 同样走 schedule(0) 路径 |
| 新增方法 | 无 | schedule 系列、setRemoveOnCancelPolicy、decorateTask |
设计要点:
-
队列强制绑定:构造器不接受外部队列参数,在 super() 调用中硬编码 DelayedWorkQueue
-
任务周期管理:ScheduledFutureTask 通过 period 字段区分一次性任务(0)、fixed-rate(正数)、fixed-delay(负数)
-
线程池复用:完全继承 ThreadPoolExecutor 的 Worker 管理、状态机、拒绝策略机制
Worker 机制复用解析:延时线程池确实能够完全复用 ThreadPoolExecutor 的 Worker 机制,关键在于队列的阻塞语义。Worker 线程的
getTask()方法调用queue.take()获取任务,而DelayedWorkQueue.take()会阻塞直到队首任务到期。Worker 线程对此完全无感知——它只是在队列上等待,取到任务后执行。换言之,延时逻辑封装在队列层而非 Worker 层,这正是 ThreadPoolExecutor 将队列设计为可扩展组件的精妙之处:通过替换队列实现,无需修改 Worker 代码即可支持延时调度。TPE 扩展边界:要扩展 ThreadPoolExecutor,能够扩展的只有队列、线程工厂、拒绝策略以及 RunnableFuture/FutureTask 任务。Worker 控制了主循环(
runWorker()中的 while 循环),其行为是固定的:取任务→执行任务→循环。真正的扩展点在ftask.run()调用处——即任务执行环节。decorateTask()方法正是为此设计,允许子类包装任务对象,在run()方法前后插入自定义逻辑,调用自定义线程池重调度方法,这也是 ScheduledThreadPoolExecutor 实现周期调度的关键机制。任务提交路径:ScheduledThreadPoolExecutor 的
execute()和schedule()都没有调用父类的execute()。execute()被重写为schedule(command, 0, NANOSECONDS),而schedule()内部通过delayedExecute()直接调用super.getQueue().add(task)向队列投递任务,并调用ensurePrestart()确保有线程运行。这跳过了 ThreadPoolExecutor 原生的入队逻辑,强制所有任务走 DelayedWorkQueue。生产者-消费者解耦:Worker 线程的运行与
execute()/schedule()是解耦的。后者只是生产者,向队列投递任务;Worker 线程一旦启动,就在runWorker()的 while 循环中自主运行,通过getTask()从队列消费任务。两者通过队列连接,互不直接驱动。任务分配机制:多个 Worker 线程同时阻塞在
queue.take()或queue.poll()上。当任务入队后,哪个线程被唤醒并获取任务由阻塞队列的锁竞争和操作系统线程调度决定,而非 Java 层面的随机分配。以DelayedWorkQueue为例,其take()方法使用ReentrantLock保护,任务出队需要获取这把锁——竞争成功的线程获得任务,其他线程继续阻塞或重试。这是竞争性分配而非随机分配。 -
API 兼容:execute/submit 语义保持不变,内部转换为即时调度
API 主次之分:从设计意图看,
execute()和submit()都是通过schedule(0)路径实现的,本质上是"延时为 0 的调度",只是延时封装下的立即执行。真正体现 ScheduledExecutorService 定时调度能力的核心 API 是schedule()、scheduleAtFixedRate()和scheduleWithFixedDelay(),而后者两个周期调度方法永远不会被传统的 AbstractExecutorService 体系(execute/submit/invokeAll/invokeAny)调用。
1 | |
ForkJoinPool
这个线程池本身就是一个复杂框架,为 JDK 其他组件提供 yet another executor alternative。
这个框架有个特点:
- 产生的线程默认是守护线程,其他线程池产生的默认不是守护线程。
- 产生的线程会自动收缩-不存在空转的 core thread 问题。
- 公共线程池的名字一般叫“ForkJoinPool.commonPool-worker-1”。
这里就要讨论到一个很多人忽略的问题:我们如何决定何时使用守护类线程。这类线程可以用来执行一些:
- 临时执行的任务,这些任务之间如果存在父子关系更好。
- 后台监控类任务。
- 可以被中断的计算任务。
规范说明:根据Java Language Specification §12.8,守护线程的关键特性是"不阻止JVM退出"。因此判断是否使用守护线程的标准应该是:
- 任务是否可以在JVM退出时被安全中断
- 任务是否需要确保完成(如数据持久化、事务提交)
- 任务失败是否可以接受或能够重试恢复
- 典型的工作线程池包括两类:
- IO线程池:平台线程池的一种,专门处理IO密集型任务(如文件读写、网络请求),通常使用固定大小的线程池(如FixedThreadPool,本质是 ThreadPoolExecutor 的封装)。
- 计算线程池:平台线程池的一种,专门处理CPU密集型任务(如数值计算、数据处理),可使用ForkJoinPool等工作窃取线程池。
初始化这类线程池有一些简单的工厂方法,比原始构造器更加可用:Executors.newWorkStealingPool(int parallelism),其余工厂方法见后文。
ForkJoinPool 概述:
ForkJoinPool 是 Java 7 引入的另一种 ExecutorService 实现,与 ThreadPoolExecutor 走了完全不同的设计路线。它的核心特性包括:
- 工作窃取(Work-Stealing):每个工作线程拥有独立的双端队列(Deque),空闲线程会主动从繁忙线程的队列中"窃取"任务,实现自动负载均衡。
- 分治并行(Fork/Join):天然支持递归任务分解,通过
ForkJoinTask(RecursiveTask/RecursiveAction)实现分治算法。 - asyncMode 参数:控制工作队列的调度模式——LIFO(默认,适合递归分治)或 FIFO(适合事件驱动场景)。
- 固定并行度:线程数通常等于 CPU 核心数,不像
ThreadPoolExecutor那样动态扩缩容。
特性关系澄清:
这四个特性中,工作窃取是 ForkJoinPool 的核心基础设施,无论选择哪种 asyncMode 或任务类型,工作窃取机制都始终启用。工作窃取是调度层面的机制(如何分发任务),分治并行是任务层面的模式(如何分解任务),两者是正交关系——工作窃取可服务于非分治任务(如 newWorkStealingPool() 处理普通并行任务),分治算法理论上也可使用其他调度机制。在 ForkJoinPool 的实现中,工作窃取是分治并行的底层支撑,但这不代表两者在概念上存在从属关系。
JDK 提供了两种常用的获取方式:
ForkJoinPool.commonPool():全局共享的 ForkJoinPool 实例,parallelStream()和CompletableFuture默认使用。Executors.newWorkStealingPool(int parallelism):创建独立的工作窃取线程池。
关于 ForkJoinPool 的 asyncMode 参数详解、工作窃取机制原理、与 ThreadPoolExecutor 的核心差异对比、commonPool 的任务排队机制等深入内容,详见 ForkJoinPool 详解:分治并行的执行引擎 章节。
小结
本章介绍了 Java 线程池的核心接口体系,遵循“契约层 → 模板层 → 实现层 → 工厂层”的设计脉络:
- 契约层:Executor → ExecutorService → ScheduledExecutorService,逐层扩展执行、生命周期、定时调度契约(详见上文各接口章节)
- 模板层:AbstractExecutorService 为
submit/invokeAll/invokeAny提供默认实现,下层只需实现execute()(详见 AbstractExecutorService 详解) - 实现层:ThreadPoolExecutor(经典线程池)、ScheduledThreadPoolExecutor(定时调度)、ForkJoinPool(工作窃取)
- 工厂层:Executors 静态工厂方法集合(如
newFixedThreadPool、newCachedThreadPool、newWorkStealingPool)
AbstractExecutorService 详解
AbstractExecutorService 将执行任务的流程串联起来,保证下层实现只需关注 execute() 方法。这一层的大部分方法实现遵循以下模式:
- 把任务包装成 FutureTask
- 用 execute 执行这个 FutureTask
- 返回 FutureTask 实例供调用者使用
newTaskFor:任务包装的核心工厂方法
newTaskFor 是 AbstractExecutorService 的核心工厂方法,它负责将用户提交的任务(Runnable 或 Callable)包装成 RunnableFuture,默认返回 FutureTask 实例,但子类可以 override 提供自定义实现。关于 FutureTask 的内部结构(callable/outcome/run 的同级关系、状态机、RunnableAdapter 适配器等),详见 ThreadPoolExecutor 如何管理任务 章节。
方法签名
1 | |
Runnable 变成 Future,总要配一个 Value,这是一个好的设计模式。
封装关系:把什么东西封装成什么东西?
1 | |
默认实现
1 | |
为什么需要 newTaskFor?
-
解耦任务类型:
- 用户提交的是
Callable<T>或Runnable - Executor 接收的是
Runnable - Future 接口提供
get()获取结果 newTaskFor将这三者统一起来
- 用户提交的是
-
支持自定义扩展:
子类可以重写newTaskFor来添加自定义逻辑:
1 | |
- 统一任务包装:
所有高级方法都依赖newTaskFor:
1 | |
invokeAny 为什么返回 T 而不是 Future
与 submit 和 invokeAll 不同,invokeAny 直接返回结果值 T。这源于语义差异:
submit/invokeAll:提交任务后立即返回,调用者稍后通过 Future 获取结果——返回时任务可能未完成invokeAny:阻塞等待任意一个任务成功完成——返回时结果已确定,不存在"未来"需要等待
如果 invokeAny 返回 Future<T>,调用者必然要调用 get(),而此时 Future 已完成,这层包装毫无价值。直接返回 T 简化了 API 使用,符合"最少意外原则"。
这三个方法的实现透露了得到 future 的诀窍:因为 execute 返回 void,所以要保存 newTaskFor 的返回值引用,然后调用 execute 执行。可以说凡是需要 execute 的最底层,要得到 Future 都需要抓住 newTaskFor 的返回值。
像 invokeAll 和 submit 只是"封装 + execute"的门面,在创建 FutureTask 后、调用 execute 前,有机会对 FutureTask 进行额外处理(如加入列表追踪、设置超时等)。
封装的核心价值
| 输入 | 封装过程 | 输出 | 价值 |
|---|---|---|---|
Callable<T> |
newTaskFor() |
FutureTask<T> |
获得异步结果获取能力 |
Runnable + T |
newTaskFor() |
FutureTask<T> |
无返回值任务也能返回结果 |
| 计算逻辑 | 包装为 Runnable + Future |
可提交、可等待 | 统一的异步编程模型 |
设计模式:工厂方法模式
classDiagram
class AbstractExecutorService {
<<abstract>>
#newTaskFor(Callable~T~) RunnableFuture~T~
#newTaskFor(Runnable, T) RunnableFuture~T~
+submit(Callable~T~) Future~T~
+invokeAll(...) List~Future~T~~
}
class ThreadPoolExecutor {
#newTaskFor(Callable~T~) RunnableFuture~T~
#newTaskFor(Runnable, T) RunnableFuture~T~
}
class CustomExecutor {
#newTaskFor(Callable~T~) RunnableFuture~T~
}
class RunnableFuture {
<<interface>>
+run() void
}
class Future~T~ {
<<interface>>
}
class FutureTask {
+run()
+get() T
+cancel()
}
RunnableFuture --|> Future : extends
AbstractExecutorService <|-- ThreadPoolExecutor
AbstractExecutorService <|-- CustomExecutor
AbstractExecutorService ..> RunnableFuture : creates via
FutureTask ..|> RunnableFuture : implements要点
newTaskFor 是连接"同步任务"和"异步执行"的桥梁:
- 它将计算任务(Callable/Runnable)封装为可执行可等待的对象(FutureTask)
- 它是 AbstractExecutorService 所有高级方法的基础
- 它提供了扩展点,允许子类自定义任务包装逻辑,我们常见的自定义 traceId 传递的 newTask 匿名类内部,都有使用扩展的 FutureTask。
- 它体现了"模板方法模式":定义算法骨架,子类实现具体步骤
FutureTask:任务包装的标准实现
类型体系与设计定位
FutureTask 是 Java 并发框架中「可取消的异步计算」的核心实现(@since 1.5, @author Doug Lea)。它实现了 RunnableFuture<V> 接口,而 RunnableFuture 同时继承了 Runnable 和 Future——这两个接口一个面向线程池(对内执行),一个面向任务调用方(对外获取结果)。FutureTask 是 RunnableFuture 的两个经典实现之一(All Known Implementing Classes: FutureTask, SwingWorker),可以认为它是可执行 Future 的最忠实实现。
classDiagram
class FutureTask {
-callable: Callable~V~
-outcome: Object
-state: int
-runner: Thread
-waiters: WaitNode
+run() void
+get() V
+cancel(boolean) boolean
+isDone() boolean
}
note for FutureTask "@since 1.5"
class RunnableFuture {
<<interface>>
+run() void
}
note for RunnableFuture "@since 1.6"
class Runnable {
<<interface>>
+run() void
}
note for Runnable "@since 1.0"
class Future {
<<interface>>
+get() V
+cancel(boolean) boolean
+isDone() boolean
}
note for Future "@since 1.5"
class Callable {
<<interface>>
+call() V
}
note for Callable "@since 1.5"
FutureTask ..|> RunnableFuture : implements
RunnableFuture --|> Runnable : extends
RunnableFuture --|> Future : extends
FutureTask o-- Callable : has
FutureTask o-- Object : stores
FutureTask o-- Thread : referencesFutureTask 本身不是 Callable,但包含 Callable。它的双重身份是设计的关键:
- 作为 Runnable:可以被提交给 Executor 执行
- 作为 Future:提供结果获取、取消、状态查询能力
核心语义约束:
- 单次执行原则:任务只能执行一次,一旦进入终态(NORMAL/EXCEPTIONAL/CANCELLED/INTERRUPTED)就不可重启。
- 阻塞语义:
get()在任务完成前会阻塞调用线程,这是 Future 模式的核心价值。 - 不可逆取消:一旦取消成功,任务即使尚未开始也不会再执行。
- runAndReset 是例外:专为周期性任务设计,执行后重置状态但不设置结果。
执行环境无关性:FutureTask 的 run()、runAndReset() 及其状态机设计与执行环境完全解耦。不假定调用者是 ThreadPoolExecutor 的 Worker、用户线程还是 main 线程;不区分同步调用、异步提交或定时调度。runner = Thread.currentThread() 的语义是“谁调用就记录谁”,状态转换完全自包含,不依赖外部线程池状态。这是典型的关注点分离设计:FutureTask 只负责状态管理、结果存储、等待/唤醒协调,线程池只负责线程管理和任务调度,两者通过 Runnable 接口解耦。
1 | |
Javadoc 释义:
- 「cancellable asynchronous computation」:FutureTask 的核心定位是可取消的异步计算单元。
- 「base implementation of Future」:提供 Future 接口的基础实现,子类可扩展。
- 「get methods will block」:阻塞是获取异步结果的代价,这是 Future 模式的本质特征。
- 「wrap a Callable or Runnable」:适配器模式,统一两种任务类型-通过两种构造器的形式。实际上只能wrap一个 Callable,Runnable 必须适配成 Callable 放进来。
- 「protected functionality」:模板方法模式,
done()等钩子供子类定制。
成员字段与构造
FutureTask 有 5 个一级成员字段,它们之间构成了一个典型的「输入 → 执行 → 输出」模型:
1 | |
run() 方法的核心职责就是调用 callable.call() 获取返回值,然后通过 set(result) 将结果写入 outcome。callable 是输入,run() 是执行器(内建),outcome 是输出(内建)。
1 | |
FutureTask 提供两个构造器,支持 Callable 和 Runnable 两种任务类型。构造器中 state = NEW 写在最后,利用 volatile 捎带同步保证 callable 的可见性:
1 | |
当传入 Runnable 时,线程池使用 RunnableAdapter 将其适配为 Callable:
1 | |
这形成了清晰的封装层次:FutureTask.run() → callable.call()(可能是 RunnableAdapter.call(),也可能是普通的callable.call())→ task.run() → return result 设置 outcome → report outcome。整个链路将无返回值的 Runnable 转换为有返回值的 Future 模式。之所以这样设计,本质上是因为 Thread 类底层只支持 run(),不支持 call()。FutureTask 是能让 runnable 内部含有结果,而且可以借助一个输出接口输出结果的经典范例。
同级封装适配的设计动因:
| 方向 | 机制 | 核心约束 | 设计要点 |
|---|---|---|---|
| Callable → Runnable | FutureTask(实质上是 RunnableFuture) | run() 是 void,无法返回值 | run() 内部调用 call(),将返回值存入 outcome,通过 get() 暴露。get() 是带有延时和状态检查的 call():call() 立即执行并返回,get() 等待状态机达到终态后才返回 outcome |
| Runnable → Callable | RunnableAdapter(实质上是 Callable) | run() 无返回值,无法产出计算结果 | 只能提供预设的 result,call() 执行 run() 后直接返回预设值。若需计算结果,应直接使用 Callable |
简言之:Callable 封装成 Runnable 需要一个中间层(FutureTask-RunnableFuture)来“接住”返回值;Runnable 适配成 Callable 只能「带着结果进去」,无法「计算出结果」。
状态机
state 字段是 FutureTask 的核心状态机,使用 volatile int 而非枚举类型——这是 Doug Lea 的常见设计风格,核心考量是:配合 UNSAFE.compareAndSwapInt 实现无锁状态转换,volatile 保证可见性,整数比较性能更高。
1 | |
Javadoc 释义:
- 「initially NEW」:构造后初始状态为 NEW(0),这是唯一可以接受任务取消的状态
- 「terminal state」:终态包括 NORMAL/EXCEPTIONAL/CANCELLED/INTERRUPTED,不可逆转
- 「transient values」:COMPLETING/INTERRUPTING 是瞬态,主要用于设置 outcome 或执行中断的窗口期
- 「ordered/lazy writes」:使用
UNSAFE.putOrderedInt而非 volatile 写,因为终态唯一不可变
putOrderedInt 语义详解:putOrderedInt 是弱化版 volatile 写(又称 lazySet)。与 putIntVolatile 的区别在于内存屏障:
| 方法 | 写前屏障 | 写后屏障 |
|---|---|---|
putIntVolatile |
StoreStore | StoreLoad |
putOrderedInt |
StoreStore | 无 |
为什么叫 “ordered”:保证 store-store ordering,此写操作之前的所有写不会被重排序到此写之后(如 outcome = v 必然先于 state = NORMAL)。
为什么叫 “lazy”:省略了写后的 StoreLoad 屏障,写入可能滞留在 CPU 写缓冲区,其他线程最终会看到但不保证立即可见。在 x86 上,putOrderedInt 编译为普通 MOV 指令,而 putIntVolatile 需要 LOCK 前缀或 MFENCE。
适用场景:只需 happens-before 传递性不需即时可见性时使用。FutureTask 终态写入正是此场景:读到终态的线程必能读到 outcome,但不要求终态立即被观测到。JDK 9+ 的 VarHandle.setRelease() 是其替代 API。
FutureTask 状态转换图:
stateDiagram-v2
[*] --> NEW: 任务创建
NEW --> COMPLETING: call()执行完成
NEW --> CANCELLED: cancel(false)
NEW --> INTERRUPTING: cancel(true)
COMPLETING --> NORMAL: 正常结果设置完成
COMPLETING --> EXCEPTIONAL: 异常结果设置完成
INTERRUPTING --> INTERRUPTED: 中断完成
NORMAL --> [*]: 终态
EXCEPTIONAL --> [*]: 终态
CANCELLED --> [*]: 终态
INTERRUPTED --> [*]: 终态
note right of NEW: 初始状态,任务可被取消
note right of COMPLETING: 瞬态,正在设置结果
note right of INTERRUPTING: 瞬态,正在中断runner值得一提的是,任务的中间状态是一个瞬态,它非常的短暂。而且任务的中间态并不代表任务正在执行,而是任务已经执行完了,正在设置最终的返回结果,所以可以这么说:
只要 state 不处于 NEW 状态,就说明任务已经执行完毕。
注意,这里的执行完毕是指传入的 Callable 对象的 call 方法执行完毕,或者抛出了异常。所以这里的 COMPLETING 的名字显得有点迷惑性,它并不意味着任务正在执行中,而意味着 call 方法已经执行完毕,正在设置任务执行的结果。
换言之,只有 NEW 状态才是 cancellable 的。
状态查询方法:
1 | |
执行入口:run() 与 runAndReset()
run()
state == NEW 检查与 CAS 绑定 runner 共同保证 FutureTask 最多执行一次。
run() 是任务执行的入口-通常由线程池的 worker 调用,worker 最终也成为 runner。核心流程:state 检查 + CAS 绑定 runner 保证幂等 → 执行 callable.call() → 根据结果调用 set() 或 setException()(内部 CAS NEW→COMPLETING 进入中间态,再转为终态,这个转换在一个方法里全部完成,所以中间态是很短暂的)→ finally 中置空 runner 并处理可能的中断。
1 | |
runner 的生命周期
runner 字段记录了正在执行任务的线程引用,它的注入和使用流程如下:
sequenceDiagram
participant Caller as 调用方线程
participant Pool as 线程池
participant FutureTask
participant Worker as 线程池Worker
Caller->>Pool: submit(task)
Pool->>FutureTask: new FutureTask(task)
Note right of FutureTask: state = NEW, runner = null
Pool-->>Caller: return futureTask
Worker->>FutureTask: run()
FutureTask->>FutureTask: CAS设置 runner = Worker
Note right of FutureTask: Worker执行 callable.call()
Caller->>FutureTask: cancel(true)
FutureTask->>FutureTask: CAS NEW→INTERRUPTING
FutureTask->>Worker: runner.interrupt()
FutureTask->>FutureTask: state = INTERRUPTED
FutureTask->>FutureTask: finishCompletion()
Note over Worker: Worker收到中断信号
Worker->>FutureTask: run()的finally块
FutureTask->>FutureTask: runner = null
FutureTask->>FutureTask: handlePossibleCancellationInterrupt()
Note right of FutureTask: 若state==INTERRUPTING则自旋等待FutureTask 只执行一次,执行完成(无论成功、异常还是取消)后,runner 字段会被置为 null。
Thread.start → Worker.run → runWorker → FutureTask.run 调用关系辨析
线程池中任务的执行涉及多个层次的 run 方法调用,理解它们的包含关系是掌握线程池执行模型的关键。
调用链:
1 | |
runAndReset()
runAndReset() 专为周期性任务设计(典型应用场景是 ScheduledThreadPoolExecutor 中的定时任务)。与 run() 的关键区别:
| 维度 | run() |
runAndReset() |
|---|---|---|
| 结果设置 | 调用 set(result) 或 setException(ex) 清空 callable;runner 在 finally 块中清空 |
不设置结果,get() 永远阻塞或超时,无法获取中间结果。正常完成时不调用 set(),故不触发 finishCompletion(),callable 保留;runner 在 finally 块中清空 |
| 正常完成 | NEW → NORMAL(终态) | 状态保持 NEW,允许再次执行 |
| 异常/取消 | 进入终态 | 进入终态(与 run() 一致) |
| 可重复执行 | 否 | 仅正常完成时可重复 |
1 | |
Javadoc 释义:
- 「without setting its result」:执行但不产生可获取的结果
- 「resets this future to initial state」:重置的是状态而非 callable 引用
- 「failing to do so if…exception or cancelled」:异常和取消都会导致进入终态,不再可重置
- 「intrinsically execute more than once」:典型如定时任务、心跳任务等周期性场景
三类终态方法:set / setException / cancel
FutureTask 有三种进入终态的路径,它们都以 finishCompletion() 收尾:
set():正常完成
状态转换:NEW → COMPLETING → NORMAL。CAS 先设置中间态 COMPLETING 防止并发取消,中间态期间写入 outcome(可见性由后续的 volatile state 写入保证),然后用 putOrderedInt(懒写)写入终态 NORMAL。
1 | |
setException():异常完成
状态转换:NEW → COMPLETING → EXCEPTIONAL。与 set() 几乎相同,但 outcome 存储的是 Throwable。如果 CAS 失败(已被 cancel),异常信息丢失,这是设计折衷。
1 | |
cancel():取消/中断
从这个方法可以看出,中断也是 cancel 的一种。只能从 NEW 状态取消,返回 true 表示状态迁移成功,不保证任务实际停止。
1 | |
| 参数 | 状态转换 | 行为 |
|---|---|---|
cancel(false) |
NEW → CANCELLED | 仅标记取消,不中断执行线程 |
cancel(true) |
NEW → INTERRUPTING → INTERRUPTED | 标记取消并对 runner 线程调用 interrupt() |
主动取消任务的 API 总览:
| API | 作用范围 | 行为 |
|---|---|---|
Future.cancel(boolean) |
单任务级别 | 标记取消,可选中断执行线程 |
shutdownNow() |
线程池级别 | 中断所有 Worker,队列任务作为返回值 |
其他如 shutdown() 是关闭线程池入口,不取消已提交任务;setRemoveOnCancelPolicy(true) 是 cancel() 的队列行为优化,非独立取消方式。
cancel(true) vs cancel(false) 的语义差异
Future.cancel(boolean mayInterruptIfRunning) 的语义:一个 Future 对应一个任务,参数决定对该任务如何处理。
| 任务状态 | cancel(false) | cancel(true) |
|---|---|---|
| 尚未开始 | 取消成功,不执行 | 取消成功,不执行 |
| 正在执行 | 不中断,让任务完成 | 调用 Thread.interrupt() 尝试中断 |
实践中的状态分布:在典型线程池场景中,"尚未开始"是一个非常短暂的时间窗口——除非任务在队列中排队,否则线程池有空闲线程时任务几乎立即被执行。因此,cancel(false) 与 cancel(true) 的核心差异几乎只体现在任务正在执行时。
1 | |
关键洞察:mayInterruptIfRunning 参数仅在任务正在执行时产生差异。任务未开始时,两参数效果相同;任务执行后,只有 cancel(true) 会额外设置中断标志。
重要注意:
- 中断只是设置中断标志,任务代码必须检查
Thread.interrupted()或使用可中断方法才能真正终止 - 阻塞 IO、
synchronized锁等不一定响应中断 - 对于不可中断阻塞,需要使用底层超时机制(HTTP timeout、JDBC timeout 等)
cancel(true) 对线程池的影响:
cancel(true) 对线程池本身无直接影响——中断信号仅作用于任务内部逻辑,Worker 线程不会因此退出。原因如下:
-
FutureTask 是异常隔离层:无论
call()抛出什么异常(包括InterruptedException),都被捕获存储为outcome,不会传播到runWorker(),因此不会触发processWorkerExit()的异常退出路径。 -
线程池唯一感知的是
task.run()的返回:正常返回则 Worker 继续循环获取下一个任务;抛出异常则可能触发线程补充机制。FutureTask 保证task.run()不抛异常。 -
中断依赖协作:如果 command 内部不检查中断标志、不调用可中断方法,
cancel(true)对任务行为无影响。
为何需要 INTERRUPTING 中间态?
cancel(true) 分两步:CAS 进入 INTERRUPTING → 执行 t.interrupt() → 设置 INTERRUPTED。若直接 CAS 到 INTERRUPTED,存在时序竞争:
1 | |
若无 INTERRUPTING 中间态,run() 无法感知 cancel(true) 正在进行,可能在 t.interrupt() 执行前就返回,线程被复用执行新任务时收到这个“过期中断”——即中断泄漏。handlePossibleCancellationInterrupt() 通过自旋等待确保中断操作完成后 run() 才返回。
finishCompletion():终态收尾
不管是正常完成/异常完成/取消,最终都一定要调用到这个方法。
所有终态方法最终都调用 finishCompletion(),它负责三件事:唤醒所有等待线程、调用 done() 钩子、置空 callable 帮助 GC。
1 | |
LockSupport 补充:
LockSupport是 JUC 底层的线程阻塞/唤醒原语,基于许可证(permit)模型:park()消费许可证(无则阻塞),unpark()生产许可证(可提前发放,不可累加)。与Object.wait/notify的关键区别是无需持有监视器锁、unpark可在park之前调用、不会抛出InterruptedException。
结果获取:get() / awaitDone() / report()
get() 的逻辑分为两部分:阻塞等待交给 awaitDone(),结果解释交给 report()。
sequenceDiagram
participant Caller as 调用方线程
participant FutureTask
participant WaitNode
participant Runner as 执行线程(Worker)
Caller->>FutureTask: get()
FutureTask->>FutureTask: 检查 state <= COMPLETING?
alt state > COMPLETING
FutureTask->>FutureTask: report(state)
FutureTask-->>Caller: 返回结果或抛出异常
else state <= COMPLETING
FutureTask->>FutureTask: awaitDone(timed, nanos)
loop 多轮自旋
Note over FutureTask: 检查中断状态
alt 被中断
FutureTask->>FutureTask: removeWaiter(q)
FutureTask-->>Caller: 抛出 InterruptedException
end
alt state > COMPLETING
FutureTask-->>FutureTask: 返回终态
else state == COMPLETING
FutureTask->>FutureTask: Thread.yield()
else q == null
FutureTask->>WaitNode: new WaitNode()
Note right of WaitNode: 捕获当前线程引用
else !queued
FutureTask->>FutureTask: CAS 入栈(q.next=waiters, waiters=q)
else
FutureTask->>FutureTask: LockSupport.park(this)
Note over FutureTask: 线程挂起等待唤醒
end
end
Note over Runner: 任务执行完成
Runner->>FutureTask: set(result) 或 setException(ex)
FutureTask->>FutureTask: finishCompletion()
loop 遍历 waiters 栈
FutureTask->>WaitNode: 获取 thread 引用
FutureTask->>Caller: LockSupport.unpark(thread)
end
Note over Caller: 被唤醒,继续自旋
FutureTask->>FutureTask: 检测到 state > COMPLETING
FutureTask-->>FutureTask: awaitDone 返回终态
FutureTask->>FutureTask: report(state)
alt state == NORMAL
FutureTask-->>Caller: 返回 (V)outcome
else state >= CANCELLED
FutureTask-->>Caller: 抛出 CancellationException
else state == EXCEPTIONAL
FutureTask-->>Caller: 抛出 ExecutionException
end
end1 | |
awaitDone():自旋 + LockSupport.park 的阻塞等待
awaitDone 采用多轮自旋策略:第一轮创建 WaitNode,第二轮 CAS 入队,第三轮开始 park。中断时清除中断位并抛出 InterruptedException,超时后清理节点并返回当前状态。唤醒由 finishCompletion() 中的 LockSupport.unpark() 触发。
1 | |
WaitNode:Treiber Stack 节点
WaitNode 是用于记录等待 get() 结果的线程的单向链表节点,组织成 Treiber Stack(无锁并发栈)。
为什么需要 waiters/WaitNode:一个 FutureTask 可能被多个线程同时调用 get(),这些线程都会通过 LockSupport.park() 阻塞等待结果。JUC 的设计约束是:每个 park() 点都必须有对应的 unpark() 路径,否则线程会永久阻塞。因此 FutureTask 必须记录所有等待线程的引用,确保任务完成时 finishCompletion() 能遍历并 unpark() 每一个。详见《Java 并发编程笔记·JUC 的统一阻塞原语》。
为什么不用 AQS 而选择 Treiber Stack:
| 维度 | AQS CLH Queue 变种 | FutureTask Treiber Stack |
|---|---|---|
| 结构 | 双向链表(prev + next) | 单向链表(仅 next) |
| 入队顺序 | FIFO(先入先出) | LIFO(后入先出) |
| 节点摘除 | 支持任意节点 cancel 后摘除(需 prev 指针回溯) | 不支持中间节点摘除(只标记 thread=null) |
| 内存开销 | 较高(每节点 2 个指针 + waitStatus) | 较低(每节点 1 个指针) |
| 适用场景 | 锁竞争(需公平性、可取消) | 结果等待(无公平性要求、节点数少) |
为什么 AQS 是 CLH 的「变种」:经典 CLH 是单向链表 + 自旋,AQS 改为双向链表 + park/unpark,因为需要支持取消语义——取消的节点必须物理摘除,否则后续节点无法被唤醒。核心差异:AQS 是「传递唤醒」(中间断链会死锁),FutureTask 是「广播唤醒」(跳过无效节点即可)。详见AQS CLH Queue 与 FutureTask Treiber Stack 对比。
1 | |
removeWaiter():清理超时/中断的等待节点
移除因超时或中断而不再等待的节点。先置空 thread 标记为"待删除",然后遍历链表跳过这些节点。头节点用 CAS,内部节点直接修改 next 指针(因为 finishCompletion() 会跳过 thread == null 的节点,所以并发遍历无害)。
1 | |
report():终态到返回值/异常的转换
report() 根据终态将 outcome 解释为结果或异常。outcome 是 Object 类型,可能是结果 V 或 Throwable,由 state 决定如何解释。类型安全由状态机保证。
1 | |
| 终态 | report() 行为 | 调用方感知 |
|---|---|---|
| NORMAL | 返回 (V)outcome |
正常获取结果 |
| EXCEPTIONAL | 抛出 ExecutionException((Throwable)outcome) |
catch (ExecutionException) |
| CANCELLED / INTERRUPTED | 抛出 CancellationException |
catch (CancellationException) |
FutureTask 在线程池中的调用链路
每个线程池的 Worker 管理的实质上是 FutureTask。一个标准的可执行可等待任务是一个 RunnableFuture<V>,用成员变量来帮助 Runnable 保存一个 Callable 的返回值,以供 Future 使用。以 invokeAll 为例,完整的调用链路如下:
sequenceDiagram
participant User
participant AbstractExecutorService
participant ThreadPoolExecutor
participant WorkerThread
participant FutureTask
User->>AbstractExecutorService: invokeAll(tasks)
loop for each task
AbstractExecutorService->>AbstractExecutorService: newTaskFor(task)
AbstractExecutorService->>FutureTask: new FutureTask(task)
AbstractExecutorService->>ThreadPoolExecutor: execute(futureTask)
ThreadPoolExecutor->>WorkerThread: 分配任务
WorkerThread->>FutureTask: futureTask.run()
FutureTask->>FutureTask: callable.call()
FutureTask->>FutureTask: set(result)
end
AbstractExecutorService->>AbstractExecutorService: for each future: future.get()
loop for each future
AbstractExecutorService->>FutureTask: future.get()
alt 任务已完成
FutureTask-->>AbstractExecutorService: 立即返回结果
else 任务未完成
FutureTask-->>FutureTask: 挂起等待
FutureTask->>FutureTask: 任务完成后唤醒
FutureTask-->>AbstractExecutorService: 返回结果
end
end
AbstractExecutorService-->>User: 返回所有Future结果invokeAll
invokeAll 是有界的-有界来源于底层的 execute 是有界的,如果一次性提交了超过它界限的任务,即使这些任务是一瞬间执行的-invokeAll 也会触发拒绝,除非任务执行的速度比 for 循环调用底层的 execute 的速度还要快。
如果有得选,我们批量执行任务应该尽量采用 invokeAll,因为它带有这些特殊的代码块:
1 | |
sequenceDiagram
participant Caller as 调用方
participant AES as AbstractExecutorService
participant TPE as ThreadPoolExecutor
participant FT as FutureTask[]
Caller->>AES: invokeAll(tasks, timeout)
rect rgb(240, 248, 255)
Note over AES: 第一阶段:包装任务
loop 遍历 tasks
AES->>FT: newTaskFor(callable)
end
end
rect rgb(255, 248, 240)
Note over AES: 第二阶段:提交任务(有界性来源)
loop 遍历 futures
AES->>TPE: execute(futureTask)
Note right of TPE: 队列满则触发拒绝策略
AES->>AES: 检查超时
alt 已超时
AES-->>Caller: return futures(部分未提交)
end
end
end
rect rgb(240, 255, 240)
Note over AES: 第三阶段:等待完成
loop 遍历 futures
AES->>FT: f.get(remaining, NANOSECONDS)
alt 超时
AES-->>Caller: return futures(部分未完成)
end
end
end
AES->>AES: done = true
AES-->>Caller: return futures(全部完成)
Note over AES: finally: if (!done) cancel 所有任务两种针对 Runnable 的 submit
1 | |
这里面使用到了2种适配器:
1 | |
底层的 execute 本身要求一个包含 callable + result 的 runnbale - FutureTask(向底层的 execute api 适配,向外提供 Future 的 get、cancel 等能力),但是这样的 callable 最初又要经过 RunnableAdapter 从 Runnable 得来(向上向原始的没有返回值的 Runnable 适配)。
可以认为,RunnableAdapter 是一个对象适配器,原始类型是 Runnable,目标类型是 Callable。
我们得到一个 Runnable,要先经过 RunnableAdapter 转成普通 Callable,然后再经 FutureTask 转成 RunnableFuture。
两类底层调用链:
1 | |
sequenceDiagram
participant Caller as 调用方
participant AES as AbstractExecutorService
participant RA as RunnableAdapter
participant FT as FutureTask
participant TPE as ThreadPoolExecutor
rect rgb(240, 248, 255)
Note over Caller,TPE: 路径一:submit(Callable)
Caller->>AES: submit(callable)
AES->>FT: new FutureTask(callable)
AES->>TPE: execute(futureTask)
TPE->>FT: futureTask.run()
FT->>FT: callable.call()
Caller->>FT: future.get()
FT-->>Caller: 返回 callable 的结果
end
rect rgb(255, 248, 240)
Note over Caller,TPE: 路径二:submit(Runnable, result)
Caller->>AES: submit(runnable, result)
AES->>RA: Executors.callable(runnable, result)
Note right of RA: RunnableAdapter 封装
AES->>FT: new FutureTask(runnableAdapter)
AES->>TPE: execute(futureTask)
TPE->>FT: futureTask.run()
FT->>RA: runnableAdapter.call()
RA->>RA: runnable.run()
RA-->>FT: return result
Caller->>FT: future.get()
FT-->>Caller: 返回预设的 result
end至此,我们已经理解了执行器体系的继承关系、任务包装机制和调用链路。
相关适配器一览
newTaskFor 使用 FutureTask 将 Callable/Runnable 适配为 RunnableFuture,这是 ThreadPoolExecutor 体系的核心适配机制。JDK 中还有其他场景的任务适配器:
Executors.RunnableAdapter
RunnableAdapter 将 Runnable + result 适配为 Callable,用于 submit(Runnable, T result) 场景:
1 | |
ForkJoinTask 中的适配器
ForkJoinPool 要求任务必须是 ForkJoinTask 类型,因此需要不同的适配器:
1 | |
ForkJoinPool 中的 RunnableExecuteAdapter
JDK 较新版本中,ForkJoinPool 使用 RunnableExecuteAdapter 处理 execute(Runnable) 场景:
1 | |
适配器对比
| 适配器 | 所在类 | 输入 | 输出 | 使用场景 |
|---|---|---|---|---|
FutureTask |
AbstractExecutorService | Callable<T> 或 Runnable + T |
RunnableFuture<T> |
submit() 返回 Future |
RunnableAdapter |
Executors | Runnable + T |
Callable<T> |
submit(Runnable, T) 内部转换 |
AdaptedRunnable<T> |
ForkJoinTask | Runnable + T |
ForkJoinTask<T> |
ForkJoinPool 处理带返回值的 Runnable |
AdaptedRunnableAction |
ForkJoinTask | Runnable |
ForkJoinTask<Void> |
ForkJoinPool 处理无返回值 Runnable |
AdaptedCallable<T> |
ForkJoinTask | Callable<T> |
ForkJoinTask<T> |
ForkJoinPool 处理 Callable |
RunnableExecuteAdapter |
ForkJoinPool | Runnable |
ForkJoinTask<Void> |
ForkJoinPool.execute(Runnable) |
设计模式共性
这些适配器都遵循适配器模式,核心价值是:
- 接口统一:将不同形式的任务(Runnable、Callable、ForkJoinTask)适配为统一的执行格式
- 语义保持:适配过程中保持原任务的执行语义不变
- 功能增强:为原任务添加 Future 能力(取消、结果获取、状态查询)
classDiagram
%% ========== 接口层 ==========
class Runnable {
<<interface>>
+run() void
}
class Callable~T~ {
<<interface>>
+call() T
}
class Future~T~ {
<<interface>>
+get() T
+cancel(boolean) boolean
+isDone() boolean
}
class RunnableFuture~T~ {
<<interface>>
+run() void
}
class ForkJoinTask~T~ {
<<abstract>>
+exec() boolean
+getRawResult() T
+setRawResult(T) void
note: "增强Future:fork/join+工作窃取"
}
%% ========== 实现层:适配器 ==========
class RunnableAdapter~T~ {
-Runnable task
-T result
+call() T
}
class FutureTask~T~ {
-Callable~T~ callable
+run() void
+get() T
}
class AdaptedRunnable~T~ {
-Runnable runnable
-T resultOnCompletion
+exec() boolean
}
%% ========== 继承关系 ==========
RunnableFuture --|> Runnable
RunnableFuture --|> Future
ForkJoinTask --|> Future
AdaptedRunnable --|> ForkJoinTask
%% ========== 实现关系 ==========
RunnableAdapter ..|> Callable
FutureTask ..|> RunnableFuture
%% ========== 组合关系 ==========
RunnableAdapter o-- Runnable : wraps
FutureTask o-- Callable : wraps
AdaptedRunnable o-- Runnable : wrapsThreadPoolExecutor
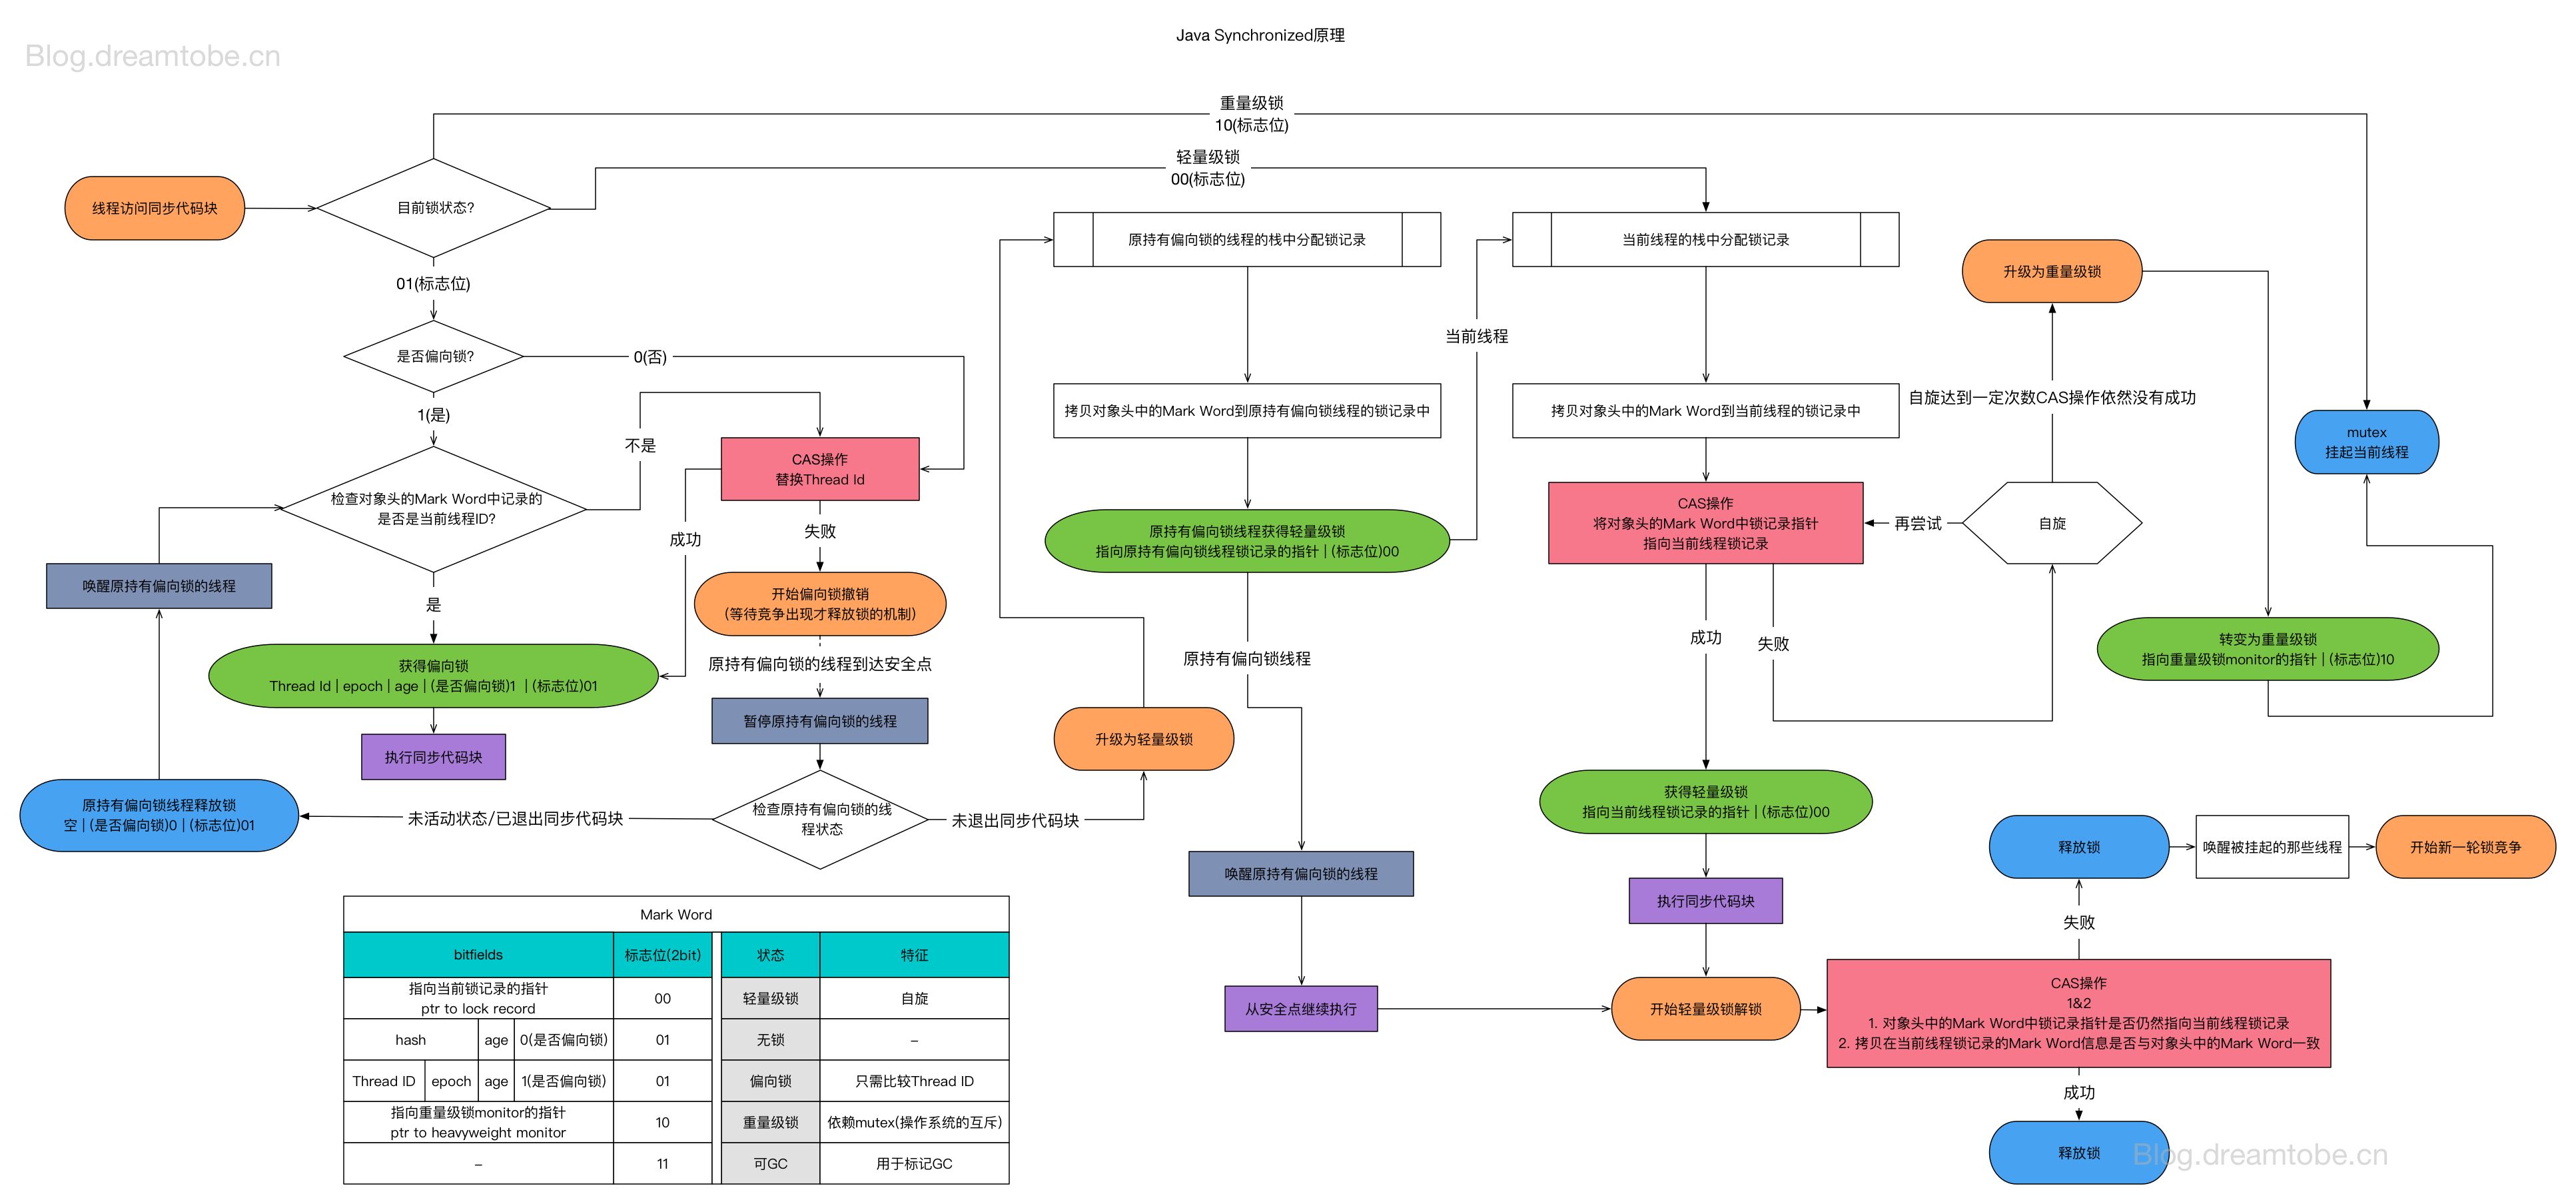
前置知识:本节内容依赖对 ThreadPoolExecutor 内部状态机制的理解。如对状态体系不熟悉,请先阅读 核心架构:ctl 与线程池状态机 章节。
核心架构:ctl 与线程池状态机
在深入 ThreadPoolExecutor 的状态维护机制之前,有必要先厘清线程池体系中涉及的多层状态体系。线程池架构中存在 4 层独立但相互关联的状态体系:
| 状态体系 | 层级 | 状态数量 | 状态类型 | 核心作用 |
|---|---|---|---|---|
| ThreadPoolExecutor 生命周期状态 | 池级别 | 5 种 | RUNNING → SHUTDOWN/STOP → TIDYING → TERMINATED | 控制线程池整体生命周期 |
| Worker 锁状态 | 工作线程级别 | 3 种 | -1 / 0 / 1 | 保护任务执行期间的中断控制(-1 是 Worker 自定义的初始化状态,0/1 是 AQS 标准锁状态) |
| Java Thread 状态 | 原生线程级别 | 6 种 | NEW / RUNNABLE / BLOCKED / WAITING / TIMED_WAITING / TERMINATED | JVM 线程调度与监控 |
| FutureTask 任务状态 | 任务级别 | 7 种 | NEW → COMPLETING → NORMAL/EXCEPTIONAL/CANCELLED/INTERRUPTED | 异步任务生命周期 |
这 4 层状态相互独立又相互影响。例如:线程池进入 STOP 状态会中断 Worker,Worker 被中断会导致其持有的 Java 线程状态变化;FutureTask 的状态变化则独立于线程池和 Worker,仅反映任务自身的执行进展。理解这些状态的层次关系,有助于在排查线程池问题时准确定位问题所在层级。
下面首先介绍 ThreadPoolExecutor 自身的生命周期状态维护机制。
线程池运行的状态,并不是用户显式设置的,而是伴随着线程池的运行,由内部来维护。线程池内部使用一个变量维护两个值:运行状态(runState)和线程数量(workerCount)。这种将多个字段打包到一个整型变量中的设计称为字段打包(Field Packing),是无锁编程中的一种惯用法。位运算只是实现手段,核心目的是将多个逻辑字段打包到一个物理字段中,实现单次CAS原子更新。
JDK中Field Packing应用案例:
| 类 | 字段 | 打包内容 | 设计目的 |
|---|---|---|---|
ThreadPoolExecutor |
ctl |
高3位runState + 低29位workerCount | 原子更新状态与线程数 |
ForkJoinPool |
ctl |
高16位runState + 中间位workerCount + 其他标志 | 原子更新状态、线程数与并行度 |
ReentrantReadWriteLock.Sync |
state |
高16位读锁计数 + 低16位写锁计数 | 原子更新读写锁计数 |
StampedLock |
state |
高24位版本戳 + 第8位写锁标志 + 低7位读锁计数 | 乐观读锁与版本校验 |
LongAdder.Cell |
状态字 | 竞争标志 + 计数值 | 高并发累加优化 |
在具体实现中,线程池将运行状态(runState)、线程数量(workerCount)两个关键参数的维护放在了一起,如下代码所示:
1 | |
ctl这个AtomicInteger类型,是对线程池的运行状态和线程池中有效线程的数量进行控制的一个字段,它同时包含两部分的信息:线程池的运行状态(runState)和线程池内有效线程的数量(workerCount),高3位保存runState,低29位保存workerCount,两个变量之间互不干扰。
原子更新机制:线程数放低位的设计使得ctl.getAndIncrement()可直接原子增加线程数而不影响高位状态,但必须校验workerCount < CAPACITY防止溢出污染状态位(不要忘记,CAPACITY 作为掩码是一个大整数)。状态变更则需要通过ctl.compareAndSet(oldCtl, ctlOf(newState, workerCountOf(oldCtl)))复合更新,一次CAS同时更新两个字段。
用一个变量去存储两个值,可避免在做相关决策时,出现不一致的情况,不必为了维护两者的一致,而占用锁资源。通过阅读线程池源代码也可以发现,经常出现要同时判断线程池运行状态和线程数量的情况。线程池也提供了若干方法去供用户获得线程池当前的运行状态、线程个数,均使用位运算实现:
1 | |
各状态的二进制表示(Java 7+ 支持 0b 前缀的二进制字面量):
1 | |
位分布示意:
1 | |
状态值按数值大小排列:RUNNING(-1) < SHUTDOWN(0) < STOP(1) < TIDYING(2) < TERMINATED(3),这使得 runStateAtLeast(c, state) 可通过数值比较判断状态是否达到或超过某阈值。
1 | |
| 运行状态 | 状态描述 |
|---|---|
| RUNNING | 能接受新提交的任务,并且也能处理阻塞队列中的任务。 |
| SHUTDOWN | 关闭状态,不再接受新提交的任务,但却可以继续处理阻塞队列中已保存的任务。 |
| STOP | 不能接受新任务,也不处理队列中的任务,会中断正在处理任务的线程。增加了两条措施,是一个更严厉的状态,理论上只要线程被中断完,线程池就可以走向关闭 |
| TIDYING | 所有的任务都已终止了,workerCount (有效线程数) 为0,这个状态的意思不是整理中,而是整理完了。 |
| TERMINATED | 在terminated() 方法执行完后进入该状态。 |

其中 running 既是初始态,也是中间态,所以才有private final AtomicInteger ctl = new AtomicInteger(ctlOf(RUNNING, 0));作为初始化块的一部分。
ThreadPoolExecutor 如何管理任务
设计哲学:任务与线程解耦
线程池的本质是对任务和线程的管理,而做到这一点最关键的思想就是将任务和线程两者解耦,不让两者直接关联,才可以做后续的分配工作。线程池采用生产者消费者模式,通过阻塞队列实现任务缓冲。
任务执行存在两种路径:
| 路径 | 触发条件 | 机制 |
|---|---|---|
| firstTask 路径 | 创建新 Worker 时(核心线程未满,或队列满但非核心线程未满) | 任务作为 firstTask 直接传入 Worker,省去入队再出队的开销 |
| 队列路径 | 任务入队后 | 空闲 Worker 通过 getTask() 从队列 poll/take 获取任务 |
1 | |
任务提交入口:submit 与 execute
submit 方法(AbstractExecutorService 提供):
1 | |
execute 方法(ThreadPoolExecutor 核心):

图中空任务的 worker 看下面对 execute 的入队分支的注释。
1 | |
创建工作线程:addWorker
addWorker 是 execute 三步调度策略的核心支撑方法,负责创建并启动工作线程。

Worker 可以被认为是线程和锁的结合体,它的使命就是不断地把 runnable/command/task 从缓冲队列里拿出来,放在自己的 thread 里执行:
1 | |
任务缓冲:阻塞队列
阻塞队列(BlockingQueue)是一个支持两个附加操作的队列。这两个附加的操作是 (阻塞的本质即为此):在队列为空时,获取元素的线程会等待队列变为非空。当队列满时,存储元素的线程会等待队列可用。 阻塞队列常用于生产者和消费者的场景,生产者是往队列里添加元素的线程,消费者是从队列里拿元素的线程。阻塞队列就是生产者存放元素的容器,而消费者也只从容器里拿元素。

| 名称 | 描述 |
|---|---|
| ArrayBlockingQueue | 一个用数组实现的有界阻塞队列,此队列按照先进先出(FIFO)的原则对元素进行排序。支持公平锁和非公平锁。 |
| DelayQueue | 一个基于 PriorityQueue(非阻塞)实现延迟获取的无界队列,元素必须实现 Delayed 接口。在创建元素时可指定延迟时间,只有延时期满后才能从队列中获取元素。 |
| LinkedBlockingDeque | 一个由链表结构组成的双向阻塞队列。队列头部和尾部都可以添加和移除元素,多线程并发时,可以将锁的竞争最多降到一半。 |
| LinkedBlockingQueue | 一个由链表结构组成的有界队列,此队列按照先进先出(FIFO)的原则对元素进行排序。此队列的默认长度为Integer.MAX_VALUE,所以默认创建的该队列有容量危险。 |
| LinkedTransferQueue | 一个由链表结构组成的无界阻塞队列,相当于其它队列,LinkedTransferQueue队列多了transfer和tryTransfer方法。 |
| PriorityBlockingQueue | 一个支持线程优先级排序的无界队列,默认自然序进行排序,也可以自定义实现compareTo()方法来指定元素排序规则,不能保证同优先级元素的顺序。 |
SynchronousQueue |
一个不存储元素的阻塞队列,每一个put操作必须等待take操作,否则不能添加元素。支持公平锁和非公平锁。SynchronousQueue的一个使用场景是在线程池里。Executors.newCachedThreadPool()就使用了SynchronousQueue,这个线程池根据需要(新任务到来时)创建新的线程,如果有空闲线程则会重复使用,线程空闲了60秒后会被回收。 |
DelayedWorkQueue |
ScheduledThreadPoolExecutor 的内部类,基于二叉堆实现。是延时线程池的刚需组件:只有通过 DelayedWorkQueue 的 take() 阻塞到任务到期,才能在复用 ThreadPoolExecutor Worker 机制的同时实现延时调度。不在公开 API 之列。 |
阻塞队列的详细选型指南(锁实现差异、使用示例、性能对比)见下文 阻塞队列选型指南 章节。
阻塞队列选型指南
锁实现差异分析:
各阻塞队列在锁策略上有本质差异,这直接影响并发性能和适用场景。
| 队列 | 锁策略 | 锁数量 | 设计原因 |
|---|---|---|---|
ArrayBlockingQueue |
单锁 | 1 把 ReentrantLock | 数组实现,put/take 需同时维护 count、head、tail,单锁保证原子性 |
LinkedBlockingQueue |
双锁(读写分离) | 2 把 ReentrantLock | 链表实现,写操作修改 tail,读操作修改 head,互不干扰 |
LinkedBlockingDeque |
单锁 | 1 把 ReentrantLock | 双端操作可能同时涉及头尾,无法分离 |
PriorityBlockingQueue |
单锁 | 1 把 ReentrantLock | 堆调整涉及整个数组,读写无法分离 |
DelayQueue |
单锁 | 1 把 ReentrantLock | 基于 PriorityBlockingQueue,堆操作无法分离 |
SynchronousQueue |
无锁 CAS | 无显式锁 | 不存储元素,直接传递,CAS 实现匹配 |
LinkedTransferQueue |
无锁 CAS | 无显式锁 | 链表 + 松弛操作,CAS 实现无锁算法 |
为什么 LinkedBlockingQueue 能用双锁?
1 | |
链表的物理结构决定了读写操作修改的是不同的内存位置:
- 写操作:修改
tail.next和tail引用 - 读操作:修改
head和head.next引用
两者互不干扰,因此可以分离锁。这是数据结构特性决定的。
为什么 ArrayBlockingQueue 不能用双锁?
1 | |
数组的环形结构导致读写操作存在共享状态:
- count 计数器:put 需要检查是否满(count == capacity),take 需要检查是否空(count == 0)
- 指针回绕:putIndex 和 takeIndex 都会在数组末尾回绕到 0,可能相遇
- 容量判断:判断满/空需要同时看到 count、takeIndex、putIndex 的一致状态
如果用双锁,put 和 take 同时修改 count,会出现竞态条件。即使使用 AtomicInteger,也无法保证 count 与指针的一致性。
SynchronousQueue 为什么不需要锁?
1 | |
SynchronousQueue 不存储任何元素,它的核心是"直接传递":
- 生产者线程将元素直接交给消费者线程
- 如果没有消费者,生产者等待
- 如果没有生产者,消费者等待
- 整个过程通过 CAS 操作完成线程间匹配,无需维护数据结构
选型建议:
| 场景 | 推荐队列 | 理由 |
|---|---|---|
| 通用生产消费(首选) | ArrayBlockingQueue | 预分配数组,缓存友好,无 GC 压力,实测性能稳定 |
| 高并发 + 队列长期非空 | LinkedBlockingQueue(指定容量) | 双锁优势显现,但须指定容量 |
| 任务直接执行,无缓冲 | SynchronousQueue | 无锁 CAS,直接传递 |
| 需要优先级 | PriorityBlockingQueue | 堆排序,无锁替代方案少 |
| 延迟调度 | DelayQueue | 时间排序,无可替代 |
flowchart TD
A[选择阻塞队列] --> B{是否需要存储元素?}
B -->|否| C[SynchronousQueue]
B -->|是| D{是否需要延迟/优先级?}
D -->|延迟| E[DelayQueue]
D -->|优先级| F[PriorityBlockingQueue]
D -->|否| G[ArrayBlockingQueue<br/>首选-缓存友好]
G --> H{需要双锁?}
H -->|否| I[使用 ArrayBlockingQueue]
H -->|是| J{LinkedBlockingQueue}
J --> K[指定容量-推荐]
J --> L[默认容量-OOM风险]
style C fill:#F0E68C
style E fill:#DDA0DD
style F fill:#FFB6C1
style G fill:#90EE90
style I fill:#90EE90
style K fill:#87CEEB
style L fill:#FF6347ThreadPoolExecutor 任务拒绝
当线程池的任务缓存队列已满并且线程池中的线程数目达到 maximumPoolSize 时,如果还有任务到来就会采取任务拒绝策略。
拒绝策略的两种触发场景:
| 触发场景 | 描述 | 常见原因 |
|---|---|---|
| 线程池饱和 | 队列已满 + 线程数达到 maximumPoolSize | 任务提交速率持续高于处理速率 |
| 线程池关闭 | 调用 shutdown() 或 shutdownNow() 后仍尝试提交任务 |
业务逻辑未正确检查线程池状态 |
常见误区:许多开发者认为拒绝策略只在"线程池满了"时触发,但实际上线程池关闭后尝试提交任务同样会触发拒绝策略。如果业务逻辑未正确检查线程池状态(通过
isShutdown()或isTerminated()),可能导致意外的任务丢失。
强制触发线程中断与拒绝的完整场景汇总:
根据Java线程池的实现,以下场景会强制触发线程中断或拒绝新任务:
主动触发(用户代码显式调用):
- shutdownNow():强制中断所有工作线程
- Future.cancel(true):强制中断指定任务的执行线程
系统被动触发(内部机制自动触发):
- 线程池饱和:队列满+达最大线程数 -> 触发 RejectedExecutionHandler
- awaitTermination超时:shutdown后等待超时 -> 强制关闭
- ScheduledFutureTask异常:周期任务未捕获异常 -> 终止调度
- tryTerminate自旋中断:线程池终止过程中 -> 中断空闲Worker
拒绝策略的四种内置实现:
- AbortPolicy:抛出 RejectedExecutionException
- CallerRunsPolicy:由调用者线程执行
- DiscardPolicy:静默丢弃
- DiscardOldestPolicy:丢弃最老任务
最佳实践:
- 不要依赖强制中断来停止任务,任务应支持检查中断标志
- 优先使用cancel(false)让任务自然完成
- 合理选择拒绝策略,根据业务对任务丢失的容忍度决定
1 | |
拒绝策略触发流程:
sequenceDiagram
participant Client as 客户端
participant TPE as ThreadPoolExecutor
participant Queue as 阻塞队列
participant Handler as RejectedExecutionHandler
Client->>TPE: execute(task)
TPE->>TPE: 检查线程数 < corePoolSize?
alt 线程数 < corePoolSize
TPE->>TPE: 创建核心线程执行
else 线程数 >= corePoolSize
TPE->>Queue: offer(task)
alt 队列未满
Queue-->>TPE: true
TPE-->>Client: 任务入队成功
else 队列已满
Queue-->>TPE: false
TPE->>TPE: 检查线程数 < maximumPoolSize?
alt 线程数 < maximumPoolSize
TPE->>TPE: 创建非核心线程执行
else 线程数 >= maximumPoolSize
TPE->>Handler: rejectedExecution(task, executor)
Note over Handler: 执行拒绝策略
end
end
end拒绝策略对比图:
graph TB
subgraph 拒绝策略对比
A[AbortPolicy] --> A1[抛出异常]
A1 --> A2[调用方感知]
A2 --> A3[适合:需要明确处理拒绝的场景]
B[CallerRunsPolicy] --> B1[调用者执行]
B1 --> B2[提供反压]
B2 --> B3[适合:不能丢弃任务的场景]
C[DiscardPolicy] --> C1[静默丢弃]
C1 --> C2[无感知]
C2 --> C3[适合:允许丢弃且无需感知]
D[DiscardOldestPolicy] --> D1[丢弃最老任务]
D1 --> D2[新任务优先]
D2 --> D3[适合:新任务更重要的场景]
end
style A fill:#FF6B6B
style B fill:#4ECDC4
style C fill:#95A5A6
style D fill:#F39C12ThreadPoolExecutor 如何管理线程
术语定义:线程回收 vs 资源回收
线程池文档中涉及两种"回收"概念,需明确区分:
| 术语 | 主体 | 行为 | 触发者 |
|---|---|---|---|
| 线程回收 | 线程池 | 从 workers 集合移除线程引用,让线程退出运行循环 | interruptIdleWorkers / getTask 超时 |
| 资源回收 | JVM/GC | 回收 Thread 对象及关联对象的内存 | 垃圾收集器 |
线程回收的本质:线程池层面的资源管理行为。线程池通过 interruptIdleWorkers() 发起回收请求,或 getTask() 超时返回 null 触发线程退出,最终由 processWorkerExit() 执行清理(移除 workers 引用、更新计数)。线程对象本身的内存回收是 JVM 的职责,不属于线程池"回收"范畴。
Javadoc 术语印证:ForkJoinPool 的 common pool 文档明确使用 “reclaim”:
“its threads are slowly reclaimed during periods of non-use, and reinstated upon subsequent use”
getTask() 返回 null 会让线程退出,走入 processWorkerExit。
ThreadPoolExecutor没有"核心线程"这种线程类型或线程属性。所有 Worker 结构相同,不存在标记某个线程为"核心"的字段。所谓的"核心线程"只是 workerCount 中属于 corePoolSize 范围内的计数——这是一个动态边界,同一个线程在不同时刻可能处于边界内或边界外。线程是否因 idle 退出是 getTask() 每次循环的动态决策:当 workerCount > corePoolSize 时使用 poll(keepAliveTime),超时返回 null 导致线程退出。可以认为这部分线程天然带超时,超时机制对其无条件生效,只受 keepAliveTime 控制。只要 getTask 得到 null,就不会回到 while 循环,而进入 processWorkerExit。当 workerCount <= corePoolSize 时使用 take() 无限阻塞,线程不会因 idle 退出。若 allowCoreThreadTimeOut=true,则所有线程均会因 idle 超时退出。
mainLock:线程池的全局互斥锁
ThreadPoolExecutor 使用 mainLock(ReentrantLock)保护线程池的核心数据结构和同步点。
mainLock 保护的对象:
| 保护对象 | 类型 | 原因 |
|---|---|---|
workers |
HashSet<Worker> |
HashSet 非线程安全,增删遍历需互斥 |
largestPoolSize |
int |
记录历史最大线程数,多线程更新需同步 |
completedTaskCount |
long |
任务完成总数累加,需原子性保证 |
termination |
Condition |
状态转换时的唤醒信号,需与锁配合 |
graph TB
mainLock[mainLock<br/>ReentrantLock]
subgraph 保护对象
workers[workers<br/>HashSet Worker]
largestPoolSize[largestPoolSize<br/>int]
completedTaskCount[completedTaskCount<br/>long]
termination[termination<br/>Condition]
end
subgraph 使用场景
addWorker[addWorker<br/>创建线程]
addWorkerFailed[addWorkerFailed<br/>创建失败]
processWorkerExit[processWorkerExit<br/>线程退出]
interruptIdleWorkers[interruptIdleWorkers<br/>中断空闲线程]
tryTerminate[tryTerminate<br/>状态转换]
getActiveCount[getActiveCount 等<br/>监控统计]
end
mainLock --> workers
mainLock --> largestPoolSize
mainLock --> completedTaskCount
mainLock --> termination
addWorker --> mainLock
addWorkerFailed --> mainLock
processWorkerExit --> mainLock
interruptIdleWorkers --> mainLock
tryTerminate --> mainLock
getActiveCount --> mainLockmainLock 的使用场景:
| 场景 | 方法 | 操作内容 |
|---|---|---|
| 创建线程 | addWorker() |
Worker 加入 workers、更新 largestPoolSize、状态重检 |
| 创建失败 | addWorkerFailed() |
从 workers 移除、回滚 workerCount |
| 线程退出 | processWorkerExit() |
累加 completedTaskCount、从 workers 移除 |
| 中断空闲线程 | interruptIdleWorkers() |
遍历 workers、tryLock 检测空闲 |
| 状态转换 | tryTerminate() |
TIDYING→TERMINATED、termination.signalAll() |
| 监控统计 | getActiveCount() 等 |
遍历 workers 统计活跃线程数 |
TOCTOU 问题与状态重检:
addWorker() 中,CAS 增加 workerCount 后、获取 mainLock 前,其他线程可能调用 shutdown() 或 shutdownNow() 改变状态。mainLock 作为同步点,允许加锁后重新检查状态,避免在 SHUTDOWN 后错误添加 Worker。
1 | |
为何不用读写锁:
workers的修改操作(增删 Worker)主要发生在线程创建、退出、关闭阶段- 遍历操作主要发生在监控方法(
getActiveCount、getPoolSize等)和关闭阶段 - 正常运行期间,这些操作竞争不频繁,读写锁的额外开销(维护读写状态、支持锁降级)不值得
mainLock 与 ctl 的分工:
ctl(AtomicInteger):高 3 位运行状态 + 低 29 位线程数,使用 CAS 无锁更新,自身保证原子性mainLock:保护以下三类对象:- 非线程安全数据结构:
workers(HashSet) - volatile 变量的复合操作:
largestPoolSize、completedTaskCount—— volatile 仅保证可见性,不保证复合操作(如max = Math.max(max, size))的原子性。实际上这种对 volatile 的复合操作需要使用同步块的设计大量遍布于 java 的日常实践中,是一种基础原则。 - 同步原语:
termination(Condition)—— 需与锁配合使用
- 非线程安全数据结构:
两者协调:CAS 先更新 ctl,成功后再获取 mainLock 修改受保护对象。若 mainLock 获取后状态检查失败,则回滚 ctl(decrementWorkerCount())。
线程数保量机制
corePoolSize 的三重语义
corePoolSize 在线程池中扮演三个角色:
- 创建阈值:
execute()方法中,当workerCount < corePoolSize时,优先创建新线程直接执行任务,绕过入队。 - 超时策略分界:
getTask()方法中,workerCount <= corePoolSize且allowCoreThreadTimeOut=false时使用take()无限阻塞(不会因超时返回 null,从而维持线程数量不低于corePoolSize);workerCount > corePoolSize时使用poll(keepAliveTime),超时则线程退出。 - 退出检查下限:
processWorkerExit()方法中,正常退出时以corePoolSize作为最小保有量检查,低于此值则补充线程。
线程增加路径
| 路径 | 触发点 | addWorker 参数 |
说明 |
|---|---|---|---|
| 正常增加-核心 | execute() 步骤1 |
(command, true) |
workerCount < corePoolSize 时 |
| 正常增加-非核心 | execute() 步骤3 |
(command, false) |
队列已满且 workerCount < maximumPoolSize 时 |
| 正常增加-补偿 | execute() 步骤2 |
(null, false) |
入队后发现 workerCount == 0 时 |
| 异常增加 | processWorkerExit() |
(null, false) |
异常退出后补充,保量 |
线程退出路径
| 路径 | 触发点 | 是否检查 min |
结果 |
|---|---|---|---|
| 正常退出 | getTask() 返回 null |
是 | 若 workerCount >= min 则不补充,否则补充 |
| 异常退出 | 任务抛未捕获异常 | 否 | 直接调用 addWorker(null, false) 补充 |
即时补偿机制:异常退出时(completedAbruptly=true),processWorkerExit() 跳过 min 检查,立即调用 addWorker(null, false) 尝试补充线程。这是即时补偿而非延迟补偿——不等待下次任务提交。
即时补偿不等于保证达成。addWorker 可能因以下原因失败:线程工厂返回 null、CAS 竞争失败、已达 maximumPoolSize。此外,allowCoreThreadTimeOut=true 时核心线程可因空闲超时退出,不触发补偿。因此 corePoolSize 是目标保有量而非硬性下限,线程池在任何时刻都不保证 workerCount >= corePoolSize。补偿失败时,线程数短暂低于 corePoolSize,由后续 execute() 步骤1(workerCount < corePoolSize 时优先创建)作为兜底策略。
allowCoreThreadTimeOut 的作用
allowCoreThreadTimeOut 是改变核心线程生命周期策略的关键也是唯一的开关:
getTask()中的timed变量:boolean timed = allowCoreThreadTimeOut || wc > corePoolSizeprocessWorkerExit()中的min变量:int min = allowCoreThreadTimeOut ? 0 : corePoolSize
当 allowCoreThreadTimeOut=true 时:
- 所有线程(无论是否达到
corePoolSize)都使用poll(keepAliveTime)等待任务 - 正常退出时
min=0,不强制保有核心线程 - 队列非空时
min=1,至少保留一个消费者
结论
corePoolSize 是目标保有量而非硬性下限。线程池在任何时刻都不保证 workerCount >= corePoolSize,原因包括:
allowCoreThreadTimeOut=true时核心线程可因空闲超时退出- 任务执行异常导致线程退出,
processWorkerExit()虽会补充但可能失败 - 线程工厂返回 null 导致
addWorker失败
graph TB
subgraph 增加路径[线程增加路径]
exec1["execute() 步骤1<br/>wc < corePoolSize"]
exec2["execute() 步骤2<br/>入队后 wc == 0"]
exec3["execute() 步骤3<br/>队列满"]
abrupt["processWorkerExit()<br/>异常退出"]
add1["addWorker(cmd, true)<br/>🆕 NEW → RUNNABLE"]
add2["addWorker(null, false)<br/>🆕 NEW → RUNNABLE"]
add3["addWorker(cmd, false)<br/>🆕 NEW → RUNNABLE"]
add4["addWorker(null, false)<br/>🆕 NEW → RUNNABLE"]
exec1 --> add1
exec2 --> add2
exec3 --> add3
abrupt --> add4
end
subgraph 退出路径[线程退出路径]
gettask["getTask() 返回 null<br/>🔚 即将 TERMINATED"]
process["processWorkerExit():<br/>if (!completedAbruptly) {<br/> min = allowCoreThreadTimeOut<br/> ? 0 : corePoolSize<br/> if (wc >= min) return;<br/>}<br/>addWorker(null, false)"]
result["补充成功: wc 恢复<br/>补充失败: wc < min<br/>☠️ TERMINATED"]
gettask --> process
process --> result
end
subgraph 配置影响[allowCoreThreadTimeOut 影响点]
timed["getTask(): timed = allowCoreThreadTimeOut || wc > corePoolSize"]
mincalc["processWorkerExit(): min = allowCoreThreadTimeOut ? 0 : corePoolSize"]
behavior_false["false (默认): workerCount <= corePoolSize 时使用 take() 无限阻塞<br/>⏳ WAITING"]
behavior_true["true: 所有线程使用 poll(timeout),核心线程可因空闲超时退出<br/>⏱️ TIMED_WAITING"]
end线程执行

线程的执行强依赖于 Worker 本身的实现。
Worker 类定义与锁状态
Worker 与 Thread 的关系:Worker 不是线程,它是一个包装器。
1 | |
newThread(this) 中,this 是 Worker 对象本身。因为 Worker 实现了 Runnable,所以 Worker 是 Thread 的 target。
| 概念 | 实际角色 |
|---|---|
| Worker | 包装器 + Runnable,封装任务获取和执行逻辑 |
| Worker.thread | 真正的线程对象,由 ThreadFactory 创建 |
| Worker 与 Thread | 组合关系:Worker 持有 Thread,同时也是 Thread 的 target |
| Worker 的锁 | 不可重入互斥锁,基于 AQS 实现 |
互相引用关系:
flowchart TB
subgraph Worker["Worker<br>extends AQS<br>implements Runnable"]
W_FIELDS["Worker 字段:"]
W_THREAD["- thread: Thread"]
W_TASK["- firstTask: Runnable"]
W_STATE["- state: int"]
W_COMPLETED["- completedTasks: long"]
W_METHODS["Worker 方法:"]
W_RUN["+ run() { runWorker(this) }"]
end
subgraph Thread["Thread"]
T_FIELDS["Thread 字段:"]
T_TARGET["- target: Runnable"]
T_METHODS["Thread 方法:"]
T_RUN["+ run() { target.run() }"]
end
%% Worker 持有 Thread 引用
W_THREAD -->|持有| T_TARGET
%% Thread.target 指向 Worker
T_TARGET -.->|指向| W_FIELDS
%% 构造流程
W_FIELDS@{ shape: braces}
subgraph Construction["构造流程"]
C1["new Worker(firstTask)"]
C2["setState(-1)"]
C3["this.thread = getThreadFactory.newThread(this)"]
C4["Thread.target = this"]
C1 --> C2 --> C3 --> C4
end
%% 执行链路
C4 -.->|启动| T_RUN
T_RUN -.->|调用| W_RUNWorker.thread → Thread(持有引用)
Thread.target → Worker(持有引用,因为 Worker 实现了 Runnable)
循环引用与 GC 回收分析:
flowchart LR
subgraph GC["GC Roots 可达性分析"]
APP["应用程序引用<br/>executor"] --> TPE["ThreadPoolExecutor"]
TPE --> WORKERS["workers"]
WORKERS --> W["Worker"]
W -->|"thread"| T["Thread"]
T -.->|"target"| W
end
Note1["循环引用不导致泄漏:JVM 用可达性分析,非引用计数"]
Note2["ThreadLocal 泄漏需警惕:任务结束务必调用 remove()"]
style Problem fill:#ffebee,stroke:#f44336,stroke-width:2px
style Solution fill:#e8f5e9,stroke:#4caf50,stroke-width:2px关键洞察:
- Worker-Thread 循环引用本身安全:GC 可达性分析能正确处理
- ThreadLocal 泄漏需要警惕:线程池中线程复用,ThreadLocal 数据可能残留
- 最佳实践:在线程池任务中使用 ThreadLocal 时,务必在
finally块中调用remove()
执行链路:
1 | |
这种设计让 Worker 既能控制线程的中断行为(通过 AQS 锁状态),又能将任务执行委托给线程池的 runWorker 方法。
1 | |
Worker 锁对中断的保护机制:
核心结论:Worker 继承 AQS,利用 state 字段区分空闲/忙碌状态,实现对执行中任务的中断保护。
| state | 线程状态 | tryLock | 是否被中断 |
|---|---|---|---|
| 1 | 执行任务中 | 失败 | 不中断(受保护) |
| 0 | 阻塞在 getTask() 等待任务 | 成功 | 可中断 |
所谓"空闲线程"即阻塞在队列上等待任务的线程。Worker线程只有两种状态:执行任务中,或阻塞在getTask()等待任务,不存在"空闲但不阻塞"的第三种状态。shutdown() 通过 tryLock() 识别空闲线程并发送中断,唤醒它们检查线程池状态后退出。执行中的线程因 tryLock 失败被跳过,任务得以正常完成。
Worker 类注释中提到"这可以防止本来用于唤醒等待任务的工作线程的中断,却错误地中断正在执行的任务"。具体保护机制如下:
shutdown() 调用 interruptIdleWorkers() 时,通过 tryLock() 检测 Worker 锁状态:
1 | |
tryLock() 调用 tryAcquire(),其实现决定了谁能被中断:
这就是注释所说的"防止错误中断":shutdown() 发送的中断信号只作用于空闲线程(唤醒它们检查池状态),不会干扰正在执行的任务。所谓唤醒,是唤醒阻塞在 getTask() 中的线程,让它们检查线程池状态后决定是否退出。被中断后,线程会检查 runState:若为 STOP 状态则直接退出;若为 SHUTDOWN 状态,队列为空时才退出,队列非空时可能继续处理完剩余任务。
Worker 生命周期状态图:
stateDiagram-v2
[*] --> Created: new Worker(firstTask)
Created --> Initialized: setState(-1)<br/>禁止中断
Initialized --> Started: thread.start()
Started --> Running: runWorker(this)
Running --> Unlocked: w.unlock()<br/>允许中断
state Running {
Unlocked --> WaitingTask: getTask()
WaitingTask --> GotTask: task != null
WaitingTask --> NoTask: task == null
GotTask --> Locked: w.lock()
Locked --> Executing: task.run()
Executing --> Unlocked: w.unlock()
}
NoTask --> Exiting: processWorkerExit()
Exiting --> [*]: 线程终止
note right of Created
Worker 构造时:
1. setState(-1) 禁止中断
2. 保存 firstTask
3. 通过 ThreadFactory 创建线程
end note
note right of WaitingTask
getTask() 返回 null 的情况:
1. 线程数 > maximumPoolSize
2. 线程池 STOP 状态
3. 线程池 SHUTDOWN 且队列空
4. 等待超时
end noteWorker 锁状态转换图:
graph TD
subgraph Worker锁状态
A[state = -1<br/>初始化状态] -->|w.unlock| B[state = 0<br/>空闲状态]
B -->|w.lock| C[state = 1<br/>执行任务中]
C -->|w.unlock| B
end
subgraph 锁状态含义
D[-1: 禁止中断<br/>Worker刚创建]
E[0: 允许中断<br/>Worker空闲等待任务]
F[1: 正在执行任务<br/>不应被中断]
end
subgraph 中断规则
G[interruptIfStarted] --> H{getState >= 0?}
H -->|是| I[可以中断]
H -->|否| J[不能中断]
end
style A fill:#FFB6C1
style B fill:#90EE90
style C fill:#87CEEBWorker 锁的三大功能:
- 状态标记:
isLocked()判断 Worker 是否正在执行任务 - 中断保护:
interruptIfStarted()检查state >= 0才允许中断 - 并发控制:
interruptIdleWorkers()用tryLock()判断是否可安全中断
为什么必须用不可重入锁?
关键在于 setCorePoolSize 等池控制方法内部会调用 interruptIdleWorkers:
1 | |
假设用户任务中调用线程池控制方法:
1 | |
如果用 ReentrantLock(可重入):
1 | |
使用 不可重入锁:
1 | |
不可重入的实现原理:
对比 Worker 与 ReentrantLock 的 tryAcquire 实现:
1 | |
不可重入的实现:就是不写 else if (current == getExclusiveOwnerThread()) 这段代码。Worker 的 tryAcquire 只有前半部分。
为什么选择 AQS 而非 volatile + CAS?
AQS 的 compareAndSetState 本质就是 volatile + Unsafe CAS:
1 | |
所以 Worker 实际上就在用 volatile int + CAS,AQS 只是做了封装。选择 AQS 是 Doug Lea 的工程风格——复用已有框架,避免手写 Unsafe 获取和反射。这不是"必须",是"够用且简洁"。AQS 的 exclusiveOwnerThread 对 Worker 来说不重要(不可重入锁不需要记录持有者)。
空闲线程的两种等待状态:
1 | |
| 场景 | 阻塞方法 | Java Thread 状态 | 唤醒条件 |
|---|---|---|---|
| 核心线程(不允许超时) | queue.take() |
WAITING | 队列有任务 或 被中断 |
| 非核心线程 / 允许超时 | queue.poll(timeout) |
TIMED_WAITING | 队列有任务 或 超时 或 被中断 |
shutdown vs shutdownNow 的中断策略对比:
两种关闭方法使用不同的中断函数,对 Worker 锁的态度截然不同:
| 方法 | 状态转换 | 中断函数 | 是否检查锁 | state=1 能否中断 |
|---|---|---|---|---|
shutdown() |
RUNNING → SHUTDOWN | interruptIdleWorkers() |
tryLock() 检查 |
否 |
shutdownNow() |
RUNNING → STOP | interruptWorkers() |
不检查 | 是 |
1 | |
Worker 中断决策流程图:
flowchart TD
subgraph shutdown决策
A1[shutdown()] --> B1[interruptIdleWorkers()]
B1 --> C1{w.tryLock()?}
C1 -->|state=0 成功| D1[t.interrupt()]
C1 -->|state=1 失败| E1[跳过,不中断]
D1 --> F1[空闲线程退出]
end
subgraph shutdownNow决策
A2[shutdownNow()] --> B2[interruptWorkers()]
B2 --> C2{state >= 0?}
C2 -->|state=0 或 1| D2[t.interrupt()]
C2 -->|state=-1| E2[跳过,未启动]
D2 --> F2[所有已启动线程中断]
end关键洞察:Worker 的 AQS 锁只保护 shutdown() 的优雅关闭,不保护 shutdownNow() 的强制关闭。STOP 状态的"更严厉"体现在:无视 Worker 锁,强制中断所有已启动线程。
runWorker 执行流程详解:
sequenceDiagram
participant TPE as ThreadPoolExecutor
participant W as Worker
participant T as Thread
participant Q as BlockingQueue
Note over W: 构造函数: setState(-1)
TPE->>W: addWorker(task, core)
TPE->>T: thread.start()
T->>W: run()
W->>TPE: runWorker(this)
TPE->>W: w.unlock() // setState(0)
Note over W: 现在允许中断
loop 任务循环
alt 有 firstTask
TPE->>TPE: task = firstTask
else 无 firstTask
TPE->>Q: getTask()
Q-->>TPE: task 或 null
end
alt task != null
TPE->>W: w.lock() // setState(1)
Note over W: 执行期间不应中断
TPE->>TPE: beforeExecute(thread, task)
TPE->>T: task.run()
TPE->>TPE: afterExecute(task, thrown)
TPE->>W: w.unlock() // setState(0)
TPE->>W: completedTasks++
else task == null
Note over TPE: 退出循环
end
end
TPE->>TPE: processWorkerExit(w, completedAbruptly)
Note over W: Worker 生命周期结束runWorker 主循环
Worker 的 run 方法委托给线程池的 runWorker 执行。执行流程如图所示,包含以下关键步骤:
- 开始:线程启动-这个线程是在 addWorker 方法里被启动的。
- 申请任务:首次使用 firstTask,后续通过 getTask() 获取
- 是否申请到了新任务:判断 task 是否为 null
- 申请Worker非重入锁:w.lock(),state 从 0 → 1
- 线程池是否至少于STOP后状态:检查是否需要中断
- 执行任务:调用 task.run()
- 释放Worker非重入锁:w.unlock(),state 从 1 → 0
- 任务结束:完成一次任务,继续循环或退出
- 到线终线程:processWorkerExit()
- 结束:线程终止
1 | |
SHUTDOWN 与 STOP 是两种平行的关闭策略
| 状态 | 设计意图 | 任务处理 | 中断策略 |
|---|---|---|---|
| SHUTDOWN | 优雅关闭 | 处理完队列中的任务 | 仅中断空闲线程 |
| STOP | 立即关闭 | drainQueue() 并返回未执行任务 | 中断所有线程(包括执行中的) |
设计为平行状态的原因:
- 使用场景不同:优雅退出 vs 紧急终止
- shutdown() 无法中断正在执行的任务,shutdownNow() 则可以
- 用户根据业务需求选择:正常关闭用
shutdown(),异常/紧急情况用shutdownNow()
状态跃迁路径(按方法边界组织):
tryTerminate 触发关闭一个空闲线程,空闲线程退出时 processWorkerExit,又再触发 tryTerminate,周而复始。
问题在于,最初谁触发了 tryTerminate?
答案:ThreadPoolExecutor 消亡全景——tryTerminate() 驱动的传播式关闭
1 | |
ThreadPoolExecutor 消亡机制要点:
tryTerminate()是条件检查而非强制关闭:内部判断runState >= SHUTDOWN && workerCount == 0才执行终止。每次 workerCount 可能变为 0 的操作后都会调用它,形成多次检查、最终触发的模式tryTerminate()的所有调用点:shutdown():状态置为 SHUTDOWN 后,检查是否可立即终止(队列为空且无 Worker)shutdownNow():状态置为 STOP 且清空队列后,检查是否可立即终止(workerCount=0)processWorkerExit():每个 Worker 退出时,传播终止信号,检查是否最后一个 Worker——这是传播式关闭的核心addWorkerFailed():Worker 创建/启动失败时,workerCount 可能变为 0,检查终止条件purge():清理已取消的 Future 任务后,队列可能变空,SHUTDOWN 状态下可触发终止remove():从队列移除指定任务后,队列可能变空,SHUTDOWN 状态下可触发终止
drainQueue()的作用:shutdownNow()调用,将队列中所有未执行的任务通过BlockingQueue.drainTo()批量转移到 List 中返回,调用者可决定取消或重新提交interruptIdleWorkers()不一定导致线程退出:中断只是唤醒线程,线程被唤醒后在getTask()循环中检查状态:- SHUTDOWN + 队列非空 → 继续从队列取任务执行(不退出)
- SHUTDOWN + 队列空 →
return null,线程退出 - STOP(任意队列状态) →
return null,线程立即退出
interruptIdleWorkers(ONLY_ONE)为什么只中断一个?:这是tryTerminate()内部的补充机制。shutdown()已调用interruptIdleWorkers(false)中断所有空闲线程,此处处理后续仍有线程存活的情况。只中断一个的原因:避免唤醒风暴(批量中断导致大量线程同时苏醒竞争 mainLock)、锁持有时间短、链式反应保证最终终止。Javadoc 原文:“To guarantee eventual termination, it suffices to always interrupt only one idle worker.”- idle 线程如何响应中断?:idle 线程阻塞在
getTask()的workQueue.take()或workQueue.poll()上。中断后抛出InterruptedException,被 catch 捕获后 continue 回到循环开头,检查状态if (rs >= SHUTDOWN && (rs >= STOP || workQueue.isEmpty())),满足条件返回 null getTask()返回 null 后 Worker 如何退出?:runWorker()的while循环条件不满足 → 退出循环 →completedAbruptly = false→processWorkerExit()→ 从 workers 移除、更新统计、调用tryTerminate()→runWorker()方法返回,线程自然结束- 异常退出路径:
task.run()抛出未捕获异常时,completedAbruptly = true(默认值未被设为 false),processWorkerExit()中会decrementWorkerCount()(正常退出在getTask中减)并addWorker(null, false)补充一个 Worker - 关闭流程的本质:状态先变、退出分散的异步模式。
advanceRunState()后调用方立即返回,不会被阻塞等待。线程池进入关闭状态(不可逆),各线程在自然执行节点逐步感知状态变化并退出——这是最终一致性设计 - 最后一个退出的 Worker 触发 TIDYING → TERMINATED 转换。
tryTerminate()确保任何导致 workerCount 减少的操作都有机会触发终止检查,避免线程池永远卡在 SHUTDOWN 状态
尝试关闭 ThreadPoolExecutor
关闭流程的本质:状态先变、退出分散的异步模式。
advanceRunState(SHUTDOWN/STOP) 后,调用方立即返回,不会被阻塞等待。线程池进入关闭状态(不可逆),各线程在自然执行节点逐步感知状态变化并退出:
| 退出触发点 | 触发机制 | 说明 |
|---|---|---|
getTask() 阻塞中被中断 |
interruptIdleWorkers() 唤醒 |
检查状态后退出 |
getTask() 队列空返回 null |
自然感知 | SHUTDOWN + 队列空 → 退出 |
任务执行完毕后回到 getTask() |
自然感知 | 检查状态后退出 |
processWorkerExit() → tryTerminate() |
传播式关闭 | 中断下一个空闲线程 |
这是最终一致性设计:不强制同步等待,而是让线程在自然执行节点逐步退出。优点:调用方快速返回、降低峰值压力、自然处理边缘情况(SHUTDOWN 下长任务正常完成)。
1 | |
生命周期钩子方法:beforeExecute / afterExecute / terminated
ThreadPoolExecutor 提供了三个 protected 钩子方法,允许子类在任务执行的关键节点插入自定义逻辑。这是模板方法模式的经典应用。
钩子方法定义与调用时机
1 | |
调用时机与执行保证:
sequenceDiagram
participant TPE as ThreadPoolExecutor
participant W as Worker
participant T as Thread
participant Task as Runnable
TPE->>W: runWorker(this)
loop 任务循环
TPE->>TPE: getTask()
TPE->>W: w.lock()
Note over TPE: === 钩子调用开始 ===
TPE->>TPE: beforeExecute(thread, task)
Note right of TPE: 默认空实现<br/>可抛出异常终止任务
alt beforeExecute 正常完成
TPE->>Task: task.run()
Task-->>TPE: 正常返回或抛出异常
TPE->>TPE: afterExecute(task, thrown)
Note right of TPE: thrown = 捕获的异常<br/>正常完成时为 null
else beforeExecute 抛出异常
Note over TPE: 任务不会执行
TPE->>TPE: afterExecute(task, thrown)
Note right of TPE: thrown = beforeExecute 的异常
end
TPE->>W: w.unlock()
TPE->>W: completedTasks++
end
TPE->>TPE: processWorkerExit()
alt 线程池进入 TIDYING 状态
TPE->>TPE: terminated()
Note right of TPE: 仅调用一次<br/>所有 Worker 已退出
end典型应用场景
1. 任务执行时间监控与统计
1 | |
2. 线程上下文传递(如 TraceId)
1 | |
3. 任务优先级动态调整
1 | |
关键注意事项
1. 异常处理原则
1 | |
FutureTask 异常处理陷阱: 当提交的任务是 FutureTask(如 submit() 返回的对象)时,异常被封装在 ExecutionException 内部,afterExecute 收到的 Throwable t 参数可能为 null。
1 | |
原因分析: FutureTask.run() 内部捕获了所有异常并存储在 outcome 字段中,对外表现为正常完成。只有调用 Future.get() 时才会抛出封装后的 ExecutionException。
2. 阻塞风险
1 | |
3. 与 shutdown 的协作
1 | |
4. 入参操纵性说明
各钩子方法的参数操纵能力不同:
| 钩子方法 | 参数 | 可操纵性 | 修改的影响范围 |
|---|---|---|---|
beforeExecute(Thread t, Runnable r) |
Thread t | 高 | 影响即将执行的任务线程属性 |
| Runnable r | 中 | 可读取任务信息、修改自定义任务内部状态 | |
afterExecute(Runnable r, Throwable t) |
Runnable r | 低 | 任务已执行完,修改无运行时影响 |
| Throwable t | 低 | 参数是捕获结果的引用,修改不影响原异常传播 | |
terminated() |
无参数 | - | 可访问线程池字段进行清理 |
beforeExecute 入参操纵示例:
1 | |
关键约束:
beforeExecute中抛出异常会导致任务不执行,但afterExecute仍会被调用(异常传递给Throwable参数)- 钩子方法在 Worker 线程中同步执行,修改入参后应避免耗时操作
钩子方法与状态机的关系
stateDiagram-v2
[*] --> RUNNING: 创建线程池
RUNNING --> SHUTDOWN: shutdown()
RUNNING --> STOP: shutdownNow()
SHUTDOWN --> TIDYING: 队列为空且所有任务完成
STOP --> TIDYING: 所有任务完成
TIDYING --> TERMINATED: terminated() 执行完成
note right of RUNNING
beforeExecute / afterExecute
在每个任务执行前后调用
end note
note right of TIDYING
terminated() 调用点:
1. 所有 Worker 已退出
2. 队列已空
3. 仅调用一次
end note核心要点:
beforeExecute/afterExecute:每个任务执行前后调用,用于任务级监控和上下文管理terminated:线程池完全终止后调用一次,用于资源清理和最终统计- 所有钩子都在同步上下文中执行,应避免耗时操作
- 异常处理要完善,避免影响线程池正常运行
getTask 获取任务
1 | |
线程回收
中断空闲线程后,线程检查终止条件或配置变更,决定是否退出。

interruptIdleWorkers 中断空闲线程
共 6 个方法调用:
| 调用方 | 调用形式 | 触发条件 | 目的 |
|---|---|---|---|
shutdown() |
interruptIdleWorkers() |
显式关闭线程池 | 中断所有空闲线程,让它们检查池状态后退出 |
tryTerminate() |
interruptIdleWorkers(ONLY_ONE) |
终止条件满足但 workerCount > 0 | 传播式关闭,唤醒一个线程形成退出连锁反应 |
setCorePoolSize() |
interruptIdleWorkers() |
新值 < 当前线程数 | 回收超出新核心数的多余线程 |
setMaximumPoolSize() |
interruptIdleWorkers() |
新值 < 当前线程数 | 回收超出新最大数的多余线程 |
setKeepAliveTime() |
interruptIdleWorkers() |
超时时间变更 | 让空闲线程重新计算超时,可能触发回收 |
allowCoreThreadTimeOut() |
interruptIdleWorkers() |
超时策略变更 | 让核心线程也参与超时回收 |
设计动因:通过 tryLock() 检测 Worker 锁状态,仅中断空闲线程,保护正在执行的任务不被错误中断。
1 | |
线程销毁

processWorkerExit Worker 退出处理
1 | |
常见问题与替代方案
调参的核心原则
线程池的调参有几个难点:
- 如果核心线程数过小,则吞吐可能不够,遇到流量毛刺可能导致 RejectExecutionException;但值得警惕的是,如果核心线程数很大,可能导致频繁的上下文切换和过多的资源消耗(不管是 cpu 时间片还是操作系统的内核线程)。
- 如果队列过长,导致请求数量增加时,大量任务堆积在队列中,任务执行时间过长,最终导致下游服务的大量调用超时失败。
那么,如何计算这些参数呢?
有一个基本的原则是:
- 计算密集型的线程数本身应该尽量贴近 cpu 核数。
- io 密集型的线程数要注意伸缩,要配合阻塞队列使用,要有承受拒绝失败的的准备。
我们常见的计算方式主要来自于《Java Concurrency in Practice》§8.2(Sizing Thread Pools):

方案一(出自《Java并发编程实践》):
The optimal pool size for keeping the processors at the desired utilization is:
问题:该方案偏理论化。首先,线程计算的时间和等待的时间要如何确定呢?这个在实际开发中很难得到确切的值。另外计算出来的线程个数逼近线程实体的个数,Java线程池可以利用线程切换的方式最大程度利用CPU核数,这样计算出来的结果是非常偏离业务场景的。
方案二:
问题:没有考虑应用中往往使用多个线程池的情况,统一的配置明显不符合多样的业务场景。
方案三:
问题:这种计算方式,考虑到了业务场景,但是该模型是在假定流量平均分布得出的。业务场景的流量往往是随机的,这样不符合真实情况。
现实中可选的线程数计算公式最好是取一个并发 qps 数和 cpu 数的折中。通常可以认为 1000ms / 单任务RT(ms) 可以得到单一线程的吞吐数,目标QPS / 单线程吞吐数 可以得到相应的线程数。但这个方案没有考虑 cpu 核数和上下文切换的问题,所以这样算出来的线程数的实际 qps 表现应该低于理论 qps,但可以通过估算和压测不断让理论值逼近实际值。
替代方案对比
其他可替代方案,都不如线程池的调优方案成熟(在可以使用新技术的前提下,我们是否还有调优旧方案的魄力呢?):
传统替代方案对比
| 名称 | 描述 | 优势 | 劣势 |
|---|---|---|---|
| Disruptor框架 | 线程池内部是通过一个工作队列去维护任务的执行的,它有一个根本性的缺陷:连续争用问题。也就是多个线程在申请任务时,为了合理地分配任务要付出锁资源,对比快速的任务执行来说,这部分申请的损耗是巨大的。高性能进程间消息库LMAX使用了一个叫作环形缓冲的数据结构,用这种这个特殊的数据结构替代队列,将会避免申请任务时出现的连续争用状况。 | 避免连续争用,性能更佳 | 缺乏线程管理的能力,使用场景较少 |
| 协程框架 | 协程是一种用户态的轻量级线程,其拥有自己的寄存器上下文和栈,当调度切换时,将寄存器上下文和栈保存到其他地方,在切回来的时候,恢复先前保存的寄存器上下文和栈。这种切换上下文的方式要小于线程的开销。在瓶颈侧重IO的情况,使用协程获得并发性要优于使用线程。 | 侧重IO情况时,性能更佳。与多线程策略无冲突,可结合使用 | 在Java中缺乏成熟的应用 |
| Actor框架 | Actor模型通过维护多个Actor去处理并发的任务,它放弃了直接使用线程去获取并发性,而是自己定义了一系列系统组件应该如何动作和交互的通用规则,不需要开发者直接使用线程。通过在原生的线程或协程的级别上做了更高层次的封装,只需要开发者关心每个Actor的逻辑即可实现并发操作。由于避免了直接使用锁,很大程度解决了传统并发编程模式下大量依赖悲观锁导致的资源竞争情况。 | 无锁策略,性能更佳,避免直接使用线程,安全性更高 | 在Java中缺乏成熟的应用,内部复杂,难以排查和调试 |
现代Java并发框架对比
根据Java并发编程实践和各框架的Javadoc文档,以下是主流并发框架的详细对比:
| 框架 | 适用场景 | 核心优势 | 主要劣势 | 典型应用 | 成熟度 |
|---|---|---|---|---|---|
| ThreadPoolExecutor | 通用任务调度、CPU/IO混合负载 | JDK内置、灵活配置、监控完善、社区成熟 | 配置复杂、需要调优经验 | Web服务、批处理、定时任务 | ⭐⭐⭐⭐⭐ |
| ForkJoinPool | CPU密集型分治任务、并行计算 | 工作窃取算法、自动负载均衡、递归任务优化 | 不适合阻塞操作、调试困难 | Stream.parallel()、大数据计算 | ⭐⭐⭐⭐ |
| ScheduledThreadPoolExecutor | 定时/周期任务调度 | 精确调度、多任务并发、内存高效 | 不支持cron表达式、时区处理弱 | 心跳检测、数据同步 | ⭐⭐⭐⭐⭐ |
| Project Reactor | 响应式异步流处理、高并发服务 | 背压支持、组合能力强、非阻塞IO | 学习曲线陡峭、调试复杂 | WebFlux、消息驱动架构 | ⭐⭐⭐⭐ |
| RxJava | 异步事件流、UI编程 | 丰富的操作符、链式调用、易于组合 | 内存开销大、线程切换频繁 | Android开发、事件驱动系统 | ⭐⭐⭐⭐ |
| Kotlin Coroutines | 轻量级协程、异步IO密集型 | 资源占用少、代码简洁、结构化并发 | 需要Kotlin环境、JVM协程非原生 | Kotlin服务端、Android | ⭐⭐⭐⭐ |
| Virtual Threads (JDK 21+) | 高并发IO密集型、阻塞API场景 | 轻量级、无需线程池、阻塞代码简化 | 新特性、生态不成熟、CPU密集型无优势 | 高并发Web服务、数据库连接 | ⭐⭐⭐ |
| Akka | 分布式Actor系统、高并发消息处理 | 无锁设计、容错性强、分布式原生 | 复杂度高、学习成本大、调试困难 | 实时系统、游戏服务器 | ⭐⭐⭐⭐ |
选择建议
选择ThreadPoolExecutor的场景:
- 通用的异步任务处理
- 需要精确控制线程数和队列大小
- 要求完善的监控和调优能力
- 团队熟悉传统并发模型
选择响应式框架(Reactor/RxJava)的场景:
- 微服务架构,需要高并发非阻塞IO
- 数据流处理,需要背压和流量控制
- 复杂的异步组合逻辑
- 已有Spring WebFlux等响应式基础设施
选择Virtual Threads的场景:
- JDK 21+环境
- 大量阻塞IO操作(数据库、HTTP调用)
- 希望简化异步代码(避免回调地狱)
- 不需要精细的线程池调优
选择ForkJoinPool的场景:
- CPU密集型递归算法
- 并行数据处理(如Stream.parallel())
- 需要工作窃取优化的场景
关键原则:
- 不要为了新而新:ThreadPoolExecutor 是传统同步阻塞模型下的首选,具备最精细的资源管控能力。只有明确的技术驱动因素才值得切换到其他方案。
- 混合使用:可以在同一系统中混合使用不同框架(如ThreadPoolExecutor处理计算,Reactor处理IO)
- 渐进式迁移:从ThreadPoolExecutor迁移到新框架需要充分测试和评估
缺乏管控能力就不适合调优。
ThreadPoolExecutor 监控与调优实践
监控指标采集
根据Java并发编程最佳实践和 ThreadPoolExecutor 的Javadoc,以下是关键的监控指标:
1 | |
调优建议
1. 核心线程数设置:
1 | |
2. 队列大小设置:
- 快速失败场景:小队列 + AbortPolicy
- 削峰填谷场景:中等队列 + CallerRunsPolicy
- 避免丢失场景:大队列(但要监控)
3. 拒绝策略选择:
| 策略 | 适用场景 | 风险 |
|---|---|---|
| AbortPolicy | 快速失败,允许丢任务 | 任务丢失 |
| CallerRunsPolicy | 降级执行,不丢任务 | 调用线程阻塞 |
| DiscardPolicy | 静默丢弃 | 无感知丢失 |
| DiscardOldestPolicy | 丢弃最老任务 | 优先级倒置 |
如果还是解决不了问题,需要考虑全局动态扩容的方案。
线程池监控指标体系:
graph TB
subgraph 核心监控指标
A[线程池监控] --> B[线程指标]
A --> C[队列指标]
A --> D[任务指标]
A --> E[异常指标]
B --> B1[poolSize<br/>当前线程数]
B --> B2[activeCount<br/>活跃线程数]
B --> B3[largestPoolSize<br/>历史最大线程数]
B --> B4[corePoolSize<br/>核心线程数]
B --> B5[maximumPoolSize<br/>最大线程数]
C --> C1[queue.size<br/>队列当前大小]
C --> C2[queue.remainingCapacity<br/>队列剩余容量]
C --> C3[队列使用率<br/>size/capacity]
D --> D1[taskCount<br/>总任务数]
D --> D2[completedTaskCount<br/>已完成任务数]
D --> D3[待执行任务数<br/>taskCount-completedTaskCount]
E --> E1[rejectedCount<br/>拒绝任务数]
E --> E2[exceptionCount<br/>异常任务数]
end
style A fill:#4ECDC4
style B fill:#87CEEB
style C fill:#90EE90
style D fill:#FFB6C1
style E fill:#FF6B6B完整的线程池监控实现:
1 | |
定时监控任务示例:
1 | |
监控告警决策流程:
flowchart TD
A[定时采集指标] --> B{活跃度 >= 80%?}
B -->|是| C[告警: 线程池繁忙]
B -->|否| D{队列使用率 >= 80%?}
D -->|是| E[告警: 队列积压]
D -->|否| F{有拒绝任务?}
F -->|是| G[告警: 任务被拒绝]
F -->|否| H{平均执行时间过长?}
H -->|是| I[告警: 任务执行慢]
H -->|否| J[正常]
C --> K{是否自动扩容?}
E --> K
G --> K
K -->|是| L[动态调整参数]
K -->|否| M[通知运维处理]
L --> N{调整core?}
N -->|是| O[setCorePoolSize]
N -->|否| P{调整max?}
P -->|是| Q[setMaximumPoolSize]
P -->|否| R[调整队列容量]
style C fill:#FF6B6B
style E fill:#FF6B6B
style G fill:#FF6B6B
style I fill:#FFB6C1
style J fill:#90EE90
style L fill:#4ECDC4Spring Boot 集成监控示例:
1 | |
这里的 activeCount 是每个 worker 是否互斥 held 的总数的统计:
1 | |
这里的 isLocked 意味着这个工作线程正在跑 task 的 run,意味着可能是如下状态:RUNNABLE、BLOCKED、WAITING、TIMED_WAITING。
最终解决方案
通过监控线程池负载,制定告警策略:
- 线程池活跃度 = activeCount/maximumPoolSize。看看这个值是不是趋近于 1。
- 监控队列的capacity 和 size 的比例。
- 监控 RejectExecutionException 的出现。
加引入线程池动态管控能力,基于告警制定 sop,确定是否要动态调节线程数和拒绝策略。
ScheduledThreadPoolExecutor 详解
在第1章中,我们了解了 ScheduledExecutorService 接口的基本用法和常见陷阱。本章将深入其核心实现 ScheduledThreadPoolExecutor,探讨其内部机制和设计原理。
延迟队列任务的标准实现模式
延迟队列任务通常包含一个代表 deadline 的时间字段,需要实现 Delayed 接口:
1 | |
ScheduledFutureTask 的实现:
1 | |
子类重写 decorateTask() 返回装饰器包装的任务时,outerTask 指向包装后的版本。重新入队时用 outerTask 可保持装饰器链完整,不丢失包装层。
1 | |
内存管理和性能优化
对象复用机制:
- 周期任务复用同一个ScheduledFutureTask对象
- 避免频繁的对象创建和垃圾回收开销
- 通过runAndReset()方法重置任务状态而非创建新实例
时间精度处理:
- 内部使用System.nanoTime()而非System.currentTimeMillis()
- 避免系统时钟调整对调度精度的影响
- 纳秒级精度确保高频调度的准确性
队列优化 - Leader-Follower 模式:
- 基于堆的优先队列实现 O(log n) 的插入和删除
- Leader-Follower 模式减少不必要的线程唤醒
- 支持快速的队首元素访问和批量操作
Leader-Follower 模式辨析:
DelayedWorkQueue 中的 Leader-Follower 是一种线程等待优化模式,与 Raft 等分布式一致性协议中的 Leader 概念完全不同:
| 特性 | DelayedWorkQueue Leader-Follower | Raft Leader |
|---|---|---|
| 领域 | 单机并发编程 | 分布式一致性 |
| Leader 角色 | 等待线程中的"定时等待者" | 日志复制协调者 |
| Leader 选举 | 自动轮换,先到先得 | 投票选举,多数派确认 |
| 核心目的 | 避免多线程同时定时等待的唤醒风暴 | 保证日志一致性 |
| 角色数量 | 任意时刻最多 1 个 leader | 任意时刻最多 1 个 leader |
DelayedWorkQueue 的 Leader-Follower 工作原理:
1 | |
为什么需要 Leader-Follower?
假设没有此模式,10 个线程同时调用 take() 等待 5 秒后的任务:
- 所有 10 个线程都调用
awaitNanos(5s) - 5 秒后,所有 10 个线程同时被唤醒
- 但只有 1 个线程能获取任务,其余 9 个线程空转
- 这就是"惊群效应"或"唤醒风暴"
有了 Leader-Follower:
- 只有 1 个 leader 线程定时等待
- 其余 9 个 follower 线程无限等待
- 任务到期后 leader 取走任务,唤醒 1 个 follower 成为新 leader
- 始终只有 1 个线程被唤醒,避免唤醒风暴
这套实现既保证了定时任务调度的精确性,又通过巧妙的设计优化了内存使用和并发性能,体现了Doug Lea在并发编程方面的深厚功底。
为何 ArrayBlockingQueue 不需要 Leader-Follower?
ArrayBlockingQueue 也有队列为空、多个消费者阻塞的情况,但它不会惊群,原因在于唤醒机制:
1 | |
| 对比项 | ArrayBlockingQueue | DelayedWorkQueue |
|---|---|---|
| 等待方式 | await() 无限等待 |
awaitNanos(delay) 定时等待 |
| 唤醒触发者 | 生产者调用 signal() |
时间到期,系统自动触发 |
| 唤醒数量 | signal() 只唤醒 1 个 |
所有 awaitNanos 线程同时醒来 |
- ArrayBlockingQueue 的唤醒是可控的:生产者决定何时唤醒、唤醒几个,
signal()只唤醒一个线程 - DelayedWorkQueue 的唤醒是时间驱动的:时间到期后系统会自动唤醒所有等待该时间的线程,无法用
signal()精确控制 - Leader-Follower 模式让只有 1 个线程去定时等待,其余线程无限等待,从而避免惊群
两者都在避免惊群,只是手段不同:ArrayBlockingQueue 用 signal() 解决;DelayedWorkQueue 无法用 signal() 解决(因为唤醒是时间驱动的),只能用 Leader-Follower 模式。
ScheduledExecutorService 与 AbstractExecutorService 的关系辨析
关键问题:API 之间是否也是 AbstractExecutorService 的调用关系?
答案:submit/invokeAll/invokeAny 仍遵循 AbstractExecutorService,但 schedule 系列方法是独立实现。execute() 被重写为调用 schedule(command, 0, NANOSECONDS),使标准 API 的底层变为调度路径。
API 分类
ScheduledExecutorService 的 API 可以分为两类:
| API 类别 | 方法 | 是否遵循 AbstractExecutorService | 实现路径 |
|---|---|---|---|
| 标准 API | submit(Runnable) |
是 | submit() → newTaskFor() → execute() → DelayedWorkQueue |
| 标准 API | submit(Callable) |
是 | submit() → newTaskFor() → execute() → DelayedWorkQueue |
| 标准 API | invokeAll() |
是 | invokeAll() → newTaskFor() × N → execute() × N |
| 标准 API | invokeAny() |
是 | invokeAny() → newTaskFor() × N → execute() × N |
| 定时 API | schedule(Runnable) |
否 | schedule() → new ScheduledFutureTask() → DelayedWorkQueue |
| 定时 API | schedule(Callable) |
否 | schedule() → new ScheduledFutureTask() → DelayedWorkQueue |
| 定时 API | scheduleAtFixedRate() |
否 | scheduleAtFixedRate() → new ScheduledFutureTask() → DelayedWorkQueue |
| 定时 API | scheduleWithFixedDelay() |
否 | scheduleWithFixedDelay() → new ScheduledFutureTask() → DelayedWorkQueue |
实现对比
标准 API(遵循 AbstractExecutorService):
1 | |
设计意图:execute() 的实现本质是语义转换——将"立即执行"转换为"延迟为0的调度"。这是API兼容性设计:ScheduledThreadPoolExecutor 继承自 ThreadPoolExecutor,必须实现 execute() 接口,但内部确保所有任务都走统一的调度路径(DelayedWorkQueue)-不延迟也得延迟。
与传统 ThreadPoolExecutor.execute() 的区别:
| 维度 | ThreadPoolExecutor | ScheduledThreadPoolExecutor |
|---|---|---|
| 语义 | 立即执行任务 | 延迟为0的调度任务 |
| 入队 | 直接入队 | 通过 schedule() → delayedExecute() |
| 任务包装 | 可选 | 强制包装为 ScheduledFutureTask |
| 队列 | 用户指定 | 强制 DelayedWorkQueue |
| 时间字段 | 无 | time = now() + 0 |
定时 API(独立实现):
1 | |
延时调度的本质:延时语义由队列层实现——schedule() 创建带 deadline 的 ScheduledFutureTask 并入队。Worker 线程调用 getTask() → DelayedWorkQueue.take() 时会阻塞直到队首任务到期,之后完全复用 ThreadPoolExecutor 的执行机制。
TPE 系的线程池都有一个原则:入队以后要确认线程池状态和线程数量,如果需要就补,如果有就出队,避免中队列中死等。
对比图示
graph TB
subgraph "标准 API(遵循 AbstractExecutorService)"
A1[submit Runnable] --> B1[newTaskFor]
B1 --> C1[FutureTask]
C1 --> D1[execute]
D1 --> E1[schedule0]
E1 --> F1[DelayedWorkQueue]
A2[submit Callable] --> B2[newTaskFor]
B2 --> C2[FutureTask]
C2 --> D1
A3[invokeAll] --> B3[newTaskFor xN]
B3 --> C3[FutureTask xN]
C3 --> D3[execute xN]
D3 --> E3[schedule0 xN]
E3 --> F3[DelayedWorkQueue]
end
subgraph "定时 API(独立实现)"
A4[schedule Runnable] --> B4[new ScheduledFutureTask]
B4 --> C4[delayedExecute]
C4 --> D4[DelayedWorkQueue]
A5[schedule Callable] --> B5[new ScheduledFutureTask]
B5 --> C5[delayedExecute]
C5 --> D4
A6[scheduleAtFixedRate] --> B6[new ScheduledFutureTask periodic]
B6 --> C6[delayedExecute]
C6 --> D4
A7[scheduleWithFixedDelay] --> B7[new ScheduledFutureTask periodic]
B7 --> C7[delayedExecute]
C7 --> D4
end
style B4 fill:#FFD700
style B5 fill:#FFD700
style B6 fill:#FFD700
style B7 fill:#FFD700
style C4 fill:#FFD700
style C5 fill:#FFD700
style C6 fill:#FFD700
style C7 fill:#FFD700关键结论
-
标准 API:
submit()、invokeAll()、invokeAny()仍然遵循 AbstractExecutorService 的契约- 通过
newTaskFor()创建 FutureTask - 调用
execute(),最终转换为schedule(0)
- 通过
-
定时 API:
schedule()系列方法是独立实现- 直接创建 ScheduledFutureTask(而非 FutureTask)
- 调用
delayedExecute(),直接提交到 DelayedWorkQueue - 不经过
execute()路径
-
任务类型差异:
- FutureTask:普通任务,执行一次即完成
- ScheduledFutureTask:定时任务,支持延迟执行和周期执行,继承自 FutureTask
-
队列差异:
- 标准 API:通过
schedule(0)间接使用 DelayedWorkQueue - 定时 API:直接使用 DelayedWorkQueue,支持基于时间的优先级排序
- 标准 API:通过
这个设计体现了 ScheduledExecutorService 的双重性质:既要兼容 ExecutorService 标准接口,又要为定时任务提供专门的实现。
ScheduledExecutorService 核心机制详解
Future.get() 的语义差异:一次性任务 vs 周期任务
根据 ScheduledFuture 的规范,Future.get() 方法在一次性任务和周期任务中的行为截然不同:
一次性任务:
get()会阻塞直到任务执行完成- 可以正常获取任务执行结果或捕获异常
- 任务完成后立即返回,这是预期行为
1 | |
周期任务:
get()基本不会"正常返回",因为周期任务的设计语义是"无限期执行"- 只在以下两种情况返回:
- 任务被取消(
cancel()被调用) - 任务执行过程中抛出未捕获的异常
- 任务被取消(
- 调用
get()会导致调用线程永久阻塞(直到上述情况发生)
1 | |
为什么这样设计?
这是有意为之的设计,强制用户通过 cancel() 来主动终止周期任务。周期任务没有自然的"完成"状态,因此 get() 无法判断何时应该返回。
串行化铁律:单一任务串行,不同任务并行
根据 ScheduledThreadPoolExecutor 的源码实现,存在一个重要的"串行化铁律":
单一周期任务的串行化:
- 同一个
ScheduledFutureTask对象在run()方法完成后才会计算下次触发时间并重新入队 - 因此同一个周期任务实例不可能并发执行
- 这个铁律适用于
scheduleAtFixedRate和scheduleWithFixedDelay两种模式
sequenceDiagram
participant Worker as Worker线程
participant Queue as DelayedWorkQueue
participant Task as ScheduledFutureTask
Note over Worker,Task: 周期任务的串行化执行
Worker->>Queue: take()
Queue-->>Worker: 返回到期任务
Worker->>Task: 执行 run()
Note over Worker: 执行任务逻辑
Worker->>Task: run() 完成
Task->>Task: setNextRunTime()
Task->>Queue: 重新入队(同一对象)
Note over Worker,Task: 下一次执行
Worker->>Queue: take()
Queue-->>Worker: 再次返回同一任务
Worker->>Task: 执行 run()不同任务的并行化:
- 多个独立的任务(即使执行相同的 Runnable)可以并行执行
- 只要线程池有足够线程,不同任务可以同时运行
1 | |
设计原因:
周期任务复用同一个 ScheduledFutureTask 对象,在执行期间不会创建新的任务对象入队,这天然保证了单一任务的串行化。
设计原理详解
ScheduledFutureTask.run() 的周期任务分支实现详见 ScheduledFutureTask 的实现,核心逻辑:super.runAndReset() -> setNextRunTime() -> reExecutePeriodic(outerTask)。
sequenceDiagram
participant Worker as Worker线程
participant Queue as DelayedWorkQueue
participant Task as ScheduledFutureTask
rect rgb(200, 220, 240)
Note over Worker,Task: 第一次执行
Worker->>Queue: take() 取出任务
Queue-->>Worker: 返回任务
Worker->>Task: 执行 run()
Note over Worker: 执行任务逻辑
Worker->>Task: run() 完成
Task->>Task: setNextRunTime()
Task->>Queue: reExecutePeriodic(同一对象)
end
rect rgb(220, 240, 220)
Note over Worker,Task: 第二次执行
Worker->>Queue: take() 取出同一任务
Queue-->>Worker: 返回任务
Worker->>Task: 执行 run()
Note over Worker: 执行任务逻辑
Worker->>Task: run() 完成
Task->>Task: setNextRunTime()
Task->>Queue: reExecutePeriodic(同一对象)
end设计优势:
- 内存效率:避免为每次执行创建新对象
- 串行化保证:因为复用同一个对象,且只有在当前执行完成后才重新入队,所以不会存在"同一个任务的多个实例同时待执行"
- 追赶机制:追赶逻辑在
setNextRunTime()中根据时间戳计算,即使追赶多次,也是串行重新入队
这就是串行追赶的本质设计原因。
漂移(Drift):线程池过小导致的执行延迟
漂移的定义:
漂移是指任务的实际执行时间偏离了理论调度时间。当线程池过小或任务执行时间过长时:
- 到期的任务从
DelayedWorkQueue中取出后,可能因为线程池繁忙而需要等待 - 即使任务已经"到期",也无法立即执行,只能等待可用线程
- 这导致执行时间晚于理论时间,产生"漂移"效应
gantt
title 漂移效应示意图(period=1s,执行时间=1.5s)
dateFormat X
axisFormat %s
section 理论时间轴
执行1 : 0, 1
执行2 : 1, 2
执行3 : 2, 3
section 实际执行(线程池过小)
等待队列 : 0, 0.5
执行1 : 0.5, 2
等待队列 : 2, 2.5
执行2 : 2.5, 4
等待队列 : 4, 4.5
执行3 : 4.5, 6漂移的影响:
- scheduleAtFixedRate:漂移会触发追赶机制,在短时间内执行更密集
- scheduleWithFixedDelay:漂移会延迟整个时间轴,不会追赶,表现为节奏变慢
避免漂移的建议:
- 合理设置线程池大小,避免线程不足
- 控制任务执行时间,避免长时间阻塞
- 监控任务执行延迟,及时调整配置
API 参数语义:delay vs period
统一的时间参数模式:
所有 ScheduledExecutorService 的方法都采用 (long time, TimeUnit unit) 的参数模式,这是 JUC 的统一设计风格。
delay 的语义:
- 表示"延迟多久后首次执行"
- 只影响第一次执行
- 是一次性的时间偏移
period 的语义:
- 表示"周期性执行的间隔"
- 决定后续执行的节奏
- 计算方式在不同 API 中有差异:
| API | period 计算 | 是否追赶 | 适用场景 |
|---|---|---|---|
scheduleAtFixedRate |
上次理论触发时间 + period |
是 | 采样、心跳、metrics 上报 |
scheduleWithFixedDelay |
上次实际结束时间 + period |
否 | 拉取消息、轮询、清理任务 |
示例:
1 | |
周期任务异常终止的深度解析
根本原因:任务对象不再重新入队
普通 ThreadPoolExecutor 的异常处理机制:
1 | |
执行流程:
- Worker 线程执行任务,任务抛出未捕获异常
- Worker 线程在
Worker.run()的 finally 块中捕获异常 - Worker 线程继续存活,从队列取下一个任务
- 若 Worker 线程数 < corePoolSize,线程池补充新线程
周期任务的异常处理机制:
1 | |
执行流程:
- Worker 线程执行
ScheduledFutureTask.run() ScheduledFutureTask.run()调用FutureTask.runAndReset()runAndReset()捕获异常,设置异常状态,返回falseScheduledFutureTask.run()检查返回值,仅当返回true时重新入队ScheduledFutureTask对象不再重新入队,后续调度终止
核心源码分析:
1 | |
为什么 CAS 设置 runner,finally 中直接赋值?
runner 字段的两种操作场景:
| 操作 | 场景 | 并发风险 | 实现方式 |
|---|---|---|---|
| 设置 runner | 任务开始前,多线程可能同时调用 run() | 多个线程竞争执行同一任务 | CAS 原子操作 |
| 清空 runner | 任务完成后,finally 块 | 当前线程独占,无竞争 | 直接赋值 |
CAS 保证只有一个线程能成功设置 runner 并执行任务。finally 块中当前线程已持有 runner,不存在竞争,直接置 null 即可。
深入理解:为什么 ThreadPoolExecutor 场景下仍需 CAS?
从 ThreadPoolExecutor 的视角看,getTask() 从 BlockingQueue 取任务是独占的,不会有两个 Worker 拿到同一个 FutureTask。但 CAS 设置 runner 的必要性来自更广的场景:
- FutureTask 是通用组件,不依赖 ThreadPoolExecutor 的队列语义
1 | |
- cancel(true) 与 run() 的竞争——这是核心场景
cancel(true) 需要先 CAS 改状态再中断 runner,而 run() 需要先绑定 runner 再执行:
1 | |
两者形成互斥:要么 run() 先 CAS 成功绑定 runner 再执行,要么 cancel() 先 CAS 改状态使 run() 的状态检查失败。
- runAndReset() 的重入场景
ScheduledThreadPoolExecutor 的周期任务会多次调用 runAndReset(),虽然是同一个 Worker,但每次执行仍需 CAS 来与潜在的 cancel() 竞争。
简言之:CAS runner 不是防多 Worker 竞争,而是防 run()/runAndReset() 与 cancel() 的并发竞争,同时保证 FutureTask 作为独立组件的幂等性。
异常终止的根本原因:
runAndReset() 仅在 c.call() 正常完成时返回 true。若抛出异常,ran 保持 false,最终返回 false,ScheduledFutureTask.run() 不会重新入队任务。
这解释了为什么周期任务中的未捕获异常会导致后续调度终止:任务对象不再入队。
执行流程图:
sequenceDiagram
participant Worker as Worker线程
participant Task as ScheduledFutureTask
participant Queue as DelayedWorkQueue
rect rgb(220, 255, 220)
Note over Worker,Queue: 正常执行流程
Worker->>Task: run()
Task->>Task: runAndReset() 内部调用
Task->>Task: callable.call()
Note right of Task: 返回 true
Task->>Task: setNextRunTime()
Task->>Queue: reExecutePeriodic() 重新入队
Task-->>Worker: 完成
Note over Queue: 等待下次执行
end
rect rgb(255, 220, 220)
Note over Worker,Queue: 异常执行流程
Worker->>Task: run()
Task->>Task: runAndReset() 内部调用
Task->>Task: callable.call() 抛出异常
Task->>Task: setException(e)
Note right of Task: 返回 false
Task-->>Worker: 完成
Note over Queue: 任务不再重新入队,后续调度终止
end异常处理机制对比:
| 维度 | 普通任务 | 周期任务 |
|---|---|---|
| 任务类型 | 每次是新 Runnable 对象 | 同一个 ScheduledFutureTask 对象重复执行 |
| 异常处理位置 | Worker.run() 的 finally 块 | FutureTask.runAndReset() |
| 异常后的行为 | Worker 线程继续,取下一个任务 | 任务对象不再重新入队 |
| 线程池补充 | 补充新线程(如需要) | Worker 线程正常,但任务不再调度 |
| 后续任务影响 | 不受影响(不同任务) | 同一任务的后继执行全部终止 |
设计原理:
该行为属于有意为之的设计决策,基于以下考量:
- 语义明确性: 周期任务抛出异常表明任务逻辑存在问题,继续执行可能导致资源泄漏或数据不一致
- 错误可见性: 若自动重试,异常将被静默吞掉,开发者难以发现潜在问题
- 符合 Javadoc 规范:
scheduleAtFixedRate的 javadoc 明确说明 “If any execution of the task encounters an exception, subsequent executions are suppressed” - 显式异常处理: 强制用户明确决定异常处理策略(重试、忽略、告警等)
其他分布式系统的异常处理策略
不同的分布式调度系统有不同的设计理念:
Spring @Scheduled:
1 | |
- 默认行为: 与 JUC 一致,异常后终止调度
- 最佳实践: 必须捕获异常
Quartz Scheduler:
1 | |
- 默认行为: 异常后任务标记为 FAILED,但仍然会继续调度(默认)
- 配置选项: 可以配置
@DisallowConcurrentExecution等策略 - 重试机制: 支持配置重试次数和间隔
XXL-Job:
1 | |
- 默认行为: 异常后任务标记为失败,但仍然会继续调度
- 失败重试: 支持配置重试次数
- 告警机制: 失败后会触发告警
Celery (Python):
1 | |
- 默认行为: 异常后任务失败,但仍然会继续调度
- 自动重试: 支持配置重试策略
- 任务状态: 区分 PENDING、STARTED、SUCCESS、FAILURE、RETRY 等
对比总结:
| 系统 | 异常后行为 | 重试机制 | 设计理念 |
|---|---|---|---|
| JUC ScheduledExecutorService | 终止调度 | 无 | 失败即停止,让用户显式处理 |
| Spring @Scheduled | 终止调度 | 无 | 遵循 JUC 规范 |
| Quartz | 继续调度 | 可配置 | 企业级,容错性强 |
| XXL-Job | 继续调度 | 可配置 | 分布式,高可用 |
| Celery | 继续调度 | 可配置 | 云原生,弹性伸缩 |
为什么 JUC 选择"失败即停止"?
- 简洁性: 不引入复杂的重试逻辑
- 可预测性: 行为明确,不会因为重试导致问题扩散
- 灵活性: 用户可以自己实现重试逻辑
- 符合 Unix 哲学: “提供机制而非策略”
分布式任务调度系统的设计思路对比
前文提到,JUC 的周期任务采用"任务重复入队"的设计思路,异常时打断入队会导致调度终止。但并非所有分布式任务调度系统都采用这种设计。不同系统的核心差异在于:任务调度的触发机制和任务状态的持久化方式。
两种核心设计思路
思路一:任务重复入队(自驱动模式)
代表系统:JUC ScheduledExecutorService、Spring @Scheduled
- 设计原理:任务对象自身负责计算下次执行时间并重新入队
- 触发机制:基于内存队列的延迟调度
- 状态管理:任务状态存储在内存中,进程重启后丢失
- 异常处理:异常时任务对象不再入队,调度终止
核心代码见上文 周期任务异常终止的深度解析 章节,关键点是 runAndReset() 返回 true 时才重新入队,异常时不入队。
思路二:调度中心驱动(中心化模式)
代表系统:阿里 SchedulerX、美团 Crane、XXL-JOB、Quartz
- 设计原理:独立的调度中心负责任务触发,执行器仅负责执行
- 触发机制:基于数据库/注册中心的定时触发
- 状态管理:任务状态持久化到数据库,进程重启后可恢复
- 异常处理:异常不影响调度中心下次触发,任务状态独立管理
flowchart LR
SC[调度中心<br/>Scheduler] -->|触发| EX[执行器 A<br/>Executor]
DB[数据库<br/>持久化] -->|读取状态| EX
EX -->|更新状态| DB
SC -->|下次触发<br/>仍会执行| EX
EX -->|失败不影响| SC阿里 SchedulerX 的设计
核心特性:
- 中心化调度架构:调度中心独立部署,负责任务触发和状态管理
- 失败自动重试:支持实例级别和子任务级别的失败重试
- 分布式执行:支持分片任务,多个执行器并行处理
- 状态持久化:任务执行状态存储在数据库中
异常处理流程:
sequenceDiagram
participant SC as 调度中心
participant DB as 数据库
participant EX as 执行器
SC->>DB: 查询待执行任务
SC->>EX: 触发任务执行
EX->>EX: 执行任务逻辑
EX->>DB: 更新执行状态
alt 执行成功
DB->>SC: 标记为 SUCCESS
else 执行失败
DB->>SC: 标记为 FAILED
SC->>SC: 检查重试策略
alt 未达到重试上限
SC->>DB: 计算下次重试时间
SC->>EX: 重新触发任务
else 达到重试上限
DB->>SC: 标记为最终失败
SC->>SC: 触发告警
end
end
Note over SC,DB: 下次调度时间到达时,不论上次成功或失败,都会重新触发关键点:
- 调度中心根据 Cron 表达式或固定间隔计算下次触发时间
- 任务执行失败不影响调度中心的触发逻辑
- 支持配置重试次数和重试间隔
- 任务状态独立于调度触发
美团 Crane 的设计
核心特性:
- 分布式调度:基于 ZooKeeper 的分布式协调
- 故障转移:执行器宕机时,任务自动转移到其他节点
- 任务分片:支持大任务分片并行处理
- 监控告警:集成 CAT 监控系统
异常处理流程:
sequenceDiagram
participant ZK as ZooKeeper
participant SC as 调度节点
participant EX as 执行器
participant DB as 数据库
SC->>ZK: 注册任务调度
ZK->>EX: 选举主执行器
EX->>EX: 执行任务
EX->>DB: 记录执行日志
alt 执行成功
DB->>ZK: 更新任务状态为 SUCCESS
else 执行失败
DB->>ZK: 更新任务状态为 FAILED
ZK->>ZK: 检查重试策略
alt 支持重试
ZK->>EX: 重新分配任务
else 不支持重试
ZK->>SC: 触发告警
end
end
Note over ZK: 下次调度时间到达时,仍然会触发任务关键点:
- 基于 ZooKeeper 实现分布式协调和故障转移
- 任务调度和执行状态持久化到数据库
- 执行器宕机不影响调度,任务会自动转移到其他节点
- 支持任务分片和并行执行
两种设计思路的优缺点对比
| 维度 | 任务重复入队(自驱动) | 调度中心驱动(中心化) |
|---|---|---|
| 架构复杂度 | 简单,单进程内完成 | 复杂,需要独立的调度中心 |
| 异常处理 | 异常即终止,需手动重启 | 异常不影响调度,自动重试 |
| 状态持久化 | 无,进程重启丢失 | 有,数据库持久化 |
| 分布式能力 | 无,单机调度 | 有,支持分布式执行 |
| 故障恢复 | 无,进程崩溃任务丢失 | 有,任务可恢复和转移 |
| 监控告警 | 需自行实现 | 内置监控告警 |
| 适用场景 | 简单定时任务,单机应用 | 企业级应用,分布式系统 |
| 资源消耗 | 低,仅内存队列 | 高,需要数据库和调度中心 |
| 实时性 | 高,内存队列延迟低 | 中,依赖数据库查询 |
| 扩展性 | 差,单机限制 | 好,可水平扩展 |
为什么 JUC 采用任务重复入队设计?
JUC 的设计目标与分布式调度系统完全不同:
- 定位:本地进程内的轻量级调度,而非分布式调度
- 性能:基于内存队列,避免数据库开销
- 简单性:保持 API 简洁,不引入外部依赖
- 可控性:异常终止让用户显式处理,避免隐式重试掩盖问题
典型适用场景:
- 定期清理缓存
- 定期刷新配置
- 定期上报指标
- 定期检查状态
这些场景的特点是:
- 任务逻辑简单,失败即终止
- 不需要分布式执行
- 不需要持久化状态
- 需要高性能和低延迟
不适用场景:
- 需要跨进程调度
- 需要任务持久化
- 需要自动故障恢复
- 需要分布式执行
对于这些场景,应该使用分布式任务调度系统(如 SchedulerX、XXL-JOB 等)。
设计模式总结
[PATTERN] 自驱动 vs 中心驱动模式
自驱动模式:
- 定义:任务对象自身负责调度逻辑
- 优点:简单、高效、低延迟
- 缺点:无持久化、无故障恢复、不支持分布式
- 适用:单机轻量级调度
中心驱动模式:
- 定义:独立的调度中心负责任务触发
- 优点:持久化、故障恢复、分布式支持
- 缺点:复杂度高、资源消耗大、延迟较高
- 适用:企业级分布式调度
选择原则:
- 单机简单场景 → 自驱动模式(JUC ScheduledExecutorService)
- 分布式复杂场景 → 中心驱动模式(SchedulerX、XXL-JOB)
如何实现自动重试?
如需实现类似 Quartz 的行为,可自行封装:
1 | |
铁律:周期任务必须捕获所有异常并记录,否则会出现"定时任务一段时间后不再执行"的现象。
setRemoveOnCancelPolicy(true) 的重要性
默认行为:
cancel()只标记任务为"已取消"- 任务对象仍留在
DelayedWorkQueue中 - 直到到期取出时才发现已取消并跳过
问题场景:
1 | |
开启移除策略:
1 | |
效果:
cancel()时立即从队列移除任务- 减少队列扫描开销和内存占用
- 强烈推荐用于"每个请求都 schedule 超时任务"的场景
time 字段的可复用设计
DelayedWorkQueue 的核心机制:
DelayedWorkQueue 基于 Delayed 接口的 getDelay() 方法:
1 | |
ScheduledFutureTask 的 time 字段:
1 | |
经典的可复用设计:
time字段用于堆排序(compareTo基于time)time字段用于判断是否到期(getDelay()计算剩余时间)- 可复用:周期任务重新入队时,只需更新
time字段,无需新建对象
这是一个经典的时间轮/延迟队列设计模式,高效且内存友好。
理论时间轴 vs 当下时间起点:Rate vs Delay 的根本差异
setNextRunTime() 完整源码:
1 | |
period 字段的编码设计:
| period 值 | 含义 | 时间计算 | 追赶行为 |
|---|---|---|---|
> 0 |
fixed-rate | time += period |
会追赶 |
< 0 |
fixed-delay | time = now() + (-period) |
不追赶 |
= 0 |
一次性任务 | 不调用 setNextRunTime | 无 |
period 正负的来源:调度方法中的编码:
用户调用 scheduleAtFixedRate(task, 0, 1, SECONDS) 时传入的是正数 period,但 period 字段的正负是在 STPE 的调度方法中决定的:
1 | |
关键行:unit.toNanos(delay) * -1。API 参数 delay 是正数,但存储到 period 字段时主动取负,以此区分两种模式。这是内部编码约定,调用者无感知。
period 字段的双重编码设计:
period 字段同时承载两个信息:
- 绝对值:延迟时间(纳秒数)
- 正负号:计算模式标识
这种编码技巧在 JDK 中常见,类似:
ThreadPoolExecutor.ctl:高 3 位存状态,低 29 位存线程数ForkJoinPool.config:高 16 位存并行度,低 16 位存模式HashMaphash 高位用于判断节点类型
优点:
- 节省字段:无需额外存储
enum Mode { FIXED_RATE, FIXED_DELAY } - 单分支判断:
if (p > 0)一个条件区分两种模式 - 值即含义:
|period|是时间,sign(period)是模式
代价是可读性稍差,需要文档说明。
scheduleAtFixedRate(固定频率):
- 基于理论时间轴:
startTime + n * period - 下次触发时间 =
上次理论触发时间 + period - 如果执行延迟,会追赶:
nextTime = max(now, theoreticalTime)
gantt
title scheduleAtFixedRate:理论时间轴(period=1s)
dateFormat X
axisFormat %s
section 理论时间轴
触发1 : 0, 1
触发2 : 1, 2
触发3 : 2, 3
触发4 : 3, 4
section 实际执行(执行慢)
执行1 : 0, 1.5
追赶 : 1.5, 2
执行2 : 2, 3
执行3 : 3, 4
执行4 : 4, 5scheduleWithFixedDelay(固定延迟):
- 基于当下时间起点:
endTime + period - 下次触发时间 =
上次实际结束时间 + period - 不会追赶:执行越慢,整个时间轴越往后推
对应 setNextRunTime() 的 else 分支:time = triggerTime(-p),详见上文源码。
gantt
title scheduleWithFixedDelay:当下时间起点(delay=1s)
dateFormat X
axisFormat %s
section 执行时间轴
执行1 : 0, 1.5
等待1s : 1.5, 2.5
执行2 : 2.5, 3.5
等待1s : 3.5, 4.5
执行3 : 4.5, 6
等待1s : 6, 7核心差异:
- Rate:基于理论时间轴,产生追赶效应
- Delay:基于当下时间起点,不产生追赶效应
这就是两套 API 产生追赶或者不追赶的根本原因。
工程级最佳实践
周期任务的三条铁律:
- 永远捕获 Throwable,避免任务因为异常而静默停止
- 永远加超时(IO/锁等待/远程调用)
- 永远可取消 + 可观测(日志/metrics/最后成功时间)
不要完全替代 cron:
如需实现“每天 02:00”(墙上时钟语义、时区/DST/补偿错过的执行)等调度需求,ScheduledExecutorService 能力不足,更适合使用:
- Quartz
- Spring
@Scheduled(cron=...)(底层常用线程池,但语义更偏 cron)
ScheduledExecutor 更擅长:
- “从现在开始每隔 5 秒”
- “延迟 200ms 后做一次”
- “固定节拍采样/心跳”
任务隔离:
不同性质任务分不同 scheduler:
- 一个专门跑心跳/采样(轻量)
- 一个专门跑清理/同步(可能重 IO)
否则重任务会把轻任务拖延,造成级联误判(比如心跳延迟导致误判下游故障)。
生产级配置示例:
1 | |
ForkJoinPool详解:分治并行的执行引擎

前言:分治并行的诞生
ForkJoinPool 不是为了通用"并行"而设计,而是专门为分治并行(Divide-and-Conquer Parallelism)这一特定模式量身定制。分治算法(如快速排序、归并排序、树遍历)具有独特的执行模式:
- 任务天然形成树状结构
- 父任务派生子任务后需要等待结果
- 子任务之间通常无依赖关系
- 计算密集,无I/O阻塞
理解分治算法的执行特性,是理解 ForkJoinPool 设计的关键。传统线程池在处理这类任务时遇到根本性挑战,ForkJoinPool 正是为解决这些挑战而诞生。
核心数据结构:ForkJoinPool的基石
ForkJoinPool:去中心化的调度器
数据结构定义
1 | |
与ThreadPoolExecutor的本质区别
1 | |
关键差异
- 队列模型:TPE使用单一共享队列,FJP使用每个线程私有队列
- 线程管理:TPE有明确的core/max参数,FJP只有目标并行度
- 调度策略:TPE基于生产者-消费者模型,FJP基于工作窃取模型
队列类型选择:阻塞队列 vs CAS 无锁队列
核心问题:为什么 TPE 用阻塞队列(BlockingQueue),而 FJP 用 CAS 实现的双端队列(WorkQueue)?
答案:取决于竞争烈度与等待语义的组合,需要在阻塞让出 CPU 与 CAS 自旋重试之间权衡。
竞争烈度的四象限分析
1 | |
关键洞察:
- 高竞争 + 长等待 → 必须阻塞,否则线程自旋浪费 CPU
- 低竞争 + 短等待 → CAS 更优,锁的上下文切换开销比 CAS 重试更贵
TPE vs FJP:竞争烈度对比
| 维度 | TPE(生产者-消费者) | FJP(工作窃取) |
|---|---|---|
| 队列模型 | N 线程竞争 1 个共享队列 | N 线程各有私有队列,偶尔窃取 |
| 竞争烈度 | 高(所有线程抢同一把锁) | 低(99% 操作自己队列,无竞争) |
| 等待时长 | 长(任务不足时可能无限等待) | 短(窃取失败立即换目标) |
| 等待语义 | 必须等待任务到达 | 窃取失败可以放弃 |
| 方案选择 | 锁 + 条件变量(让等待者睡眠) | CAS 无锁(快速尝试) |
| 开销对比 | 锁开销 ~100-200 CPU 周期 | CAS ~50 CPU 周期 |
为什么 TPE 必须用阻塞队列?
假设 8 核机器,8 个线程,任务不足时:
- CAS 方案:8 个线程都在自旋,CPU 使用率 800%,但没有任何有用工作
- 阻塞方案:所有线程
wait()睡眠,让出 CPU 给其他进程
为什么 FJP 可以用 CAS?
- 99% 时间操作自己队列,无竞争
- 窃取是低频操作(1%),失败立即换目标,不需要"等待"
- 窃取失败不意味着业务错误,可以放弃
通用设计原则
| 竞争烈度 | 等待语义 | 推荐方案 | 典型场景 |
|---|---|---|---|
| 高(N 线程竞争 1 资源) | 长等待(等待资源可用) | 锁 + 条件变量 | TPE 共享队列、生产者-消费者 |
| 高(N 线程竞争 1 资源) | 短等待(快速操作) | 自旋锁/乐观锁 | 短临界区、读多写少 |
| 低(N 线程各有资源) | 无等待(失败即走) | CAS 无锁 | FJP 私有队列、工作窃取 |
| 低(N 线程各有资源) | 需等待(等待条件) | 每资源独立锁 | 分片锁、分段锁 |
什么是"等待"?为什么要等待?
等待的本质:线程无法继续执行,需要等待条件成立或资源可用。
关键区别:
| 维度 | 需等待(阻塞语义) | 无等待(非阻塞语义) |
|---|---|---|
| 操作是否必须成功 | 是,失败意味着业务错误 | 否,失败可以重试或放弃 |
| 失败后的选择 | 等待重试(阻塞) | 立即重试或走人 |
| 典型语义 | “我必须拿到这个资源” | “有机会就试试,没机会就算了” |
| 实现机制 | 锁 + 条件变量 | CAS |
为什么"低竞争 + 需等待"选择"每资源独立锁"?
关键在于分片降低竞争。例如 ConcurrentHashMap:
- 全局锁:16 线程竞争同一把锁 → 高竞争
- 分段锁(16 segment):竞争概率降至 1/16
决策树
1 | |
一句话总结
竞争烈度决定机制选择:高竞争长等待必须阻塞(否则 CPU 空转),低竞争无等待应该 CAS(否则锁开销过大)。TPE 和 FJP 的队列选择,是这一原则的完美诠释。
ForkJoinWorkerThreadFactory:专用线程工厂
接口定义与对比
1 | |
关键区别
- 完全不同的接口:两者没有继承关系,签名完全不同
- 上下文差异:标准工厂只接收Runnable,即任务,负责包装出线程;FJP工厂接收 ForkJoinPool 即线程池。
- 线程定制能力:线程工厂通常可以设置:
- 线程名称(便于调试)
- 线程优先级(Thread.setPriority())
- 守护状态(Thread.setDaemon())
- 上下文类加载器(Thread.setContextClassLoader())
- 异常处理器(Thread.setUncaughtExceptionHandler())
- 为什么在工厂里创建,传统工厂使用这个接口把任务包装成进程,并且启动:
thread.start(); // 一旦 start(),大部分属性就无法修改了
FJP 的扩展方法
1 | |
设计意义
FJP的工作线程需要知道池的存在,才能参与工作窃取算法。标准ThreadFactory无法提供这种上下文,因此需要专用接口。
ForkJoinWorkerThread:协作式执行者
数据结构
1 | |
与ThreadPoolExecutor.Worker的对比
1 | |
- Worker:“可以自锁定的 runnable,初始化是把自己装进 Thread 里,run 是在线程里循环阻塞获取拥塞队列里的任务-在 runWorker 里getTask”。
- ForkJoinWorkerThread:“具有自主窃取能力的协作线程,run 是在本地队列空闲时主动扫描并窃取其他工作队列任务的群体智能执行器”。
设计决策
- Worker使用组合:TPE的工作线程只需执行任务,无需特殊行为
- FJP使用继承:需要重写run()实现工作窃取,且需要池上下文。继承意味着可以直接使用线程的生命周期方法。
线程安全特性:为什么ForkJoinPool不会有线程泄露问题?
ForkJoinPool 在线程管理上具有两个关键特性,使其天然避免了线程泄露问题:
1. 所有工作线程都是 Daemon 线程
1 | |
这意味着:
- 即使忘记调用
shutdown(),ForkJoinPool 的线程也不会阻止 JVM 退出 - 当所有非 daemon 线程结束时,JVM 会自动终止,daemon 线程随之销毁
- 与 ThreadPoolExecutor 的关键区别:TPE 默认创建非 daemon 线程,忘记关闭会导致 JVM 无法退出
2. 线程回收与资源管理
根据 Javadoc 文档:
“Using the common pool normally reduces resource usage (its threads are slowly reclaimed during periods of non-use, and reinstated upon subsequent use).”
线程回收机制:
- 空闲线程不会立即销毁,而是先
park()等待 - 空闲时间超过阈值(约60秒)后,线程主动退出
run()循环 - 下次需要时重新创建,避免永久空闲线程占用资源
不关闭时的资源状态:
- Worker线程在运行/空闲期间持有FJP引用,实例暂时无法被GC回收
- 所有Worker退出后,FJP实例可被GC回收
显式关闭的优势:
shutdown()后已提交任务执行完成即关闭,无需等待空闲超时shutdownNow()立即中断正在执行的任务并返回未执行任务列表
结论:daemon线程确保JVM可正常退出,但显式关闭仍是良好实践,可及时释放资源。
WorkQueue:双端队列的实现
数据结构
1 | |
术语定义:
- base = 队头(低索引端,存放最早入队的任务)
- top = 队尾(高索引端,存放最新入队的任务)
1 | |
工作窃取(Work-Stealing)机制详解
工作窃取是双端队列的两端分离操作:owner 线程操作队尾(push 时 top++),stealer 线程操作队头(steal 时 base++),两端各自单向移动,通过 CAS 仲裁竞争,实现无锁化负载均衡。
asyncMode 决定 owner 取任务方向:
- LIFO 模式(默认):从队尾 pop(
top--),与 stealer 两端分离,无竞争 - FIFO 模式:从队头 poll(
base++),与 stealer 同端操作,需 CAS 竞争。Executors.newWorkStealingPool()默认此模式,竞争开销高于 LIFO。
graph TB
subgraph "ForkJoinPool 工作窃取示意图"
direction TB
subgraph "Worker Thread 1 (繁忙)"
W1[Worker 1<br/>正在执行 Task A]
W1Q["WorkQueue 1 (双端队列)<br/>━━━━━━━━━━━━━━━━━━━━<br/>base → [T1][T2][T3][T4][T5] ← top<br/>━━━━━━━━━━━━━━━━━━━━"]
W1 -.->|"push/pop<br/>(LIFO 模式)"| W1Q
end
subgraph "Worker Thread 2 (空闲)"
W2[Worker 2<br/>队列已空]
W2Q["WorkQueue 2 (双端队列)<br/>━━━━━━━━━━━━━━━━━━━━<br/>base → [ ] ← top<br/>━━━━━━━━━━━━━━━━━━━━<br/>(空队列)"]
W2 -.->|"尝试 pop"| W2Q
end
subgraph "Worker Thread 3 (繁忙)"
W3[Worker 3<br/>正在执行 Task B]
W3Q["WorkQueue 3 (双端队列)<br/>━━━━━━━━━━━━━━━━━━━━<br/>base → [T6][T7][T8] ← top<br/>━━━━━━━━━━━━━━━━━━━━"]
W3 -.->|"push/pop<br/>(LIFO 模式)"| W3Q
end
W2 ==>|"① 扫描其他队列"| W1Q
W2 ==>|"② 从 base 端窃取 T1"| W1Q
W1Q -.->|"③ 窃取成功<br/>T1 移至 Worker 2"| W2
style W1 fill:#ffcdd2
style W2 fill:#c8e6c9
style W3 fill:#ffcdd2
style W1Q fill:#fff3e0
style W2Q fill:#e8f5e9
style W3Q fill:#fff3e0
end工作模式与适用场景:
| 模式 | Owner 操作 | 竞争情况 | 适用场景 | 优点 | 缺点 |
|---|---|---|---|---|---|
| LIFO(默认) | 队尾 push/pop | 无竞争(两端分离) | 递归分治、并行流、CompletableFuture | 缓存局部性好、无锁化 | 不适用于 IO 阻塞 |
| FIFO | 队尾 push/队头 poll | 同端 CAS 竞争 | 事件处理、消息消费 | 任务顺序公平 | 竞争开销略高 |
核心操作
1 | |
LIFO + FIFO 的设计智慧:
- 本地LIFO:最近派生的任务最先执行,保持时间局部性(temporal locality):
- 时间局部性:最近访问的数据很可能再次被访问
- 在分治算法中,最近派生的任务通常与父任务共享数据
- 保持这些数据在CPU缓存中,避免缓存失效惩罚
- 窃取FIFO:最早派生的任务最先被窃取,保证窃取到"大块"任务
- "大块任务"解释:这不是编程隐喻,而是指计算量大的任务。在分治算法中:
- 最早派生的任务通常是父任务分解的第一层子任务,包含大量工作
- 最近派生的任务通常是深层子任务,计算量较小
- 例如快速排序中,根任务分解为左右子任务,这两个是"大块任务";而叶子节点任务只处理几个元素,是"小块任务"
- 本地LIFO执行小任务(保持缓存),窃取FIFO获取大任务(避免任务碎片化)
- "大块任务"解释:这不是编程隐喻,而是指计算量大的任务。在分治算法中:
ForkJoinTask.join() 与 Thread.join() 的本质差异
这是 ForkJoinPool 能够高效处理海量递归任务而不会死锁的关键机制。两种 join 有着根本性的不同。
Thread.join() - 阻塞式等待
Thread.join() 的核心机制是:在一个 synchronized 方法中,通过 while (isAlive()) 循环调用 wait(),让调用线程进入 WAITING 状态。当目标线程终止时,JVM 自动调用 notifyAll() 唤醒等待者。这是一种典型的操作系统级别的线程阻塞。
关于
Thread.join()的完整源码解析、设计哲学(三个关键角色的分离、接力式等待的本质、Thread 对象的特殊性等),请参阅《Java 并发编程笔记》中的 join 章节。
当调用 Thread.join() 时:
- 调用线程进入 WAITING 状态(由
wait()方法决定) - 线程被操作系统挂起,完全停止执行
- 直到目标线程结束,JVM 调用
notifyAll()唤醒等待的线程 - 这是操作系统级别的线程阻塞
ForkJoinTask.join() - 协作式等待
当调用 ForkJoinTask.join() 时:
- 工作线程不会进入 WAITING 状态
- 线程继续执行其他任务(work-stealing)
- 定期检查等待的任务是否完成
- 这是用户态的协作式调度
关键差异对比
| 特性 | Thread.join() | ForkJoinTask.join() |
|---|---|---|
| 线程状态 | WAITING(阻塞) | RUNNABLE(继续工作) |
| CPU 利用率 | 降低(线程挂起) | 保持(继续执行任务) |
| 上下文切换 | 需要(操作系统调度) | 不需要(用户态调度) |
| 死锁风险 | 高(递归场景) | 无(协作式调度) |
| 适用场景 | 独立线程 | 分治递归任务 |
为什么 ForkJoinTask.join() 不会导致死锁
考虑这个递归场景:
1 | |
如果使用 Thread.join(),这种模式会导致问题:
- 父线程阻塞等待子线程
- 但子任务可能还在队列中等待执行
- 如果所有线程都在等待,就会死锁
使用 ForkJoinTask.join(),不会死锁:
- 父任务调用
join()时,工作线程不会阻塞 - 工作线程会尝试执行等待的子任务
- 如果子任务在自己的队列中,直接执行
- 如果子任务在其他队列中,窃取其他任务继续工作
- 这样父子任务永远不会相互阻塞
实现原理:详见后文协作式等待的源码实现章节。
总结
ForkJoinTask.join() 的协作式等待机制是 ForkJoinPool 的核心优势:
- 避免线程阻塞:工作线程永远不会因为等待而停止工作
- 充分利用 CPU:等待期间继续执行其他任务
- 避免死锁:父子任务可以在同一个线程中执行
- 支持海量任务:可以提交远超线程数的任务而不会耗尽资源
这种设计使得 ForkJoinPool 特别适合处理递归分治问题,如归并排序、快速排序、并行流等场景。
ForkJoinTask:任务抽象
核心结构
1 | |
标准子类
1 | |
分治并行的编程模型简化
ForkJoinPool 将分治并行的复杂度封装在框架内部,开发者只需关注业务逻辑层面:
1 | |
框架自动处理的复杂度:
| 开发者负责 | 框架负责 |
|---|---|
| 任务分解逻辑 | 任务调度与分发 |
fork() 派发子任务 |
工作窃取负载均衡 |
join() 获取结果 |
线程协作式等待(非阻塞) |
compute() 合并结果 |
任务队列管理、缓存局部性优化 |
这种设计体现了关注点分离:开发者专注于分治算法的业务逻辑(如何分解、如何合并),框架负责底层并行执行的复杂性(何时调度、如何均衡)。这也是 Doug Lea 论文中强调的核心价值——让并行编程变得便捷。
与FutureTask的关键区别
1 | |
关键API:与ThreadPoolExecutor的差异
ForkJoinPool的核心API
外部客户端API
1 | |
- 对 TPE:
execute(Runnable)是调度层的核心,不是最底层。最底层是runWorker()。 - 对于外部提交,
externalPush()或externalSubmit()是入口;但内部fork()调用的是WorkQueue.push(),两者是并行的入口路径,不是汇聚关系。
内部计算API
1 | |
监控与管理API
1 | |
ForkJoinPool 与 AbstractExecutorService 的关系辨析
关键问题:submit 和 execute 的关系是否改变了?
答案:接口契约未变,但实现路径不同。
根据 JSR-166 规范和 ForkJoinPool 的 Javadoc,需要区分两种情况:
情况1:普通 Runnable/Callable 任务
对于普通 Runnable/Callable,ForkJoinPool 完全遵循 AbstractExecutorService 的契约:
1 | |
调用链:submit() → newTaskFor() → execute() → externalPush() → WorkQueue
情况2:ForkJoinTask 任务
对于 ForkJoinTask,ForkJoinPool 提供了重载方法,绕过 FutureTask 包装:
1 | |
调用链:submit() → externalPush() → WorkQueue(跳过 FutureTask 包装)
对比图示
graph TB
subgraph "ThreadPoolExecutor(标准实现)"
A1[submit Runnable] --> B1[newTaskFor]
B1 --> C1[FutureTask]
C1 --> D1[execute]
D1 --> E1[WorkerQueue]
A2[submit Callable] --> B2[newTaskFor]
B2 --> C2[FutureTask]
C2 --> D1
end
subgraph "ForkJoinPool(普通任务)"
A3[submit Runnable] --> B3[newTaskFor]
B3 --> C3[FutureTask]
C3 --> D3[execute]
D3 --> E3[externalPush]
E3 --> F3[WorkQueue]
A4[submit Callable] --> B4[newTaskFor]
B4 --> C4[FutureTask]
C4 --> D3
end
subgraph "ForkJoinPool(ForkJoinTask)"
A5[submit ForkJoinTask] --> D5[externalPush]
D5 --> F5[WorkQueue]
A6[execute ForkJoinTask] --> D5
end
style A5 fill:#90EE90
style A6 fill:#90EE90
style D5 fill:#90EE90
style F5 fill:#90EE90关键结论
- 接口契约未变:ForkJoinPool 仍然继承 AbstractExecutorService,
submit()、invokeAll()、invokeAny()的契约保持不变 - 实现路径不同:
- 普通任务:
submit()→FutureTask→execute()→externalPush()→ WorkQueue - ForkJoinTask:
submit()→externalPush()→ WorkQueue(跳过 FutureTask)
- 普通任务:
- 性能优化:ForkJoinTask 重载方法避免了不必要的 FutureTask 包装开销
- 工作窃取:无论哪种路径,最终都通过
externalPush()提交到 WorkQueue,支持工作窃取算法
这个设计体现了 ForkJoinPool 的双重性质:既要兼容 ExecutorService 标准接口,又要为 ForkJoinTask 提供优化路径。
API 主次之分:与 ScheduledThreadPoolExecutor 类似,ForkJoinPool 的传统 execute/submit/invokeAll/invokeAny 是"外部客户端 API",用于从非 fork/join 上下文提交任务。真正体现 ForkJoinPool 分治并行能力的核心 API 是
ForkJoinPool.invoke(ForkJoinTask)和ForkJoinTask.fork()/join()——前者是外部提交根任务的入口,后者是任务内部分解和合并的机制。在 fork/join 计算内部混用外部 API 会导致绕过工作窃取优化,详见 API使用边界 章节。
API使用边界:为什么不能混用?
Javadoc 明确划分了 API 使用边界:
| meannings | Call from non-fork/join clients | Call from within fork/join computations |
|---|---|---|
| Arrange async execution | execute(ForkJoinTask) |
ForkJoinTask.fork() |
| Await and obtain result | invoke(ForkJoinTask) |
ForkJoinTask.invoke() |
| Arrange exec and obtain Future | submit(ForkJoinTask) |
ForkJoinTask.fork() (ForkJoinTasks are Futures) |
"Arrange"的含义:
此处的"Arrange"是英语动词,意为"安排、组织",描述API的意图:
- Arrange async execution = “安排异步执行” → 任务提交后立即返回
- Await and obtain result = “等待并获取结果” → 阻塞直到任务完成
- Arrange exec and obtain Future = “安排执行并获取 Future” → 异步执行但保留结果句柄,通过 Future 获取结果。
原始文档强调2: “These methods are designed to be used primarily by clients
not already engaged in fork/join computations in the current pool…
tasks that are already executing in a pool should normally instead use
the within-computation forms…”
混用API的代价:
- 性能下降:绕过工作窃取优化
- 死锁风险:阻塞式等待导致资源浪费
- 缓存失效:失去任务局部性
线程调度机制:动态适应的艺术
并行度:唯一的核心参数
配置参数
1 | |
四个参数详解:
-
parallelism:目标并行度
- 控制池中活跃工作线程的数量上限
- 默认值为
Runtime.getRuntime().availableProcessors() - 实际线程数会根据负载动态调整
-
factory:工作线程工厂
- 用于创建ForkJoinWorkerThread实例
- 默认使用
ForkJoinPool.defaultForkJoinWorkerThreadFactory - 可自定义线程名称、优先级、上下文类加载器等属性
-
handler:未捕获异常处理器
- 处理工作线程中未被捕获的异常
- 默认为null,异常会传播到
ThreadGroup.uncaughtException() - 可设置自定义处理器进行统一异常处理
-
asyncMode:任务调度模式(核心设计决策)
- false(默认):LIFO模式 - 本地队列采用后进先出
- 适合递归分解任务(divide-and-conquer)
- 增强任务局部性,提高缓存命中率
- Owner 从队尾取,Stealer 从队头窃取,两端分离无竞争
- true:FIFO模式 - 本地队列采用先进先出
- 适合事件驱动任务(event-style tasks)
- 任务按顺序公平分发
- Owner 和 Stealer 都从队头取,同端 CAS 竞争
- false(默认):LIFO模式 - 本地队列采用后进先出
设计哲学与JRE源码的深层考量:
表面上看,newWorkStealingPool()设置asyncMode=true似乎与"递归分解适合LIFO"的原则相矛盾。但实际上这是精心设计的结果:
-
使用场景区分:
- 直接使用
ForkJoinPool构造函数:通常是开发者明确知道在做分治算法 - 使用
newWorkStealingPool():面向通用并发任务,多数是非递归的独立任务
- 直接使用
-
性能优化考量:
1
2
3
4
5asyncMode=true的优势:
→ 任务按提交顺序执行,减少线程竞争
→ 适合大量独立小任务的并发执行
→ 避免递归深度导致的栈溢出风险
→ 更好的负载均衡效果 -
API设计意图:
newWorkStealingPool()旨在提供"开箱即用"的高性能并发池- 默认FIFO模式对大多数应用更友好
- 需要专门的分治算法时,开发者会直接使用
ForkJoinPool构造函数
-
Doug Lea的设计智慧:
1
2
3
4
5
6// JDK源码中的实际设计
public static ExecutorService newWorkStealingPool(int parallelism) {
return new ForkJoinPool(parallelism,
defaultForkJoinWorkerThreadFactory,
null, true); // 故意设为true
}这种设计体现了"默认最优"的理念:为普通用户提供最适合大多数场景的配置,而将专业调优留给有明确需求的开发者。
关于工作窃取算法的澄清(回应读者核心疑问):
这是一个非常重要的概念澄清:
正确 工作窃取算法始终启用:
- 无论是
asyncMode=true还是false,工作窃取机制都100%启用 - 这是ForkJoinPool的核心特性,不因asyncMode而改变
- Doug Lea设计的work-stealing算法是ForkJoinPool存在的根本
错误 常见的误解纠正:
graph TD
A[ForkJoinPool核心机制] --> B[工作窃取算法<br/>始终启用]
A --> C[任务调度策略<br/>受asyncMode影响]
B --> D[线程空闲时<br/>从其他线程队列窃取任务]
C --> E[asyncMode=false: LIFO本地队列]
C --> F[asyncMode=true: FIFO本地队列]
E --> G[适合递归分解<br/>增强局部性]
F --> H[适合独立任务<br/>减少竞争]递归分解 vs 工作窃取的关系:
这两个特性不是互斥的,而是互补的:
- 工作窃取是基础设施:提供线程间的负载均衡能力
- 任务调度策略是优化手段:针对不同类型任务优化性能
1 | |
要点:
- 工作窃取 ≠ 任务调度策略
- 工作窃取是"怎么分任务",调度策略是"按什么顺序执行任务"
newWorkStealingPool()名称强调的是"使用工作窃取算法的池",而非"积极启用工作窃取"- asyncMode=true实际上是选择了更适合通用任务的执行顺序,但工作窃取机制从未关闭
公共池的系统属性
1 | |
构造器参数的实际影响:
- parallelism:直接影响CPU利用率,设置过大导致上下文切换开销
- threadFactory:可控制线程优先级、名称、守护状态
- exceptionHandler:确保异常不会静默失败
系统属性配置(非构造器参数):
- maximumSpares:处理阻塞时的补偿线程上限,通过系统属性
java.util.concurrent.ForkJoinPool.common.maximumSpares配置,默认 256
无core/max参数的设计哲学
ThreadPoolExecutor的线程管理
1 | |
ForkJoinPool的线程管理
1 | |
parallelism vs corePoolSize, maximumSpares vs maximumPoolSize:
- 本质不同:
- TPE:corePoolSize是静态下限(保持的最小线程数),maximumPoolSize是静态上限(允许的最大线程数)
- FJP:parallelism是动态目标(期望的活跃线程数),maximumSpares是补偿上限(允许的额外线程数):只要有任务,机制可以通过一个有限度的补偿拼命维持 active thread 的 count;ThreadPoolExecutor维持的是线程数量的边界范围(corePoolSize ≤ 线程数 ≤ maximumPoolSize),而不是特别关注线程的活跃状态。
- TPE的线程边界是硬性的,FJP的线程边界是软性的
- TPE创建线程是为了处理更多任务,FJP创建spare线程是为了补偿阻塞
- 关键区别:
- 线程数硬性上限:FJP的线程数永远不会超过 parallelism + maximumSpares
- 当达到上限后:
- 有线程阻塞时,无法创建spare线程
- 新任务入队到现有线程的队列(队列无界,会动态扩容)
- 与TPE的核心区别:
- TPE:有界队列满 + 线程=max 时触发拒绝策略(RejectedExecutionHandler)
- FJP:无需配置拒绝策略,队列动态扩容,仅在 shutdown 或内部资源耗尽时抛出 RejectedExecutionException
线程回收机制对比
Javadoc明确说明 2: “Using the common pool normally reduces resource
usage (its threads are slowly reclaimed during periods of non-use, and
reinstated upon subsequent use).”
FJP线程回收细节
- 空闲线程不会立即销毁,而是park()
- 如果空闲时间超过阈值,标记为可回收
- 通过ctl字段的位操作,逐步减少活跃线程计数
- 下次需要时重新创建,避免频繁创建/销毁开销
为什么没有拒绝策略:无界队列与任务消费模型
ForkJoinPool 构造器对比
查看 ForkJoinPool 的构造器签名,会发现一个显著的差异:
1 | |
ForkJoinPool 没有 RejectedExecutionHandler 参数。这不是疏忽,而是有意为之的设计决策。
为什么不需要拒绝策略?
flowchart TB
subgraph TPE["ThreadPoolExecutor 任务流"]
T1[新任务] --> T2{线程数 < core?}
T2 -->|是| T3[创建核心线程]
T2 -->|否| T4{队列未满?}
T4 -->|是| T5[入队等待]
T4 -->|否| T6{线程数 < max?}
T6 -->|是| T7[创建非核心线程]
T6 -->|否| T8[触发拒绝策略]
style T8 fill:#ff6b6b,color:#fff
end
subgraph FJP["ForkJoinPool 任务流"]
F1[新任务] --> F2{外部提交?}
F2 -->|是| F3[放入共享提交队列]
F2 -->|否| F4[放入当前线程本地队列]
F3 --> F5[队列动态扩容]
F4 --> F5
F5 --> F6[工作窃取平衡负载]
F6 --> F7[join时帮助执行]
style F5 fill:#51cf66,color:#fff
style F7 fill:#51cf66,color:#fff
end原因一:队列是无界的
每个 WorkQueue 内部使用 ForkJoinTask<?>[] array 存储任务:
根据 ForkJoinPool 的 Javadoc(Java SE 8+):
“This implementation rejects submitted tasks (that is, by throwing RejectedExecutionException) only when the pool is shut down or internal resources have been exhausted.”
这意味着 ForkJoinPool 不需要显式的拒绝策略参数,因为:
- 正常运行时,任务总能被接受(队列会动态扩容)
- 只有在 shutdown 或内部资源耗尽时才会拒绝
1 | |
当队列满时,会自动扩容(容量翻倍),直到达到 MAXIMUM_QUEUE_CAPACITY。这意味着:
- 单个队列理论上可以容纳约 6700 万个任务
- 多个工作线程各有自己的队列
- 实际上,内存耗尽(OOM)会先于队列容量上限触发 “internal resources exhausted”
原因二:任务模型的本质差异
ThreadPoolExecutor 处理的是独立任务:
- 任务之间没有依赖关系
- 拒绝一个任务不影响其他任务
- 拒绝策略是合理的边界保护
ForkJoinPool 处理的是可分解的递归任务:
- 父任务 fork 出子任务
- 父任务必须 join 等待子任务完成
- 如果拒绝子任务,父任务将永远无法完成,导致死锁
1 | |
原因三:join 的协作式消费
ForkJoinPool 的 join 不是被动等待,而是主动帮助消费任务:
sequenceDiagram
participant Parent as 父任务线程
participant Queue as 本地队列
participant Child as 子任务
Parent->>Queue: fork(子任务)
Parent->>Parent: 准备 join
alt 子任务还在本地队列顶部
Parent->>Queue: tryUnpush(子任务)
Parent->>Child: 直接执行子任务
Child-->>Parent: 返回结果
else 子任务被窃取
Parent->>Queue: 执行队列中其他任务
Note over Parent: 帮助消费,而非空等
Child-->>Parent: 异步完成后返回结果
end这种设计意味着:
- 即使队列中有大量任务,线程也在持续消费
- join 操作本身就是在帮助消费队列
- 任务的生产和消费是协作式的,不会出现"生产远超消费"的失控情况
队列无界会导致 OOM 吗?
理论上是的,但在正确使用 ForkJoinPool 的场景下,这不是问题:
分治任务的"菱形"特征:
graph TD
subgraph "任务数量随时间变化"
A[根任务] --> B1[子任务1]
A --> B2[子任务2]
B1 --> C1[孙任务1]
B1 --> C2[孙任务2]
B2 --> C3[孙任务3]
B2 --> C4[孙任务4]
C1 --> D1[结果1]
C2 --> D2[结果2]
C3 --> D3[结果3]
C4 --> D4[结果4]
D1 --> E1[合并1]
D2 --> E1
D3 --> E2[合并2]
D4 --> E2
E1 --> F[最终结果]
E2 --> F
end
style A fill:#4dabf7
style B1 fill:#748ffc
style B2 fill:#748ffc
style C1 fill:#9775fa
style C2 fill:#9775fa
style C3 fill:#9775fa
style C4 fill:#9775fa
style D1 fill:#da77f2
style D2 fill:#da77f2
style D3 fill:#da77f2
style D4 fill:#da77f2
style E1 fill:#f783ac
style E2 fill:#f783ac
style F fill:#ff6b6b典型的分治任务呈现"先增后减"的菱形模式:
- 分解阶段:任务数量指数增长
- 基准情况:到达阈值,开始直接计算
- 合并阶段:任务数量指数减少
工作窃取算法确保任务被及时消费,队列长度不会无限增长。
如果滥用会怎样?
如果把 ForkJoinPool 当作普通线程池,不断提交独立任务而不消费结果:
1 | |
这与使用 new ThreadPoolExecutor(..., new LinkedBlockingQueue<>()) 的效果相同——都会因为无界队列导致 OOM。
设计哲学总结
| 维度 | ThreadPoolExecutor | ForkJoinPool |
|---|---|---|
| 任务模型 | 独立任务 | 可分解的递归任务 |
| 队列类型 | 可配置(有界/无界) | 动态扩容(无界) |
| 拒绝策略 | 必需配置 RejectedExecutionHandler | 无需配置,仅在 shutdown/资源耗尽时拒绝 |
| 消费模式 | 被动等待 | 协作式消费(join帮助执行) |
| 适用场景 | 通用任务执行 | 分治并行计算 |
| OOM风险 | 无界队列时存在 | 滥用时存在(触发 internal resources exhausted) |
要点:ForkJoinPool 的构造器不需要 RejectedExecutionHandler 参数,是因为在分治并行模型中,拒绝子任务会导致父任务死锁。根据 Javadoc,ForkJoinPool 仅在 shutdown 或内部资源耗尽时抛出 RejectedExecutionException。动态扩容的队列配合工作窃取和协作式 join,形成了一个自平衡的任务消费系统。
工作线程生命周期
工作线程经历四个阶段:
- 初始化:首次提交任务时创建,初始活跃线程数不超过parallelism,但总线程数可能达到 parallelism + maximumSpares
- 与TPE的关键区别:TPE的核心线程即使空闲也不会回收(除非设置allowCoreThreadTimeOut),而FJP的所有线程在空闲时都会被回收
- FJP的设计哲学:按需创建,及时释放,适合间歇性负载
- 活跃期:执行任务 + 窃取任务,检测阻塞时触发spare线程
- 通过
ManagedBlocker接口检测阻塞 - 当线程阻塞时,可能创建spare线程补偿
- 通过
- 空闲期:无任务时park(),保持空闲状态
- 线程通过
awaitWork()方法(内部实现)进入等待,使用LockSupport.park()挂起 - 有新任务时被唤醒
- 线程通过
- 回收期:空闲超过阈值,逐步减少线程
- 通过ctl字段的位操作管理线程状态,空闲超时后线程主动退出run()循环
- 线程退出run()方法,被垃圾回收
- 下次需要时重新创建,避免永久空闲线程
根据 ForkJoinPool 源码注释和 Javadoc 文档:
“The pool attempts to maintain enough active (or available) threads by dynamically adding, suspending, or resuming internal worker threads, even if some tasks are stalled waiting to join others.”
这意味着 ForkJoinPool 会动态调整线程数以维持目标并行度,同时避免频繁的线程创建/销毁循环。与传统线程池不同,ForkJoinPool 会回收所有空闲线程以减少资源消耗。
实战案例:并行文件搜索系统
业务需求
- 搜索指定目录下的所有文件
- 查找包含特定关键词的文件
- 统计匹配行数
- 处理大型目录(10万+文件)
- 要求高效利用多核CPU
数据结构定义
1 | |
线程池初始化与使用
1 | |
所以正确的框架是:
graph TD
A[ForkJoinPool任务执行] --> B{使用哪个API?}
B -->|invoke()| C[正确方式]
B -->|submit()/execute()| D[错误方式]
C --> E[触发工作窃取机制]
C --> F[维护任务父子关系]
C --> G[支持fork()/join()调用链]
C --> H[同步等待结果]
D --> I[无法触发工作窃取]
D --> J[破坏任务分解结构]
D --> K[RecursiveTask无法正常工作]-
必须使用invoke()而非submit()/execute():
invoke()是ForkJoinPool的专用API,专为工作窃取算法设计- 只有通过
invoke()提交的任务才能正确触发fork()和join()的执行机制 submit()/execute()提交的任务无法参与工作窃取,违背了ForkJoinPool的设计初衷
-
定义一个 RecursiveTask 或者 RecursiveAction,而不是直接使用 ForkJoinTask,然后让 ForkJoinPool 来 invoke 根 task。
-
每个任务内部:
- 先检查任务大小,只有大任务才分解生成子任务,小任务直接计算。
- 从子任务列表中移除最后一个任务,保留给自己直接执行。
- 对其余子任务调用fork()(异步提交)。
- 对保留的任务调用compute()(同步执行)。
Specification支撑:根据JSR 166规范和Doug Lea的设计原则,ForkJoinPool的invoke()方法是唯一能够正确激活工作窃取调度器的入口点。使用其他API会导致任务无法被正确分解和调度。
5. 对其他任务进行 join 收集计算结果,合并进上一个计算结果里。
6. 返回全部计算结果。
3. 所以在任务外部使用 invoke,内部使用 fork/compute/join。外部不应该用fork()/join(),看上面的 arrange。
关键设计决策解析
为什么使用 RecursiveTask 而不是 RecursiveAction?
- 需要返回搜索结果(List)
- RecursiveTask 提供类型安全的返回值
- 符合分治模式:子任务结果合并为父任务结果
为什么设置THRESHOLD=100?
- 任务分解粒度需要平衡:
- 太小:调度开销超过计算收益
-
- 太大:负载不均衡,CPU核心利用率低
- 100是经验值,可根据文件大小调整
- 通过基准测试确定最优值
为什么fork其他任务,直接执行最后一个任务?
1 | |
设计理由:
- 避免调度开销:直接compute()比fork()后再join()少一次入队出队操作
- 缓存局部性:直接执行的任务与父任务共享数据,保持CPU缓存热度
- 栈深度控制:避免过深的递归导致StackOverflowError
- 注意:这里的"最后一个任务"不是指"最大的任务",而是任意选择一个任务直接执行以减少调度开销
为什么创建自定义池而不是使用公共池?
1 | |
设计理由:
- 资源隔离:避免影响其他使用公共池的组件
- 参数定制:限制并行度(16),避免I/O瓶颈
- 异常处理:自定义异常处理器,确保错误可见
- 生命周期管理:try-with-resources确保池关闭
为什么asyncMode=false?
1 | |
设计理由:
-
LIFO模式:适合分治算法,保持缓存局部性
-
asyncMode=true:使用FIFO模式,适合事件处理
-
文件搜索是典型的分治场景,LIFO更高效
ForkJoinPool 与 ThreadPoolExecutor 的对比及 commonPool 实践
ForkJoinPool vs ThreadPoolExecutor 核心差异
| 特性 | ForkJoinPool | ThreadPoolExecutor |
|---|---|---|
| 队列架构 | 每个工作线程一个双端队列 | 全局共享队列 |
| 负载均衡 | 工作窃取(主动,线程闲了就去偷) | 队列分发(被动,线程从队列取) |
| 适合场景 | 大量短任务、CPU 密集型 | IO 密集型、混合任务 |
| 线程数 | 固定 = CPU 核心数 | 可动态扩缩容(core → max) |
| 拥塞队列 | 无(直接入队到工作线程) | 有(可配置容量,如 LinkedBlockingQueue) |
| 队列满时行为 | 队列动态扩容,任务无限排队 | RejectedExecutionHandler(4种策略) |
| 线程收缩 | 自动收缩(无 core thread 空转) | 依赖 keepAliveTime |
| 线程类型 | 守护线程(默认) | 非守护线程(默认) |
何时选择 ForkJoinPool 而非 ThreadPoolExecutor(非递归分治场景):
| 场景 | 推荐选择 | 理由 |
|---|---|---|
| 大量细粒度任务(如并行流处理、批量计算) | FJP | 工作窃取机制减少线程空闲,任务短到可快速完成时全局队列竞争会成为瓶颈 |
| 任务执行时间差异大(部分任务耗时极长,部分极短) | FJP | 短任务可被其他空闲线程窃取执行,长任务不会阻塞短任务 |
| 需要最大化 CPU 利用率(CPU 密集型混合任务) | FJP | 线程数固定为 CPU 核心数,避免线程切换开销,且工作窃取保证所有核心 busy |
| 并行流(Parallel Stream) | FJP(自动使用) | Arrays.parallelSort()、List.parallelStream() 内部依赖 FJP |
| CompletableFuture 编排大量计算任务 | FJP | CompletableFuture.runAsync() 默认使用 commonPool,适合 CPU 密集型任务编排 |
| IO 密集型任务 | TPE | FJP 工作线程默认为守护线程——JVM 退出时不会等待守护线程执行完毕。如果守护线程长时间阻塞(如等待网络响应),JVM 可能在任务完成前退出,导致任务被"截断";TPE 为非守护线程,JVM 会等待其执行完毕 |
| 需要任务队列有界控制 | TPE | FJP 无队列容量控制,任务无限排队风险 |
简言之:当你的任务是大量 CPU 密集型的短任务,且任务执行时间相对均衡或差异不大时,FJP 的工作窃取机制能提供更高的吞吐量;否则(如 IO 密集型、任务时长差异极大、需要可控的队列容量),TPE 是更稳妥的选择。
线程池的演进逻辑
从历史发展的角度看,Java 线程池经历了一个逐步演进的过程:
1 | |
没有虚拟线程的时代:
- IO 密集型业务 → TPE(可动态扩缩容)
- CPU 密集型业务 → FJP(工作窃取)
虚拟线程出现后:
- 虚拟线程让 IO 阻塞不再占用物理线程
- 大量 IO 密集型任务可以用极少的载体线程支撑海量并发
- 但 FJP 的守护线程问题仍然存在,不适合长时间阻塞
日常使用习惯:现实中 TPE 用得多,因为大多数业务是 IO 密集型。你对线程池的选择,只在追求资源利用率和性价比时才重要——只要任务能正确完成,用哪个线程池并无本质区别。
commonPool 的并发控制机制
关键问题:当大量外部线程涌入时,commonPool 会无限扩张吗?
答案:不会。commonPool 有固定的并行度限制。但需要注意:当线程被阻塞任务占用时,新任务将无限排队等待执行。
并行度计算:
commonPool并行度 =CPU 核心数 - 1(至少为 1)- 8 核 CPU → commonPool 并行度 = 7
- 可通过
-Djava.util.concurrent.ForkJoinPool.common.parallelism=N覆盖
任务入队机制:当任务提交超过并行度时,ForkJoinPool 不会无限创建线程,而是:
- 任务入队:外部线程随机选择一个工作线程,将任务 push 到其双端队列
- 工作窃取:闲线程从其他线程队列尾部窃取任务
- 不会创建新线程:线程数固定为并行度,不会像 TPE 那样动态扩容
关键风险:线程数最终不可扩张 + 可调度资源稀缺性
- 队列几乎永远不会满:单个 WorkQueue 最大容量约 6700 万(
MAXIMUM_QUEUE_CAPACITY = 1 << 26),在达到这个上限之前,OOM 会先触发 - 不存在类似 CallerRunsPolicy 的机制:ForkJoinPool 的 Javadoc 明确说明,仅在 shutdown 或内部资源耗尽时抛出 RejectedExecutionException,不会让提交线程执行任务
- 真正的风险是任务无限排队:多个业务共用 commonPool 时,若部分任务执行阻塞操作(如 Thread.sleep、DB 查询),会占用有限的线程资源,导致其他任务无法及时执行——这正是许多生产环境事故的根本原因
核心机制:可调度单元 vs 不可调度单元
commonPool 的根本问题在于线程数最终不可扩张,且可调度的线程比不可调度的队列元素更宝贵:
- 线程是 OS 可调度的执行单元,拥有独立的执行上下文和 CPU 时间片
- 队列中的任务只是内存中的数据结构,无法主动获取 CPU 资源,必须依赖线程来执行
- 当工作线程阻塞时(如 Thread.sleep),它让出了 CPU,但没有让出线程的 runnable 位置——该线程仍被标记为"活跃",继续占用 commonPool 的并行度名额
- 结果是:阻塞的线程无法执行新任务,新任务只能无限排队,而 commonPool 又不会创建新线程来补偿(maximumSpares 仅用于补偿 ForkJoinTask 的 join 等待,不用于补偿外部阻塞)
结论:在父子任务场景下,maximumSpares(默认 256)可以在拆分任务时提供充足的补偿线程,避免反向的线程互锁;但对于外部提交的任务,可使用的线程不超过并行度,超过并行度的部分必须排队。
对比:若采用 newCachedThreadPool 这类近乎无限线程的方案,也不会出现父子线程死锁——每个子任务都能获得新线程执行,无需依赖协作式等待或补偿机制。代价是线程数可能无限增长,资源消耗不可控。
任务无限排队的场景:commonPool 线程数 = CPU 核心数 - 1(8 核 CPU 只有 7 个线程),若 7 个线程都被阻塞任务占用,新提交的任务只能无限排队等待——队列本身不可调度,没有可用的可调度单元(线程),任务永远无法执行。
生产环境最佳实践:
1 | |
对 CompletableFuture 的影响
CompletableFuture.runAsync() 默认使用 commonPool()(FIFO 模式),但若显式传入 LIFO 模式的线程池,任务执行顺序可能与提交顺序不同:
1 | |
需注意:CompletableFuture 的 happens-before 关系由回调链保证,与底层线程池调度策略无关。asyncMode 仅影响独立任务的入队/出队顺序,不影响 CompletableFuture 的语义正确性。
ForkJoinPool 常见错误模式
API混用错误
在 ForkJoinTask.compute() 内部应使用 fork()/join() API,而非 pool.submit() 或 pool.invoke()。
1 | |
I/O阻塞错误与资源泄漏
详见 线程池横切对比 - 常见错误用法。
父子任务死锁:传统线程池的致命缺陷与ForkJoinPool的解决方案
问题场景:线程池饥饿死锁
在使用传统ThreadPoolExecutor时,一个经典的陷阱是父子任务使用同一线程池导致的死锁。
死锁复现代码
1 | |
死锁分析
1 | |
这就是经典的线程池饥饿死锁(Thread Pool Starvation Deadlock):
- 必要条件1:父任务持有线程资源
- 必要条件2:父任务阻塞等待子任务
- 必要条件3:子任务需要线程资源才能执行
- 必要条件4:线程池容量有限
传统解决方案的局限性
方案1:增大线程池容量
1 | |
问题:
- 无法预知任务的嵌套深度
- 递归分治算法的任务数量呈指数增长
- 过大的线程池浪费资源,过小仍可能死锁
方案2:使用无界线程池
1 | |
问题:
- 失去对并发度的控制
- 可能创建过多线程,导致OOM或上下文切换开销
- 不适合生产环境
方案3:父子任务使用不同线程池
1 | |
问题:
- 需要预知任务层级结构
- 多层嵌套需要多个线程池
- 资源利用率低,管理复杂
ForkJoinPool的根本性解决:协作式等待
ForkJoinPool通过协作式等待(Cooperative Waiting)从根本上解决了这个问题。
核心机制:join()不是真正的阻塞
1 | |
tryUnpush() 与 doExec():本地任务的快速执行
doJoin() 中的关键调用:
1 | |
tryUnpush(this):尝试从本地队列弹出目标任务
- 工作队列是双端队列,
fork()将任务压入队尾 tryUnpush()检查目标任务是否在队尾,若是则弹出- 仅当任务未被其他线程窃取时才能成功
1 | |
doExec():执行任务的 compute() 方法
- 弹出成功后立即执行,无需调度
- 执行完成后设置 status 为负数(NORMAL/EXCEPTIONAL)
1 | |
为什么先 tryUnpush 再 doExec?
- 如果任务还在本地队尾,直接弹出执行比等待其他线程窃取更快
- 这是一种"自我窃取",避免了任务在不同线程间传递的开销
- 如果 tryUnpush 失败(任务已被窃取或不在队尾),才进入 awaitJoin()
协作等待的核心:awaitJoin()
1 | |
帮助窃取者机制(Help Stealer)
当线程A等待任务T完成时,如果T被线程B窃取:
- A不会阻塞等待
- A会扫描B的工作队列
- A帮助执行B队列中的任务(可能是T的子任务)
- 通过帮助B,间接加速T的完成
1 | |
为什么父子任务可以不相互阻塞?
这个问题的答案涉及ForkJoinTask接口设计的精妙之处:
接口层面的异步化解耦
ForkJoinTask的fork()和join()方法在接口设计上实现了计算与等待的解耦:
1 | |
关键设计点:
- fork()是纯异步的:只负责将任务放入队列,立即返回
- join()是协作式的:不是被动等待,而是主动寻找可执行的工作
- compute()是可分解的:子类通过重写compute()定义分解逻辑
分治模式的天然适配
1 | |
为什么不会死锁:
right.compute()直接在当前线程执行,不占用额外线程left.join()时,如果left还在本地队列顶部,直接弹出执行(tryUnpush)- 如果left被窃取,当前线程不会阻塞,而是帮助执行其他任务
- 即使所有线程都在"等待",它们实际上都在执行任务
线程补偿机制:有限度的弹性
线程可以无限补偿吗?
答案是否定的。ForkJoinPool的线程补偿受到maximumSpares参数的严格限制。
补偿机制的工作原理
1 | |
线程数的硬性上限
ForkJoinPool的线程数永远不会超过:parallelism + maximumSpares
1 | |
当达到上限后会发生什么?
- 无法创建新的补偿线程
- tryCompensate()返回false
- 线程进入真正的阻塞等待(LockSupport.park)
- 如果所有线程都阻塞,可能导致吞吐量下降
为什么要限制补偿?
- 防止线程爆炸:无限补偿可能导致创建过多线程
- 资源保护:每个线程都消耗栈内存(默认1MB)
- 上下文切换开销:过多线程导致调度开销增加
- 设计哲学:ForkJoinPool假设任务是CPU密集型的,不应频繁阻塞
最佳实践
- 避免在ForkJoinTask中执行阻塞I/O
- 如果必须阻塞,使用ManagedBlocker接口
- 合理设置parallelism和maximumSpares
- 监控getPoolSize()和getActiveThreadCount()
1 | |
对比验证
ForkJoinPool版本(不会死锁)
1 | |
执行结果
1 | |
注意:即使只有2个线程,父任务也能完成,因为父线程在join()时直接执行了Child1。
设计启示
| 特性 | ThreadPoolExecutor | ForkJoinPool |
|---|---|---|
| 等待语义 | 阻塞等待(浪费线程) | 协作等待(帮助执行) |
| 父子任务 | 可能死锁 | 天然支持 |
| 线程利用率 | 等待时为0 | 等待时仍在工作 |
| 线程补偿 | 无 | 有限度补偿(maximumSpares) |
| 适用场景 | 独立任务 | 分治/递归任务 |
要点:ForkJoinPool的
join()不是"等待",而是"参与"。线程不会因为等待子任务而闲置,而是主动寻找可执行的工作。这种设计从根本上消除了父子任务死锁的可能性,同时通过有限度的线程补偿机制,在保证系统稳定性的前提下提供了额外的弹性。
结论:设计的本质
ForkJoinPool不是"另一个线程池",而是为分治并行量身定制的执行引擎。其核心设计决策源于对问题域的深刻理解:
- 任务结构驱动执行模型:分治算法的"父-子"任务结构要求特殊的调度策略,工作窃取正是为这种结构优化。
- 局部性优先于公平性:LIFO本地执行牺牲任务执行的公平性,换取时间局部性的显著提升。
- 协作优于竞争:线程从"竞争共享资源"转变为"协作完成任务",资源利用率显著提高。
- 动态适应优于静态配置:与ThreadPoolExecutor的"核心-最大"静态模型不同,ForkJoinPool通过目标并行度+spare线程机制,动态适应工作负载。
- 资源效率优于固定开销:与TPE保持核心线程不同,FJP回收所有空闲线程,适合间歇性负载。
正如Doug Lea在论文结论中所述:
“This paper has demonstrated that it is possible to support portable, efficient, scalable parallel processing in pure Java, with a programming model and framework that can be convenient for programmers.”
(本论文证明了,纯粹的Java语言也能够实现可移植、高效可伸缩的并行处理,并且能够为程序员提供便捷的编程模型和框架。)
理解ForkJoinPool的核心数据结构和设计哲学,才能在正确场景发挥其价值。它不是万能的,但在分治并行领域,它代表了并发计算的理论最优解。
ForkJoinPool参考文献:
- Doug Lea. “A Java Fork/Join Framework”. In Proceedings of the ACM 2000 conference on Java Grande, 2000. https://gee.cs.oswego.edu/dl/papers/fj.pdf
线程池横切对比
本章节横切对比 ThreadPoolExecutor、ScheduledThreadPoolExecutor、ForkJoinPool 三种线程池实现在队列架构、execute 方法、异常处理、生命周期管理等方面的差异。
WorkQueue 队列架构对比
Java 线程池体系中的三种核心实现在任务队列的设计上有着根本性的差异,这些差异直接决定了它们各自的适用场景和性能特征。
队列架构对比总览
| 特性 | ThreadPoolExecutor | ScheduledThreadPoolExecutor | ForkJoinPool |
|---|---|---|---|
| 队列类型 | 单一共享阻塞队列 | 单一共享延迟队列 | 每线程私有双端队列 |
| 队列实现 | BlockingQueue<Runnable>(可配置) |
DelayedWorkQueue(内置) |
WorkQueue[](内置) |
| 数据结构 | 链表/数组(依具体实现) | 二叉堆(最小堆) | 环形数组 |
| 访问模式 | FIFO(先进先出) | 按时间优先级 | LIFO/FIFO(可配置) |
| 线程竞争 | 高(所有线程共享) | 高(所有线程共享) | 低(本地操作无锁) |
ThreadPoolExecutor 的 BlockingQueue
ThreadPoolExecutor 使用单一共享的 BlockingQueue<Runnable> 作为任务缓冲区,这是最经典的生产者-消费者模式。
核心特性:
- 可配置性:允许用户在构造时传入任意
BlockingQueue实现 - 共享竞争:所有工作线程从同一队列获取任务,存在锁竞争
- 容量可控:可选择有界队列(防止 OOM)或无界队列(提高吞吐)
常用队列选择:
| 队列类型 | 有界性 | 适用场景 | 风险 |
|---|---|---|---|
ArrayBlockingQueue |
有界 | 生产消费速率相近,需控制内存 | 无 |
LinkedBlockingQueue |
可配置 | IO 密集型,需要缓冲 | 默认无界,可能 OOM |
SynchronousQueue |
无容量 | 任务需立即执行,CachedThreadPool | 可能创建大量线程 |
PriorityBlockingQueue |
无界 | 任务有优先级区分 | 可能 OOM |
任务调度流程:
1 | |
详细说明见 ThreadPoolExecutor 任务缓冲 章节。
ScheduledThreadPoolExecutor 的 DelayedWorkQueue
基于**二叉堆(最小堆)**实现的延迟队列,任务按执行时间排序,最早到期的任务位于堆顶。
| 操作 | 时间复杂度 | 说明 |
|---|---|---|
| 入队 | O(log n) | 堆调整 |
| 出队 | O(log n) | 取堆顶 + 堆调整 |
| 查看队首 | O(1) | 直接访问堆顶 |
核心机制:Leader-Follower 模式避免多线程同时等待导致的唤醒风暴。
数据结构选择(二叉堆vs跳表)、Leader-Follower 工作原理详见 DelayedWorkQueue 的数据结构选择。
ForkJoinPool 的 WorkQueue
ForkJoinPool 采用每线程私有双端队列的架构,这是工作窃取算法的基础。
核心特性:队列私有化(避免共享竞争)、双端操作(owner 用 top,stealer 用 base)、本地操作无锁化(仅窃取用 CAS)、动态扩容(最大约 6700 万任务)。
数据结构:
1 | |
操作模式:owner 从 top 端 push/pop(LIFO/FIFO 由 asyncMode 决定),stealer 从 base 端 poll(始终 FIFO)。
工作窃取的完整原理、LIFO/FIFO 设计智慧详见 工作窃取机制详解 章节。
三者架构图示
1 | |
设计哲学对比
| 维度 | ThreadPoolExecutor | ScheduledThreadPoolExecutor | ForkJoinPool |
|---|---|---|---|
| 调度模型 | 生产者-消费者 | 定时调度 | 工作窃取 |
| 队列目的 | 解耦 + 缓冲 | 时间排序 + 延迟执行 | 负载均衡 + 局部性 |
| 竞争点 | 队列锁 | 队列锁 | 窃取时 CAS |
| 拒绝策略 | 必须配置 | 继承自 TPE | 无需配置(队列动态扩容) |
| 适用场景 | 通用任务 | 定时/周期任务 | 分治并行计算 |
execute() 实现对比
Executor 接口只定义了一个方法 execute(Runnable),但三种线程池实现赋予了它完全不同的语义。理解这些差异,有助于选择正确的线程池类型。
实现对比总览
| 特性 | ThreadPoolExecutor | ScheduledThreadPoolExecutor | ForkJoinPool |
|---|---|---|---|
| execute 语义 | 立即执行 | 延迟为0的调度 | 包装后提交外部队列 |
| 是否调用父类 execute | N/A(基类) | 否,重写为 schedule(0) | N/A(独立实现) |
| 任务入队方式 | 条件判断后入队或创建线程 | 直接 add + ensurePrestart | 包装后 externalPush |
| 线程创建时机 | execute 中动态判断 | ensurePrestart 预创建 | 懒加载 |
| 队列访问 | 通过 queue 成员 | super.getQueue() | externalPush → 共享队列 |
ThreadPoolExecutor:经典的"三段式"判断
ThreadPoolExecutor 的 execute() 实现是最经典的线程池调度逻辑:
1 | |
核心特点:
- execute 内部包含完整的调度逻辑(线程创建、入队、拒绝)
- 线程创建是动态的,根据当前状态实时决策
- 队列通过构造器注入,execute 只负责使用
这是其他线程池设计的"参照系"——理解它才能理解其他实现为何不同。
ScheduledThreadPoolExecutor:语义转换 + 直接入队
1 | |
schedule() 内部调用 delayedExecute() 直接入队。delayedExecute() 的详细实现见 ScheduledExecutorService 与 AbstractExecutorService 的关系辨析 章节。
设计意图:
- API 兼容:继承 ThreadPoolExecutor,必须实现 execute() 接口
- 强制统一路径:所有任务都走 schedule → DelayedWorkQueue,确保延时语义一致
- 跳过三段式判断:直接入队 + ensurePrestart,因为定时任务不适合"队列满则创建线程"的逻辑
为什么不调用 super.execute()?
如果调用 super.execute(command),任务会走父类的三段式判断。虽然 ScheduledThreadPoolExecutor 构造器已硬编码 DelayedWorkQueue,但 execute 也必须重写才能确保所有任务都走统一的 schedule 路径,而非父类的入队逻辑。
ForkJoinPool:包装 + 外部队列
1 | |
设计意图:
- 类型适配:Runnable 必须包装为 ForkJoinTask 才能进入工作窃取体系
- 统一入口:无论外部提交还是内部 fork,最终都通过 externalPush 进入队列
- 独立体系:ForkJoinPool 继承 AbstractExecutorService 而非 ThreadPoolExecutor,execute 是全新实现
externalPush vs super.execute:
ForkJoinPool 没有继承 ThreadPoolExecutor,所以不存在"是否调用父类 execute"的问题。它的 execute 实现是独立设计的,核心是:
- 包装任务(如果需要)
- 提交到共享的 external queue
- 工作窃取机制负责后续调度
对比图示
1 | |
核心洞察
三种实现的差异源于各自的设计目标:
| 设计目标 | execute 实现策略 |
|---|---|
| ThreadPoolExecutor:通用任务执行 | execute 包含完整调度逻辑,灵活但复杂 |
| ScheduledThreadPoolExecutor:延时/周期调度 | execute 语义转换,强制走延时队列 |
| ForkJoinPool:分治并行计算 | execute 是适配层,核心在工作窃取 |
一句话总结:ThreadPoolExecutor 的 execute 是调度中枢;ScheduledThreadPoolExecutor 的 execute 是语义转换;ForkJoinPool 的 execute 是类型适配。
异常处理汇总
三种线程池的异常处理对比
| 维度 | ThreadPoolExecutor | ScheduledThreadPoolExecutor | ForkJoinPool |
|---|---|---|---|
| 任务异常传播 | Worker继续存活,取下一个任务 | 周期任务异常导致后续调度终止 | 任务状态记录异常,不影响其他任务 |
| 异常捕获位置 | Worker.run() 的 finally 块 | FutureTask.runAndReset() | ForkJoinTask.setException() |
| 异常后线程行为 | 线程继续存活 | 线程继续存活,但任务不再调度 | 线程继续存活 |
| 异常获取方式 | Future.get() 抛出 ExecutionException | Future.get() 永久阻塞(周期任务) | ForkJoinTask.get() 抛出 ExecutionException |
ThreadPoolExecutor 异常处理
普通任务抛出未捕获异常后,Worker 线程继续存活,从队列取下一个任务。异常可通过 Future.get() 获取。
1 | |
ScheduledThreadPoolExecutor 异常处理
铁律:周期任务必须用 try-catch(Throwable) 包裹全部逻辑,否则任务会在首次异常后停止后续调度。
1 | |
详细源码分析见 周期任务异常终止的深度解析。
ForkJoinPool 异常处理
ForkJoinTask 执行异常会通过 setException() 记录,不影响其他任务。异常可通过 ForkJoinTask.get() 或 ForkJoinTask.exception() 获取。
1 | |
常见错误用法
错误1: 使用无界队列导致OOM
newFixedThreadPool 使用 LinkedBlockingQueue(默认容量 Integer.MAX_VALUE),任务积压会导致堆内存耗尽。
正确做法:使用有界队列 + 拒绝策略。
错误2: newCachedThreadPool导致线程爆炸
newCachedThreadPool 最大线程数为 Integer.MAX_VALUE,任务持续提交会无限创建线程。
正确做法:限制最大线程数。
错误3: 不设置线程名称导致排查困难
默认线程名为 pool-1-thread-1,多个线程池时无法区分。
正确做法:自定义 ThreadFactory 设置有意义的名称。
错误4: shutdown 后立即 awaitTermination
shutdown() 只是不再接受新任务,队列中的任务还在执行。立即 awaitTermination 可能导致任务丢失。
正确做法:根据业务设置合理的等待时间,分阶段关闭。
错误5: ForkJoinPool 中执行阻塞I/O
ForkJoinPool 设计用于 CPU 密集型计算,阻塞 I/O 会占用有限的线程资源,导致其他任务无限排队。
正确做法:I/O 操作使用独立的线程池。
错误6: ForkJoinPool 不关闭
ForkJoinPool 不会自动释放线程池实例持有的内部资源。
正确做法:显式调用 shutdown() 或使用 try-with-resources(JDK 19+)。
生命周期管理对比
关闭机制对比
| 维度 | ThreadPoolExecutor | ScheduledThreadPoolExecutor | ForkJoinPool |
|---|---|---|---|
| 关闭入口 | shutdown() / shutdownNow() | 继承自 TPE | shutdown() / shutdownNow() |
| 优雅关闭 | awaitTermination() | 继承自 TPE | awaitQuiescence() |
| 状态机 | RUNNING → SHUTDOWN/STOP → TIDYING → TERMINATED | 继承自 TPE | 无显式状态机,通过 ctl 字段管理 |
| 线程回收 | 依赖 keepAliveTime | 继承自 TPE | 所有线程空闲时自动回收 |
ThreadPoolExecutor 生命周期
1 | |
ForkJoinPool 生命周期
ForkJoinPool 没有显式的状态机,通过 ctl 字段管理线程状态。所有线程在空闲时都会被回收,不存在 core thread 空转问题。
1 | |
监控指标对比
三种线程池的监控API
| 指标 | ThreadPoolExecutor | ScheduledThreadPoolExecutor | ForkJoinPool |
|---|---|---|---|
| 当前线程数 | getPoolSize() | 继承自 TPE | getPoolSize() |
| 活跃线程数 | getActiveCount() | 继承自 TPE | getActiveThreadCount() |
| 最大线程数 | getMaximumPoolSize() | 继承自 TPE | getParallelism() |
| 队列大小 | getQueue().size() | 继承自 TPE | getQueuedSubmissionCount() |
| 已完成任务数 | getCompletedTaskCount() | 继承自 TPE | getStealCount()(窃取次数) |
| 拒绝次数 | 需自行包装 RejectedExecutionHandler | 继承自 TPE | 无(仅在 shutdown/资源耗尽时拒绝) |
ThreadPoolExecutor 监控实践
1 | |
ForkJoinPool 监控实践
1 | |
The Executors
provides convenient factory methods for these Executors.
常用工厂方法详解
java.util.concurrent.Executors 类提供了多个工厂方法用于创建预配置的线程池实现。这些方法简化了常见场景下的线程池创建,但开发者必须理解其内部配置的适用场景和潜在风险。
graph TB
A[Executors 工厂方法] --> B[newFixedThreadPool]
A --> C[newCachedThreadPool]
A --> D[newSingleThreadExecutor]
A --> E[newSingleThreadScheduledExecutor]
A --> F[newScheduledThreadPool]
A --> G[newWorkStealingPool]
B --> B1["固定大小线程池"]
B --> B2["无界队列"]
B --> B3["适用于限流场景"]
C --> C1["可缓存线程池"]
C --> C2["SynchronousQueue"]
C --> C3["适用于短任务"]
D --> D1["单线程执行器"]
D --> D2["无界队列"]
D --> D3["顺序执行保证"]
E --> E1["单线程调度器"]
E --> E2["支持定时/周期"]
E --> E3["顺序调度保证"]
F --> F1["多线程调度器"]
F --> F2["支持定时/周期"]
F --> F3["固定大小"]
G --> G1["工作窃取池"]
G --> G2["ForkJoinPool"]
G --> G3["并行任务优化"]newFixedThreadPool
1 | |
内部配置:
- 核心线程数:
nThreads - 最大线程数:
nThreads(等于核心线程数) - 空闲线程存活时间:0
- 工作队列:
LinkedBlockingQueue(无界队列) - 拒绝策略:
AbortPolicy(抛出RejectedExecutionException)
优点:
- 线程数量固定,资源消耗可预测,适合限流场景
- 通过无界队列保证任务不会丢失
- 核心线程不会回收,减少线程创建开销
缺点:
- 无界队列风险:任务提交速度持续超过处理速度时,队列会无限增长,可能导致
OutOfMemoryError - 无法应对突发性任务高峰(因为最大线程数等于核心线程数)
- 队列积压会导致任务延迟增加
适用场景:
- 任务执行时间相对稳定
- 需要限制系统资源使用
- 任务可以接受排队等待
- 典型应用:数据库连接池辅助、限流的批处理任务
newCachedThreadPool
1 | |
内部配置:
- 核心线程数:0
- 最大线程数:
Integer.MAX_VALUE(理论无界) - 空闲线程存活时间:60秒
- 工作队列:
SynchronousQueue(不存储元素,直接传递) - 拒绝策略:
AbortPolicy
命名解析:
"cached"源于其核心的线程缓存复用机制:
- 线程执行完任务后进入60秒缓存期而非立即销毁
- 缓存期内的新任务可直接复用现有线程
- 减少线程创建/销毁开销,实现资源的有效利用
这种设计使线程池能够在任务执行间隙实现线程复用,体现了"缓存"的核心语义。
优点:
- 能够快速响应大量短时任务
- 空闲线程自动回收,节省资源
- 无队列积压,任务提交即执行(有空闲线程时)
缺点:
- 线程数无界风险:任务提交速度持续超过处理速度时,线程数会无限增长,可能导致
OutOfMemoryError或系统资源耗尽 - 不适合长时间运行的任务
- 线程创建和销毁有性能开销
适用场景:
- 大量短时异步任务
- 任务执行时间不可预测但通常很短
- 对响应速度要求高
- 典型应用:异步日志记录、HTTP 请求分发
newSingleThreadExecutor
1 | |
内部配置:
- 核心线程数:1
- 最大线程数:1
- 空闲线程存活时间:0
- 工作队列:
LinkedBlockingQueue(无界队列) - 拒绝策略:
AbortPolicy
优点:
- 保证任务按提交顺序执行(FIFO)
- 无并发安全问题(单线程)
- 不可重新配置(委托模式封装)
套壳机制解析:
FinalizableDelegatedExecutorService 解决两个问题:
-
防止重新配置:
DelegatedExecutorService将ThreadPoolExecutor包装为仅暴露ExecutorService接口,调用者无法强转为ThreadPoolExecutor调用setCorePoolSize()等方法,从而保证 Javadoc 承诺的"guaranteed not to be reconfigurable to use additional threads" -
防止资源泄漏:
FinalizableDelegatedExecutorService在finalize()中自动调用shutdown(),避免用户忘记关闭线程池导致的资源泄漏。JDK 9+ 将其重命名为AutoShutdownDelegatedExecutorService,语义更清晰
对比:newFixedThreadPool(1) 直接返回 ThreadPoolExecutor,可被强转后修改线程数
缺点:
- 无界队列风险:任务积压可能导致 OOM
- 吞吐量受限于单线程性能
- 任务执行失败会影响后续任务
适用场景:
- 需要保证执行顺序的任务
- 避免并发竞争的场景
- 事务性操作(需要串行化)
- 典型应用:数据库事务操作、文件顺序写入
newSingleThreadScheduledExecutor
1 | |
内部配置:
- 基于
ScheduledThreadPoolExecutor,核心线程数为1 - 支持
schedule、scheduleAtFixedRate、scheduleWithFixedDelay - 使用
DelayedWorkQueue作为工作队列
优点:
- 支持定时和周期性任务
- 保证任务顺序执行
- 延迟任务调度精确
缺点:
- 单线程限制吞吐量
- 周期任务执行时间过长会影响后续调度
- 任务异常会导致后续周期任务停止
适用场景:
- 定时任务(如心跳检测)
- 周期性数据清理
- 需要严格顺序的定时任务
newScheduledThreadPool
1 | |
内部配置:
- 核心线程数:
corePoolSize - 最大线程数:
Integer.MAX_VALUE - 工作队列:
DelayedWorkQueue - 支持延迟和周期性任务
优点:
- 支持定时和周期性任务
- 多线程提高吞吐量
- 延迟调度精确
缺点:
- 最大线程数无界
- 周期任务执行时间过长会影响后续调度
- 相比
newSingleThreadScheduledExecutor无顺序保证
适用场景:
- 多定时任务并发执行
- 周期性任务需要并行处理
- 批量定时调度
newWorkStealingPool(JDK 8+)
1 | |
内部配置:
- 基于
ForkJoinPool - 默认并行度:
Runtime.getRuntime().availableProcessors() - 工作窃取算法优化任务分配
- 使用
ForkJoinPool.WorkQueue
优点:
- 工作窃取算法提高 CPU 利用率
- 适合分治并行任务
- 自动负载均衡
- 支持异步任务和递归任务
缺点:
- 不适合阻塞操作(会降低工作窃取效率)
- 任务粒度过小会增加调度开销
- 与传统
ThreadPoolExecutor语义不同
适用场景:
- 分治算法(如归并排序)
- 递归并行任务
- CPU 密集型并行计算
- 典型应用:并行流处理、大数据计算
工厂方法对比总结
| 工厂方法 | 核心线程数 | 最大线程数 | 工作队列 | 主要风险 | 适用场景 |
|---|---|---|---|---|---|
newFixedThreadPool |
n | n | LinkedBlockingQueue(无界) | OOM(队列积压) | 限流、稳定负载 |
newCachedThreadPool |
0 | MAX_VALUE | SynchronousQueue | OOM(线程爆炸) | 短时任务、突发负载 |
newSingleThreadExecutor |
1 | 1 | LinkedBlockingQueue(无界) | OOM(队列积压) | 顺序执行、事务操作 |
newSingleThreadScheduledExecutor |
1 | MAX_VALUE | DelayedWorkQueue | 单点瓶颈 | 定时任务、顺序调度 |
newScheduledThreadPool |
n | MAX_VALUE | DelayedWorkQueue | 线程爆炸 | 并发定时任务 |
newWorkStealingPool |
parallelism | parallelism | ForkJoinPool.WorkQueue | 不适合阻塞任务 | 分治并行、CPU密集型 |
生产环境建议
根据 Java 并发实践专家的建议(基于 JSR-166 规范和 Javadoc):
- 避免使用无界队列:生产环境应使用有界队列(如
ArrayBlockingQueue)或自定义拒绝策略 - 避免使用无界线程数:明确设置合理的最大线程数
- 为线程池命名:使用自定义
ThreadFactory设置有意义的线程名称,便于问题排查 - 显式指定拒绝策略:根据业务需求选择合适的拒绝策略
- 监控线程池状态:通过
ThreadPoolExecutor提供的监控方法跟踪活跃线程数、队列大小等指标
1 | |
包装方法:unconfigurableExecutorService
Executors 还提供了一组包装方法,用于将任意线程池转换为不可配置的视图:
1 | |
设计目的:
-
安全性:将线程池暴露给不可信代码时,防止调用者通过强转为
ThreadPoolExecutor后修改核心参数(线程数、队列、拒绝策略等) -
API 边界保护:库/框架作者可向调用者提供线程池实例,同时保留配置控制权
典型场景:
1 | |
调用者拿到的实例无法强转为 ThreadPoolExecutor,只能使用 ExecutorService 接口定义的方法。框架内部仍持有原始引用,可按需调整配置。
与 newSingleThreadExecutor 的关系:unconfigurableExecutorService 返回 DelegatedExecutorService,而 newSingleThreadExecutor 返回其子类 FinalizableDelegatedExecutorService(增加了 finalize 自动关闭)
构造器 vs 工厂方法:选择依据
阿里巴巴代码规范要求强制使用 ThreadPoolExecutor 构造器创建线程池,禁止使用 Executors 工厂方法。这一规范的核心依据在于:
- 默认配置陷阱:工厂方法的预设参数(尤其是无界队列容量
Integer.MAX_VALUE和无界最大线程数Integer.MAX_VALUE)可能在生产环境中导致资源耗尽(OOM 或线程爆炸) - 强制思考原则:构造器强制开发者在实例化时必须明确指定核心参数(队列容量、最大线程数、拒绝策略),而非依赖隐式默认值
然而,这一规范并非要求我们完全摒弃工厂方法。选择何种创建方式,应当基于具体线程池类型的语义特征做出判断。
ThreadPoolExecutor:优先使用构造器
对于通用目的的线程执行器,强烈建议使用构造器。理由如下:
- 核心线程数和最大线程数需要根据业务负载特征(CPU 密集型 vs IO 密集型)精心配置,依赖默认值往往意味着未经思考的决策
- 队列容量必须设置上限,防止任务积压导致
OutOfMemoryError - 拒绝策略直接影响系统的容错行为和降级能力,需要显式选择而非接受默认的
AbortPolicy
1 | |
ScheduledThreadPoolExecutor:可以使用工厂方法
对于定时任务调度器,在大多数场景下工厂方法是可接受的选择,理由如下:
DelayedWorkQueue与LinkedBlockingQueue本质相同,内部数组按需翻倍扩容,上限为Integer.MAX_VALUE,并非有界队列- 真正的原因在于定时任务与普通任务的本质差异:
- 定时任务的提交频率由业务逻辑控制(如每日凌晨批量处理、每小时执行一次),而非由用户请求触发
- 用户对延时任务积压的容忍度远高于实时任务——队列中积压1000条待执行的定时任务通常可接受(它们只是在等待各自的延迟时间到期),而普通任务积压1000条则意味着系统已过载
- 定时任务的单次提交量通常较小,即使在大业务量系统中,单次调度请求也往往是数十至数百条级别,而非无限制地提交
ScheduledThreadPoolExecutor的核心线程数通常较小(通常为 CPU 核数),即使队列积压,线程数的增长也受限于任务执行时长
关键区分:DelayedWorkQueue 的"无界"风险与 LinkedBlockingQueue 的"无界"风险完全相同。在高频调度场景下(如每秒数千次调度请求),同样可能导致 OOM。因此:
- 低频调度场景(每秒任务数 < 100):工厂方法可接受
- 高频调度场景:应使用构造器,配置有界队列和合理的拒绝策略
尽管如此,在高可靠性要求的系统中,仍推荐使用构造器进行精细化配置:
1 | |
ForkJoinPool:通用并行任务用工厂方法,递归分治任务用构造器
ForkJoinPool 最初确实是为递归分治任务设计的(默认 LIFO 模式利于缓存局部性),但其工作窃取机制的应用范围已扩展到更广泛的并行任务场景。
Executors.newWorkStealingPool() 工厂方法适用于非递归的通用并行任务:
- 默认并行度
Runtime.getRuntime().availableProcessors()正是该池设计的核心目标——充分利用系统 CPU 资源 - 内部传入
asyncMode = true(FIFO 模式),适合非递归的并行任务调度 - 工作窃取算法会自动平衡负载,过度手动调优往往适得其反
关键区分:执行递归分治任务(如归并排序、树遍历、深度优先搜索)时,应使用
ForkJoinPool构造器并指定asyncMode = false(LIFO 模式)。LIFO 模式使子任务在同一个线程中顺序执行,减少线程切换开销;FIFO 模式则让任务更均匀地分配到各个线程,减少长任务阻塞短任务的风险。
当存在以下特定需求时,应直接使用 ForkJoinPool 构造器:
- 需要 LIFO 模式(
asyncMode = false)处理递归分治任务(如归并排序、树遍历)时,LIFO 利于缓存局部性 - 需要自定义线程工厂以设置特定线程属性(如守护线程状态、优先级)
- 需要限制最大线程数以控制资源占用(虽然通常不推荐,但某些隔离场景需要)
1 | |
newCachedThreadPool vs newFixedThreadPool:选择依据
这两个工厂方法均不推荐在生产环境直接使用,原因已在工厂方法对比总结中详述:
newFixedThreadPool使用无界LinkedBlockingQueue,队列积压会导致 OOMnewCachedThreadPool使用Integer.MAX_VALUE作为最大线程数,可能导致线程爆炸
如需使用二者之一,应通过 ThreadPoolExecutor 构造器手动配置:
1 | |
二者的选择依据:任务特征
| 任务特征 | 推荐 |
|---|---|
| 任务量稳定可预测,期望限制并发数 | newFixedThreadPool(或等效构造器) |
| 任务量波动大,存在明显空闲期 | newCachedThreadPool(或等效构造器) |
| 任何生产环境 | 均使用构造器,明确配置队列容量和线程数上限 |
总结
| 线程池类型 | 推荐创建方式 | 核心理由 |
|---|---|---|
ThreadPoolExecutor(通用) |
构造器 | 队列容量和线程数必须有界,拒绝策略必须显式 |
newCachedThreadPool / newFixedThreadPool |
不推荐 | 使用构造器替代,明确配置资源上限 |
ScheduledThreadPoolExecutor |
工厂方法(低频调度)或构造器(高频调度) | 调度频率通常可控,但高频场景需构造器配置有界队列 |
ForkJoinPool |
工厂方法(默认),构造器(特定场景) | 并行度应匹配 CPU 核心数,LIFO 模式需手动指定 |
阿里巴巴代码规范的真正目的不是"禁止工厂方法",而是"强制开发者思考关键配置"。当我们充分理解了每种线程池类型的行为特征后,选择工厂方法或构造器就成为了一种有意识的工程决策,而非盲从或规避。
线程组
线程组提供一个“集合”,可以把一群线程归于一处,可以批量 interrupt/stop/suspend。
但这个方案是很危险的,使用线程池和并发安全的 Collection 都可以管理好线程。
原本设计目的
- 资源管理:将相关线程组织在一起,便于批量操作
- 安全隔离:不同线程组可以有不同的安全策略
- 异常处理:提供组级别的未捕获异常处理
- 层次结构:支持线程组的嵌套(parent-child关系)
缺陷
- API设计不一致且不完整
- 线程安全问题
- 功能缺失
- 安全模型过时
替代方案
- Executor框架
- CompletableFuture
- ForkJoinPool
官方态度
- Java 16+:ThreadGroup 的多个方法(
stop/suspend/resume/destroy/isDaemon/setDaemon/checkAccess等)标记为@Deprecated(forRemoval = true) - JEP 411:废弃 Security Manager,线程组的安全相关方法失去存在意义
- OpenJDK 邮件列表:多次讨论完全移除线程组
CompletionStage
这是定义“可能是”异步计算的一个阶段,可能被其他阶段触发,也可以触发其他阶段。它是 CompletableFuture 的父接口。
它有一个特点,大量非 void 方法返回值都是 CompletionStage 类型,这样既允许 builder 模式,也允许各种 transformation 模式。
CompletableFuture
线程池的超时中断机制
1 | |
会让这个类型中断提前返回:
1 | |
小技巧
如何处理任务超时问题
方法1:使用 FutureTask 的实现
1 | |
方法2:使用条件变量
1 | |
方法3:使用 countDownLatch/CyclicBarrier
1 | |
这个方法不需要依赖于 ReentrantLock,是通过纯 AQS 实现的,见 CountDownLatch 源码。
自定义线程池实现自定义中断
1 | |
Java 异步执行中的异常处理与线程生命周期
从 FutureTask、AsyncUncaughtExceptionHandler 到 UncaughtExceptionHandler
在 Java 并发和 Spring 异步执行模型中,异常处理涉及多个抽象层级:
JVM 线程模型、JDK 并发工具以及 Spring 框架本身。
这些层级各自对异常承担不同职责,但它们的行为经常被混淆,典型问题包括:
- 异步任务抛出的异常为何没有日志
UncaughtExceptionHandler在线程池中为何不生效AsyncUncaughtExceptionHandler是否会影响线程生命周期
本文从线程是否终止这一确定性问题出发,系统梳理三种机制的边界与协作方式。
一、线程是否终止的唯一判定标准
在 JVM 层面,线程是否终止只取决于一个条件:
是否存在未被捕获、并逃逸出
Thread.run()的Throwable。从这个 run 出去以后,就进入 jvm 的cpp 代码的接管范围
这一规则与使用何种框架无关。
会导致线程终止的情况
1 | |
执行结果:
- 异常未被捕获
- 异常逃逸出 run()
- JVM 调用 UncaughtExceptionHandler
- 线程终止
1 | |
源码位置:Thread 的实现
还可以参考这个:《01.崩溃捕获设计实践方案 crash方案》
1 | |
sequenceDiagram
participant JVM as JVM(C++)
participant JavaThread as JavaThread(C++)
participant ThreadJava as java.lang.Thread
JVM->>JavaThread: 线程执行中抛出异常
JavaThread->>JavaThread: set_pending_exception(exception)
JVM->>JavaThread: 线程退出调用 exit()
JavaThread->>JavaThread: has_pending_exception()
JavaThread->>JavaThread: 直接在 exit() 中处理
JavaThread->>ThreadJava: JNI call_virtual("uncaughtException")
ThreadJava->>ThreadJava: 实际调用 java.lang.Thread.uncaughtException
ThreadJava->>ThreadJava: dispatchUncaughtException(e)
ThreadJava->>ThreadGroup: getUncaughtExceptionHandler()
ThreadGroup->>SystemErr: 默认处理不会导致线程终止的情况
1 | |
执行结果:
- 异常被捕获
- JVM 不介入
- 线程继续运行
结论:
- 异常是否被捕获,决定了线程是否终止;
- 异常由谁处理,并不决定线程生死。
二、FutureTask 对异常传播路径的改变
理解线程池与 Spring 异步行为,必须先理解 FutureTask。
execute 与 submit 的根本差异
1 | |
差异不在返回值,而在执行结构:
execute:Runnable直接在线程中执行submit:任务先被包装为FutureTask,再执行
FutureTask 中的异常拦截点
FutureTask.run() 的核心逻辑如下(简化):
1 | |
关键点:
- Throwable 被主动捕获
- 异常不会逃逸出 run()
- JVM 不认为线程发生未捕获异常
线程不会终止
异常在这里已经脱离“线程异常”的语义。
异常如何被重新抛出:report()
异常并未消失,而是作为执行结果存储:
1 | |
在调用Future.get()时:
1 | |
report()的职责是:
- 将“执行结果状态”翻译为 Java 异常语义
- 将原始异常包装为 ExecutionException
结论:
FutureTask 将异常从“线程控制流”转移为“任务结果数据”。
三、UncaughtExceptionHandler 的职责边界
触发条件
UncaughtExceptionHandler仅在以下条件满足时被调用:
- 异常未被捕获
- 异常逃逸出
Thread.run() - 线程即将终止
JVM 调用顺序为:
- Thread 自身的 handler
- ThreadGroup
- DefaultUncaughtExceptionHandler
- JVM 默认 stderr
能力与限制
UncaughtExceptionHandler:
- 无法阻止线程终止
- 无法恢复线程执行
- 仅用于日志、告警等系统级兜底
在线程池中,只有 execute()且异常未被捕获时,才可能触发该 handler。
四、Spring AsyncUncaughtExceptionHandler 的作用范围
适用条件
Spring 明确限定:
- 仅处理 @Async 标注的 void 方法
- 不处理返回 Future / CompletableFuture 的方法
1 | |
Spring 的异常拦截方式
Spring 在异步调用边界处捕获异常:
1 | |
对线程生命周期的影响
AsyncUncaughtExceptionHandler:
- 不会阻止线程终止
- 也不会导致线程终止
原因是:
- 异常已经被 Spring 捕获
- JVM 无法感知未捕获异常
- 线程本身没有死亡条件
结论:
- AsyncUncaughtExceptionHandler 只影响异常的业务处理路径,不影响线程生命周期。
五、三种异常路径的对比
@Async void 方法
1 | |
异常路径:
1 | |
线程池execute
1 | |
异常路径:
1 | |
线程池 submit
1 | |
异常路径:
1 | |
六、两种 Handler 的推荐使用方式
AsyncUncaughtExceptionHandler(业务层)
1 | |
适用场景:
- @Async void 方法
- 业务补偿、告警、日志
UncaughtExceptionHandler(系统层)
1 | |
适用场景:
execute()执行的任务- 系统级兜底监控
有返回值的异步任务
1 | |
必须显式消费异常,否则异常不会被观察到。
结论
- 线程是否终止,仅由异常是否逃逸到 JVM 决定
- FutureTask 和 Spring 已在更高层捕获异常,因此不会触发 JVM 机制
- AsyncUncaughtExceptionHandler 不控制线程生死,仅提供业务回调
- UncaughtExceptionHandler 只用于处理线程终止前的系统级事件
Spring 的异步支持
- 如果只是
@EnableAsync,Spring 会创建一个默认的 SimpleAsyncTaskExecutor(注意不是 ThreadPoolTaskExecutor):- 每个任务都会创建新线程
- 没有线程池复用
- 性能较差,不适合生产环境
- 在这个基础上,再实现
AsyncConfigurer.getAsyncExecutor()就可以让自己的线程池替代框架的 Bean。
ThreadPoolTaskExecutor
ThreadPoolTaskExecutor 是 ExecutorConfigurationSupport 的子类,也包装了一个 ThreadPoolExecutor。
- ExecutorConfigurationSupport 作为基类提供了:
- 生命周期管理:实现了 InitializingBean, DisposableBean
- 配置管理:线程工厂、拒绝策略、优雅关闭等配置
- 模板方法:定义了初始化和销毁的标准流程
特别是:
1 | |
所以在这个 bean 被使用以前,内部线程池要经过一个 afterPropertiesSet 驱动进行初始化和注入这个 ThreadPoolTaskExecutor 线程池外壳。
ThreadPoolTaskExecutor 内部线程池的替换
推荐:使用初始化器装饰
initializeExecutor 初始化过程里会允许我们装饰这个线程池:
1 | |
java 线程池的装饰逻辑就是只覆盖一个public void execute(Runnable command)即可。
这个方法本质上是一切线程池外部提交/执行操作的入口,所以它的执行线程是外部线程而已不是工作线程。
可以说这个壳的其他方法都只是包装一下普通线程的成员方法,但是这个 initializeExecutor 和 decorate 是这个壳特有的,是它存在的意义。
所有外部 command 在执行前都要被 decorate 一下,而且存在 decoratedTaskMap 里,模式是装饰后->原始命令。目前这个map没有用处,未来可能在用修饰后的任务找原始 Runnable 的时候会有用。
其他代理
其他方法都是用类似的模式来代理的,而且不支持多态:
1 | |
如果我们要替换线程池实现
我们只能用反射来替换:
1 | |
我们不推荐使用这种做法,除非我们真的有增强 execute 以外的诉求。
对线程池实行 trace 传递
如果使用统一包装器
1 | |
其中装饰器被调用的地方是就是上面的使用初始化器装饰。
本质上 executor 共有三个入口:
1 | |
前两个 newTaskFor 是其他 submit 方法到 execute 之前的底层方法。因为前两个入口最终都会调到execute(Runnable command),所以它的内部要避开if (command instanceof FutureTask) {的场景。这个设计因此显得比较累赘。
实际上 decorator 的实现就是最佳的,最终只要实现一个 execute 的包装提交就行了。
这个实现里有一个地方要注意:执行完当前的 runnable 需要 clear,否则可能会出现以前有的遗留 traceId 污染的问题。
参考资料:
- 《一行一行源码分析清楚AbstractQueuedSynchronizer》
- 《Java线程池实现原理及其在美团业务中的实践》
- 《CompletableFuture原理与实践-外卖商家端API的异步化》
异步编程的进化
本章节一部分来自于qwen,一部分来自于以下文章:
演进本质
graph LR
A[Java 5 Future] -->|阻塞痛点| B[Guava ListenableFuture]
B -->|回调地狱| C[CompletableFuture]
C -->|流处理需求| D[RxJava]
D -->|Spring整合| E[Reactor]
A -->|范式转变| F[命令式->声明式]
B -->|抽象提升| G[事件驱动->数据流]
C -->|能力增强| H[组合->背压]
D & E -->|统一理念| I[异步即数据流]- 控制流:阻塞等待 → 回调响应 → 声明式组合 → 响应式流
- 错误处理:分散try-catch → 回调onFailure → 链式exceptionally → 流式onError
- 组合能力:无 → 有限transform → 丰富组合操作符 → 完整流处理
- 背压支持:无 → 无 → 有限 → 完整内建支持
| 模式 | 核心特征 | 编程范式 | 适用场景 |
|---|---|---|---|
| Java 5 Future | 阻塞等待 | 命令式 | 简单异步任务,兼容性要求高 |
| Guava ListenableFuture | 回调驱动 | 事件驱动 | 中等复杂度,需要非阻塞回调 |
| CompletableFuture | 链式组合 | 声明式 | 复杂异步流程,需要组合和错误处理 |
| RxJava | 响应式流 | 函数式响应式 | 事件流处理,背压支持,复杂数据转换 |
| Reactor | 响应式流 | 函数式响应式 | Spring生态,高性能流处理,背压内建 |
传统调用时序
Java 5 Future
%%{init: {'theme': 'base', 'themeVariables': { 'primaryColor': '#FFF5E1', 'edgeLabelBackground':'#FFF', 'fontFamily': 'monospace'}}}%%
sequenceDiagram
participant Client as Client
participant Executor as ExecutorService
participant Future as Future<T>
participant Task as Callable<T>
Note over Client,Task: Java 5 Future (阻塞式)
Client->>Executor: submit(Callable)
Executor->>Future: 创建Future
Executor-->>Client: 返回Future
Note right of Client: 非阻塞返回
Executor->>Task: 执行任务
Task-->>Executor: 返回结果
Client->>Future: get() / get(timeout)
Note right of Client: 阻塞等待
Future-->>Client: 返回结果或抛出异常
Note over Client: 阻塞式: submit/get1 | |
Guava ListenableFuture
%%{init: {'theme': 'base', 'themeVariables': { 'primaryColor': '#D5E8D4', 'edgeLabelBackground':'#FFF', 'fontFamily': 'monospace'}}}%%
sequenceDiagram
participant Client as Client
participant Executor as ListeningExecutorService
participant Future as ListenableFuture<T>
participant Callback as FutureCallback<T>
participant Task as Callable<T>
Note over Client,Task: Guava ListenableFuture (回调式)
Client->>Executor: submit(Callable)
Executor->>Future: 创建ListenableFuture
Executor-->>Client: 返回ListenableFuture
Note right of Client: 非阻塞返回
Client->>Future: addCallback(FutureCallback)
Note right of Client: 注册回调,非阻塞
Executor->>Task: 执行任务
Task-->>Executor: 返回结果
Future->>Callback: onSuccess(result) 或 onFailure(ex)
Note over Client: 回调式: submit/addCallback1 | |
这个方案是很容易产生回调地狱的,因为总是会有 addCallback + onSuccess 这种不可编排、组合 api 不适合把大型并发结果组合在一起的缺陷:
1 | |
CompletableFuture
%%{init: {'theme': 'base', 'themeVariables': { 'primaryColor': '#DAE8FC', 'edgeLabelBackground':'#FFF', 'fontFamily': 'monospace'}}}%%
sequenceDiagram
participant Client as Client
participant CF1 as CompletableFuture<T>
participant CF2 as CompletableFuture<U>
participant Executor as Executor
Note over Client,Executor: CompletableFuture (链式组合)
Client->>CF1: supplyAsync(Supplier)
CF1-->>Client: 返回CompletableFuture
Note right of Client: 非阻塞返回
Client->>CF1: thenApply(Function)
CF1->>CF2: 创建新的CompletableFuture
CF2-->>Client: 返回新的CompletableFuture
Note right of Client: 链式组合,非阻塞
Executor->>CF1: 执行任务
CF1->>CF2: 传递结果
CF2-->>Client: 完成时通知
Note over Client: 链式: supplyAsync/thenApply/thenComposeCompletableFuture 和 ListenableFuture 的设计哲学差异:
1 | |
执行树

核心 API
classDiagram
class CompletableFuture~T~ {
<<核心类>>
+T result
+Throwable exception
+Object stack
%% 创建方法
+supplyAsync(Supplier~T~) CompletableFuture~T~
+runAsync(Runnable) CompletableFuture~Void~
+completedFuture(T) CompletableFuture~T~
%% 转换方法
+thenApply(Function) CompletableFuture~U~
+thenApplyAsync(Function) CompletableFuture~U~
+thenCompose(Function) CompletableFuture~U~
%% 消费方法
+thenAccept(Consumer) CompletableFuture~Void~
+thenRun(Runnable) CompletableFuture~Void~
%% 组合方法
+thenCombine(CompletableFuture, BiFunction) CompletableFuture~V~
+allOf(CompletableFuture...) CompletableFuture~Void~
+anyOf(CompletableFuture...) CompletableFuture~Object~
%% 异常处理
+exceptionally(Function) CompletableFuture~T~
+handle(BiFunction) CompletableFuture~U~
+whenComplete(BiConsumer) CompletableFuture~T~
%% 完成方法
+complete(T) boolean
+completeExceptionally(Throwable) boolean
%% 获取结果
+get() T
+join() T
+getNow(T) T
}
class CompletionStage~T~ {
<<接口>>
+thenApply(Function) CompletionStage~U~
+thenCompose(Function) CompletionStage~U~
+thenCombine(CompletionStage, BiFunction) CompletionStage~V~
+exceptionally(Function) CompletionStage~T~
}
class Future~T~ {
<<接口>>
+get() T
+get(long, TimeUnit) T
+cancel(boolean) boolean
+isDone() boolean
+isCancelled() boolean
}
CompletableFuture ..|> CompletionStage : implements
CompletableFuture ..|> Future : implements使用原则
六大原则速览:
| 原则 | 核心要点 | 常见错误 |
|---|---|---|
| 一:传线程池 | 异步回调必须显式指定线程池 | 使用默认 commonPool |
| 二:不吞异常 | 用 exceptionally/handle 处理异常 | 不调用 get/join 导致异常被吞 |
| 三:饱和策略 | 有界队列 + 合适拒绝策略 | 无界队列导致 OOM |
| 四:异常处理 | 链末端统一处理,或用 handle | 只处理部分异常 |
| 五:设超时 | 用 orTimeout 或 get(timeout) | 永远阻塞 |
| 六:不阻塞回调 | 用 thenCompose 替代阻塞调用 | 回调中调用同步阻塞方法 |
原则一:异步回调要传线程池
1 | |
原则二:CompletableFuture 中不要吞异常
1 | |
原则三:自定义线程池时,注意饱和策略
1 | |
原则四:正确进行异常处理
1 | |
原则五:合理设置超时
1 | |
CompletableFuture.allOf 的超时控制
CompletableFuture.allOf 提供了一种更现代的批量任务等待方式,其核心优势体现在以下几个方面:
统一异常处理
传统的 Future.get 方式需要对每个任务单独捕获异常:
1 | |
而 CompletableFuture.allOf 可以通过调用链统一处理所有子任务的异常:
1 | |
这种方式的优势在于:
- 单一职责:异常处理逻辑集中在一处,易于维护
- 避免重复:不需要为每个任务写相同的 try-catch
- 声明式风格:通过函数式编程链表达"等待所有完成,统一处理异常"的意图
组合式编程
CompletableFuture.allOf 支持链式调用,可以轻松组合多个异步操作:
1 | |
与 Future.get 的关键区别
| 维度 | Future.get 逐个等待 | CompletableFuture.allOf |
|---|---|---|
| 等待策略 | 串行等待,总时间 = N x timeout | 并行等待,总时间 = max(各任务时间) |
| 异常处理 | 每个任务单独 try-catch | 统一的 exceptionally 处理 |
| 超时语义 | 每个任务独立的超时 | 整体超时(所有任务的总时间) |
| 代码风格 | 命令式,循环 + try-catch | 声明式,链式调用 |
| 灵活性 | 可以中途退出(break/continue) | 必须等待所有任务完成 |
注意事项
- 超时控制:
allOf本身不提供超时功能,需要配合get(timeout)或orTimeout使用 - 无法中途退出:一旦调用
allOf,必须等待所有任务完成(即使部分任务已经失败) - 异常传播:任何一个子任务失败,
allOf都会失败,异常会被封装在CompletionException中
CompletableFuture.orTimeout 底层实现深入分析
CompletableFuture.orTimeout() 和 JavaScript 的 Promise.race + setTimeout 在表面上实现了相同的功能——为异步操作附加超时控制。但二者的底层机制截然不同,这种差异根植于两种语言完全不同的并发模型。
orTimeout 源码剖析
1 | |
与 JavaScript setTimeout 的对比
1 | |
二者的关键差异可以从以下维度理解:
graph TB
subgraph Java["Java CompletableFuture.orTimeout"]
J1["ScheduledThreadPoolExecutor<br/>(守护线程池,全局共享)"]
J2["DelayQueue (最小堆)<br/>O(log n) 插入/取消"]
J3["独立线程执行超时回调"]
J4["多线程环境:需要 CAS/volatile<br/>保证 completeExceptionally 的线程安全"]
J1 --> J2 --> J3 --> J4
end
subgraph JS["JavaScript setTimeout"]
JS1["事件循环定时器队列<br/>(libuv / 浏览器引擎)"]
JS2["红黑树或最小堆<br/>O(log n) 管理"]
JS3["主线程在下一个 tick 执行回调"]
JS4["单线程环境:天然无竞态<br/>无需同步原语"]
JS1 --> JS2 --> JS3 --> JS4
end
style Java fill:#FFF3E0
style JS fill:#FFFDE7| 维度 | Java CompletableFuture.orTimeout |
JavaScript Promise.race + setTimeout |
|---|---|---|
| 定时器实现 | ScheduledThreadPoolExecutor(线程池 + DelayQueue) |
事件循环内置定时器(libuv 红黑树 / 浏览器最小堆) |
| 回调执行线程 | ScheduledThreadPoolExecutor 的工作线程 | 主线程(事件循环的下一个 tick) |
| 线程安全 | 需要 CAS 保证 completeExceptionally 的原子性 |
单线程,天然无竞态 |
| 取消机制 | Canceller 在 Future 正常完成时取消定时任务;setRemoveOnCancelPolicy(true) 避免队列堆积 |
clearTimeout 从定时器队列移除;但 Promise.race 无法自动取消 |
| 精度 | 依赖 ScheduledThreadPoolExecutor 的调度精度(通常毫秒级) |
依赖事件循环 tick 频率(通常毫秒级,但受主线程阻塞影响) |
| 资源开销 | 全局共享 1 个守护线程 + DelayQueue 堆操作 | 零额外线程,定时器由运行时管理 |
| 任务真正取消 | orTimeout 不会取消原始任务的执行线程 |
setTimeout 不会取消原始 fetch 请求 |
共同缺陷:超时不等于取消
无论是 Java 的 orTimeout 还是 JavaScript 的 Promise.race,超时后原始任务都不会被真正取消。Java 中 supplyAsync 提交的任务仍在线程池中运行;JavaScript 中 fetch 请求仍在进行网络 IO。要实现真正的取消,Java 需要配合 cancel(true) + 中断检查,JavaScript 需要使用 AbortController。
1 | |
本质差异:Java 的 CompletableFuture 是在多线程模型上构建的异步抽象,超时调度需要额外的线程池和同步机制;JavaScript 的 Promise 是在单线程事件循环上构建的异步抽象,超时调度由运行时内置的定时器队列完成,无需额外线程。二者在 API 层面趋于一致(都是"给异步操作附加超时"),但底层的复杂度差异巨大——这正是并发模型选择对上层 API 设计的深远影响。
原则六:避免在回调中阻塞
1 | |
完成保证原则
完成保证原则(Completion Guarantee Principle)是 CompletableFuture 编程中的一个核心设计模式,其核心思想是:
在调用
join()或get()之前,确保目标 Future 已经完成,从而将阻塞操作转化为非阻塞的结果获取。
为什么需要完成保证原则?
1 | |
完成保证原则的核心模式
1 | |
完整示例
1 | |
对传统的线程池的效率改进
CompletableFuture 相对于一般线程池的改进主要来自于对于复杂结果编排的 API 优化,本身并不提供性能优化。
如果要实现性能优化,可以
- 基于 Netty/NIO 实现了真正的异步 RPC:
- 发起调用后立即返回,不阻塞线程;
- 结果由 Netty 的 IO 线程(或专用回调线程)在数据到达时触发;
- 一个 IO 线程可同时管理成千上万个连接(C10K+)。
- CompletableFuture 被用作"胶水层":
- 将 NIO 回调封装为 CompletableFuture(如 toCompletableFuture 工具方法);
- 用 thenCompose / allOf 等组合多个异步 RPC;
- 业务逻辑不再关心回调注册,只关注数据流依赖。
graph TD
A["Client Request"] --> B["Inbound IO Thread<br>Netty EventLoop"]
B --> C["Business Worker Thread<br>from biz-pool"]
C --> d1["Create CF1 = new CompletableFuture()"]
C --> d2["Create CF2 = new CompletableFuture()"]
C --> d3["Create CF3 = new CompletableFuture()"]
d1 --> e1["Register Observer1:<br>onSuccess → CF1.complete(...)<br>onFailure → CF1.completeEx(...)"]
d2 --> e2["Register Observer2:<br>onSuccess → CF2.complete(...)<br>onFailure → CF2.completeEx(...)"]
d3 --> e3["Register Observer3:<br>onSuccess → CF3.complete(...)<br>onFailure → CF3.completeEx(...)"]
e1 --> f1["Call mtthrift.async(orderService, Observer1)"]
e2 --> f2["Call mtthrift.async(productService, Observer2)"]
e3 --> f3["Call mtthrift.async(deliveryService, Observer3)"]
f1 --> g["Outbound IO Thread<br>Netty Client EventLoop"]
f2 --> g
f3 --> g
g --> h1["(orderService)"]
g --> h2["(productService)"]
g --> h3["(deliveryService)"]
h1 -->|Response| i1["Outbound IO Thread invokes<br>Observer1.onSuccess(result)"]
h2 -->|Response| i2["Outbound IO Thread invokes<br>Observer2.onSuccess(result)"]
h3 -->|Error| i3["Outbound IO Thread invokes<br>Observer3.onFailure(ex)"]
i1 --> j1["CF1.complete(result)"]
i2 --> j2["CF2.complete(result)"]
i3 --> j3["CF3.completeExceptionally(ex)"]
j1 --> k1["CF1.thenApplyAsync(enrichOrder, cpu-pool)"]
j2 --> k2["CF2.thenApplyAsync(enrichProduct, cpu-pool)"]
j3 --> k3["CF3.exceptionally(handleFallback)"]
k1 --> l["CF4 = CF1.thenCombine(CF2, merge)"]
k2 --> l
k1 --> m["CompletableFuture.allOf(CF1..CF30)"]
k2 --> m
k3 --> m
m --> n["m.thenApplyAsync(aggregateAll, cpu-pool)"]
n --> o["Final Result"]
o --> p["Write Response via Inbound IO Thread"]
p --> q["Client"]
classDef io fill:#d5e8d4,stroke:#82b366;
classDef worker fill:#dae8fc,stroke:#6c8ebf;
classDef outbound fill:#e1d5e7,stroke:#9673a6;
classDef cf fill:#fff2cc,stroke:#d6b656;
classDef service fill:#f8cecc,stroke:#b85450;
classDef observer fill:#e6e6fa,stroke:#999;
class B,p io
class C,d1,d2,d3,e1,e2,e3,f1,f2,f3,k1,k2,k3,l,m,n worker
class g,i1,i2,i3 outbound
class j1,j2,j3,o cf
class h1,h2,h3 service
class e1,e2,e3 observerSpring框架中的线程池实现与最佳实践
Spring线程池体系概述
Spring框架提供了多层次的线程池抽象,从底层的JDK线程池封装到高层的应用级线程池管理:
graph TD
A[Spring线程池体系] --> B{抽象层级}
B -->|底层封装| C[TaskExecutor接口]
B -->|中层实现| D[ThreadPoolTaskExecutor]
B -->|高层管理| E[TaskScheduler]
B -->|应用集成| F[@Async注解支持]
C --> G[SimpleAsyncTaskExecutor]
C --> H[ConcurrentTaskExecutor]
C --> I[ThreadPoolTaskExecutor]
D --> J[配置属性]
D --> K[生命周期管理]
D --> L[监控指标]
E --> M[定时任务]
E --> N[Cron表达式]
E --> O[延迟执行]核心组件详解
TaskExecutor接口设计
1 | |
设计优势:
- 解耦了应用代码与具体线程池实现
- 提供了统一的异常处理机制
- 支持任务装饰器模式
ThreadPoolTaskExecutor实现
1 | |
与原生线程池的映射关系
| Spring组件 | JDK原生组件 | 配置映射 |
|---|---|---|
| ThreadPoolTaskExecutor | ThreadPoolExecutor | 1:1直接映射 |
| SimpleAsyncTaskExecutor | ThreadFactory | 每次创建新线程 |
| ConcurrentTaskExecutor | ExecutorService | 适配器模式 |
graph LR
A[ThreadPoolTaskExecutor] --> B[ThreadPoolExecutor]
A --> C[配置参数映射]
C --> D[corePoolSize]
C --> E[maxPoolSize]
C --> F[keepAliveTime]
C --> G[workQueue]
B --> H[实际执行]定时任务:ScheduledExecutorService vs Timer
为什么不推荐使用 Timer?
在 Java 5(2004年)引入 ScheduledExecutorService 之前,java.util.Timer 是实现定时任务的标准方式。但 Timer 有以下严重缺陷:
| 特性 | Timer | ScheduledExecutorService |
|---|---|---|
| 线程模型 | 单线程执行所有任务;异常后线程终止,无补偿机制 | 线程池支持并行;Worker异常退出后自动创建新线程补偿 |
| 异常处理 | 任何任务抛出异常会导致 Timer 线程终止,所有后续任务(含不相干任务)全部停止 | 异常隔离:周期任务异常后该任务停止调度,但不影响其他独立任务 |
| 时间精度 | 系统时钟敏感,受系统时间调整影响-所以使用的是墙上时钟 | 相对稳定,使用 System.nanoTime(),使用单调系统时钟 |
| 灵活性 | 仅支持 schedule(TimerTask, delay)、schedule(TimerTask, delay, period)、scheduleAtFixedRate |
支持 schedule(Callable) 返回结果、scheduleAtFixedRate、scheduleWithFixedDelay、可配置 RemoveOnCancelPolicy 等 |
| 配置调整 | 创建后无法调整线程数等参数 | 支持动态调整 corePoolSize 等参数 |
Timer 的致命缺陷示例:
1 | |
输出:
1 | |
ScheduledExecutorService 的正确行为:
1 | |
输出:
1 | |
结论:永远不要在生产环境使用 Timer,它已经被 ScheduledExecutorService 完全取代。
Spring @Scheduled 的默认陷阱:单线程调度器
问题描述
在 Spring 中,@Scheduled 的执行由 TaskScheduler/ScheduledTaskRegistrar 驱动。未显式配置时,很多场景会退化到单线程调度器。
这是一个长期存在的坑,不同 Spring Boot 版本与配置路径略有差异:
- Spring Boot 2.x: 默认使用单线程的
ConcurrentTaskScheduler - Spring Boot 3.x: 仍然是单线程,但提供了更好的配置支持(
spring.task.scheduling.pool.size) - 核心问题: 无论哪个版本,默认调度器线程池大小都是1,需要显式配置才能并行执行
但"默认不一定是你想要的并行度"是核心问题。
问题影响
结果:一个定时任务慢了,会拖住其他任务的触发/执行。
sequenceDiagram
participant T1 as Task1 (慢任务)
participant T2 as Task2 (正常任务)
participant T3 as Task3 (正常任务)
participant S as 单线程调度器
Note over S: 默认配置:单线程
S->>T1: 执行 Task1
T1->>T1: 执行中...(耗时5秒)
Note over T2,T3: Task2 和 Task3 等待
T2--xS: 无法执行
T3--xS: 无法执行
T1->>S: 完成
S->>T2: 执行 Task2
T2->>S: 完成
S->>T3: 执行 Task3
T3->>S: 完成正确做法:显式配置
方式一:实现 SchedulingConfigurer(最可控)
1 | |
对应的任务:
1 | |
方式二:使用 ThreadPoolTaskScheduler(Spring 的包装)
1 | |
关键要点
- 线程名很重要:排查线程栈、日志定位、告警归因都靠它
- ErrorHandler 更像"集中兜底记录":你仍应在任务内部捕获异常并做业务级处理
- 显式配置是必须的:不要依赖默认值,因为它可能不是你想要的
Spring 的 fixedRate/fixedDelay 与 JUC 的对应关系
| Spring 注解 | JUC 方法 | 语义 | 时间计算基准 |
|---|---|---|---|
@Scheduled(fixedRate=1000) |
scheduleAtFixedRate |
固定频率(理论上每1s执行) | 上次开始时间 + period |
@Scheduled(fixedDelay=1000) |
scheduleWithFixedDelay |
固定延迟(完成后延迟1s再执行) | 上次完成时间 + delay |
@Scheduled(cron=...) |
无直接对应 | Cron 语义(墙上时钟) | 绝对时间点 |
关键差异:
fixedRate: 努力维持固定频率,但如果任务执行时间超过period,会等待任务完成后立即执行下一次fixedDelay: 严格保证任务间隔,每次都在完成后等待delay时间cron: 按照cron表达式的绝对时间执行,与任务执行时间无关
注意:@Scheduled(cron=...) 是 cron 语义(墙上时钟),通常更像 Quartz 的使用体验;但底层执行仍依赖 scheduler/线程池,仍会受线程池大小影响。
避免"任务重入"的手段
在 Spring 集群中,@Scheduled 默认每个实例都会跑一遍。常见做法:
- 用 DB/Redis 分布式锁(ShedLock 是常用库)保证同一时刻只有一个实例执行
- 或用 leader election(K8s lease / ZK / etcd)
此外即便单机,也可能因为任务慢造成"下一次触发时上一次还没结束"的重入风险(cron 语义更常见)。处理方式:
1 | |
生产环境最佳实践
参数调优指南
1 | |
与其他框架组件的集成
与@Async注解集成
1 | |
虚拟线程:Java 并发模型的未来
虚拟线程(Virtual Threads)是 JDK 21 正式引入的重要特性(JEP 444),代表了 Java 并发模型的未来方向。理解虚拟线程与传统线程池的差异,对架构决策至关重要。
为什么需要虚拟线程?
传统线程模型的困境
graph TD
subgraph "传统平台线程模型"
A[Java Thread] -->|1:1 映射| B[OS Thread]
B --> C[内核调度]
C --> D[上下文切换开销大]
D --> E[线程数受限于内存]
E --> F[线程池成为必需品]
end
subgraph "问题"
F --> G[线程池大小难以调优]
F --> H[阻塞操作浪费线程]
F --> I[高并发场景受限]
end传统 Java 线程(平台线程)的问题:
| 问题 | 描述 | 影响 |
|---|---|---|
| 内存开销大 | 每个线程默认栈大小 1MB | 10000 线程 ≈ 10GB 内存 |
| 创建成本高 | 需要 OS 内核参与 | 创建/销毁耗时约 1ms |
| 上下文切换昂贵 | 内核态切换 | 约 1-10μs 每次切换 |
| 数量受限 | 受 OS 和内存限制 | 通常数千到数万 |
虚拟线程的解决方案
graph TD
subgraph "虚拟线程模型"
A1[Virtual Thread 1] --> B1[Carrier Thread 1]
A2[Virtual Thread 2] --> B1
A3[Virtual Thread 3] --> B1
A4[Virtual Thread 4] --> B2[Carrier Thread 2]
A5[Virtual Thread ...] --> B2
A6[Virtual Thread N] --> B2
B1 --> C1[OS Thread 1]
B2 --> C2[OS Thread 2]
end
subgraph "优势"
D[M:N 调度模型]
E[JVM 管理调度]
F[阻塞时自动让出]
G[百万级并发]
end虚拟线程 vs 平台线程
核心差异对比
| 特性 | 平台线程 (Platform Thread) | 虚拟线程 (Virtual Thread) |
|---|---|---|
| 映射关系 | 1:1 映射到 OS 线程 | M:N 映射(多对少) |
| 调度者 | OS 内核 | JVM(用户态调度) |
| 栈大小 | 固定(默认 1MB) | 动态增长(初始 KB 级) |
| 创建成本 | 高(~1ms) | 极低(~1μs) |
| 数量上限 | 数千到数万 | 数百万 |
| 阻塞行为 | 阻塞 OS 线程 | 自动挂起,让出载体线程 |
| 适用场景 | CPU 密集型 | IO 密集型 |
代码对比
1 | |
虚拟线程的工作原理
挂载与卸载机制
sequenceDiagram
participant VT as Virtual Thread
participant CT as Carrier Thread
participant OS as OS Thread
participant IO as IO Operation
Note over VT,OS: 虚拟线程执行流程
VT->>CT: 挂载 (mount)
CT->>OS: 执行用户代码
VT->>IO: 发起阻塞IO
Note over VT: 检测到阻塞操作
VT->>CT: 卸载 (unmount)
Note over CT: 载体线程空闲,可执行其他虚拟线程
IO-->>VT: IO完成
VT->>CT: 重新挂载 (remount)
CT->>OS: 继续执行虚拟线程调度模型:与 Go GPM 的对比
理解虚拟线程的调度机制,需要与 Go 语言的 GPM 模型进行对比。两者都实现了 M:N 调度,但设计哲学有所不同。
Go 的 GPM 模型
graph TB
subgraph "Go Runtime"
G1[Goroutine 1]
G2[Goroutine 2]
G3[Goroutine 3]
G4[Goroutine 4]
P1[P: Processor 1<br/>本地队列]
P2[P: Processor 2<br/>本地队列]
M1[M: OS Thread 1]
M2[M: OS Thread 2]
GQ[Global Queue<br/>全局队列]
G1 --> P1
G2 --> P1
G3 --> P2
G4 --> GQ
P1 --> M1
P2 --> M2
M1 --> OS1[OS Scheduler]
M2 --> OS1
end
style P1 fill:#90EE90
style P2 fill:#90EE90Java 虚拟线程模型
graph TB
subgraph "JVM"
VT1[Virtual Thread 1]
VT2[Virtual Thread 2]
VT3[Virtual Thread 3]
VT4[Virtual Thread 4]
WQ1[WorkQueue 1]
WQ2[WorkQueue 2]
CT1[Carrier Thread 1<br/>ForkJoinWorkerThread]
CT2[Carrier Thread 2<br/>ForkJoinWorkerThread]
VT1 -.unmounted.-> WQ1
VT2 --> CT1
VT3 --> CT2
VT4 -.unmounted.-> WQ2
CT1 --> OS1[OS Thread 1]
CT2 --> OS2[OS Thread 2]
OS1 --> OSS[OS Scheduler]
OS2 --> OSS
end
style CT1 fill:#87CEEB
style CT2 fill:#87CEEB核心差异对比
| 维度 | Go GPM | Java Virtual Thread |
|---|---|---|
| G (Goroutine) | 用户态协程 | 虚拟线程 (Virtual Thread) |
| P (Processor) | 逻辑处理器,持有 G 的本地队列 | 无显式 P 概念,使用 ForkJoinPool 的 WorkQueue |
| M (Machine) | OS 线程 | Carrier Thread (载体线程) |
| 调度器 | Go Runtime Scheduler | ForkJoinPool (work-stealing) |
| 队列模型 | 本地队列 + 全局队列 | 每个 Carrier Thread 的 WorkQueue |
| Work Stealing | P 之间窃取 G | Carrier Thread 之间窃取任务 |
| 阻塞处理 | M 阻塞时创建新 M | 正常情况:Carrier Thread 不阻塞,虚拟线程 unmount;Pinning 场景(synchronized/JNI):Carrier Thread 被阻塞 |
关键设计差异
-
Go 的 P (Processor):
- Go 显式引入了 P 的概念,作为 G 和 M 之间的中介
- P 的数量通常等于 CPU 核心数(GOMAXPROCS)
- P 持有本地队列,减少全局队列的竞争
-
Java 的简化模型:
- Java 没有显式的 P 概念
- 直接使用 ForkJoinPool 的 work-stealing 机制
- Carrier Thread 数量默认等于 CPU 核心数
- 每个 Carrier Thread 有自己的 WorkQueue
为什么 Java 不需要 P?
Go 的 P 设计是为了解决以下问题:
- 减少全局队列的锁竞争
- 支持 work-stealing
- 管理 G 的本地缓存
Java 虚拟线程通过 ForkJoinPool 已经实现了这些功能:
- ForkJoinPool 本身就是为 work-stealing 设计的
- 每个 ForkJoinWorkerThread 有自己的双端队列
- 无需额外的 P 抽象层
虚拟线程的 Continuation 机制:unmount/mount 的本质
虚拟线程的核心是 Continuation(延续)机制。这是理解 unmount/mount 行为的关键。
什么是 Continuation?
Continuation 是一种可以暂停和恢复执行的程序抽象。在 Java 中,它是 jdk.internal.vm.Continuation 类的实例。
1 | |
虚拟线程的 unmount/mount 流程
stateDiagram-v2
[*] --> Unmounted: 创建虚拟线程
Unmounted --> Mounted: mount()<br/>分配 Carrier Thread
Mounted --> Running: 开始执行
Running --> Unmounted: unmount()<br/>遇到阻塞操作
Running --> Pinned: 遇到 synchronized<br/>或 native 方法
Pinned --> Running: 阻塞操作完成<br/>(Carrier Thread 被阻塞)
Unmounted --> Mounted: IO 完成<br/>重新调度
Running --> [*]: 任务完成
note right of Unmounted
虚拟线程状态保存在堆中
Continuation 保存栈帧
不占用 Carrier Thread
end note
note right of Mounted
虚拟线程在 Carrier Thread 上执行
栈帧在 Carrier Thread 的栈上
end note
note right of Pinned
无法 unmount
Carrier Thread 被阻塞
降级为平台线程行为
end note自动 unmount 的场景
根据 JEP 444 和 JDK 源码,虚拟线程在以下场景会自动 unmount:
| 阻塞操作 | 是否 unmount | 说明 |
|---|---|---|
Thread.sleep() |
是 | JDK 内部实现为 Continuation.yield() |
Object.wait() |
是 | 不在 synchronized 块内时 |
LockSupport.park() |
是 | 虚拟线程的标准阻塞原语 |
BlockingQueue.take() |
是 | 内部使用 LockSupport.park() |
Semaphore.acquire() |
是 | 内部使用 LockSupport.park() |
ReentrantLock.lock() |
是 | 阻塞时使用 LockSupport.park() |
| Socket I/O | 是 | JDK 改造为非阻塞实现 |
| File I/O | 是 | JDK 改造为非阻塞实现 |
synchronized 块 |
否 | Pinning 问题 |
| JNI 调用 | 否 | Pinning 问题 |
| CPU 密集计算 | 否 | 无阻塞点,无法 unmount |
unmount 的实现原理
1 | |
与 C 协程的差异:隐式 vs 显式调度
这是一个关键的设计差异:
C 协程(如 libco):
1 | |
Java 虚拟线程:
1 | |
为什么 Java 选择隐式调度?
- 向后兼容:现有的阻塞 API 无需修改即可工作
- 简化编程:开发者无需关心调度细节
- 安全性:避免程序员错误使用 yield 导致的问题
- 性能:JVM 可以优化 unmount 时机
unmount 的性能开销
1 | |
要点
-
Java 虚拟线程不是"完全"的协程:
- 无法在任意点 yield
- 只能在特定的阻塞点 unmount
- 这是设计选择,不是技术限制
-
unmount 是自动的,不是手动的:
- JVM 检测到阻塞操作时自动触发
- 开发者无需(也无法)显式控制
-
Pinning 是虚拟线程的限制:
synchronized和 JNI 调用无法 unmount- 这是当前实现的限制,未来可能改进
-
虚拟线程的价值不在于"任意点切换":
- 而在于"阻塞时不浪费 Carrier Thread"
- 这对 IO 密集型应用已经足够
关键概念
1 | |
虚拟线程的使用原则
原则一:不要池化虚拟线程
1 | |
为什么虚拟线程无需池化?
传统线程池的设计目的是复用昂贵的操作系统线程资源。理解这一点是理解虚拟线程设计哲学的关键。
平台线程的成本结构:
| 成本项 | 平台线程 | 虚拟线程 |
|---|---|---|
| 创建成本 | ~1ms(需要 OS 内核参与) | ~1μs(纯 JVM 对象创建) |
| 内存占用 | 固定 1MB 栈空间 | 初始几 KB,按需增长 |
| 调度开销 | 内核态切换(~1-10μs) | 用户态切换(纳秒级) |
| 数量上限 | 数千到数万(受内存限制) | 数百万(受堆内存限制) |
虚拟线程的"用完即弃"设计:
根据 JEP 444,虚拟线程被设计为 use-and-throw-away(用完即弃)资源:
1 | |
池化虚拟线程的问题:
- 违背设计初衷:虚拟线程本身就是为了避免池化的复杂性
- 限制并发能力:池化会人为限制虚拟线程数量,失去其核心优势
- 增加复杂性:需要管理池的生命周期、任务队列等
- 状态清理开销:复用线程需要清理 ThreadLocal 等状态,反而增加开销
对比示例:
1 | |
要点:虚拟线程将"线程"从"昂贵的需要复用的资源"变成了"廉价的可随意创建的对象"。这是并发编程范式的重大转变。
原则二:避免在虚拟线程中执行 CPU 密集型任务
1 | |
原因:虚拟线程的优势在于 IO 等待期间让出载体线程。CPU 密集型任务没有等待,无法发挥虚拟线程优势。
原则三:注意 synchronized 和 native 方法的 Pinning 问题
1 | |
Pinning(钉住):当虚拟线程执行 synchronized 块或 native 方法时,无法从载体线程卸载,导致载体线程被阻塞。
原则四:正确使用 ThreadLocal
1 | |
ThreadLocal 在虚拟线程中为何仍然有效?
这是一个重要的设计决策,需要从JVM实现层面理解:
graph LR
A[虚拟线程创建] --> B[继承载体线程ThreadLocal]
B --> C[创建独立ThreadLocal映射]
C --> D[执行期间访问本地数据]
D --> E[虚拟线程结束]
E --> F[自动清理ThreadLocal]
subgraph "载体线程"
G[ThreadLocal Map]
end
subgraph "虚拟线程"
H[独立ThreadLocal Map]
I[执行任务]
end
G -.-> B
B --> H
H --> D
H --> FTechnical Details:
- 继承机制:虚拟线程创建时会继承载体线程的ThreadLocal值副本
- 独立存储:每个虚拟线程维护自己的ThreadLocal映射表,与载体线程隔离
- 生命周期管理:虚拟线程结束时,JVM会自动清理其ThreadLocal变量,防止内存泄漏
JDK实现改进:
- 增加了针对大量虚拟线程的内存优化策略
- 改进了ThreadLocal清理机制的性能
- 添加了虚拟线程专用的ThreadLocal访问路径
ScopedValue 为什么优于 ThreadLocal?
对于虚拟线程场景,ScopedValue是更好的选择:
graph TD
A[并发数据传递需求] --> B{选择哪种机制?}
B -->|传统场景| C[ThreadLocal]
B -->|虚拟线程场景| D[ScopedValue]
C --> E[可变状态]
C --> F[潜在内存泄漏]
C --> G[性能开销]
D --> H[不可变数据]
D --> I[明确作用域]
D --> J[零内存泄漏风险]
D --> K[更高性能]ScopedValue的核心优势:
- 不可变性保证:一旦设置就无法修改,避免并发修改问题
- 作用域明确:具有清晰的生命周期边界,不会跨作用域泄漏
- M:N调度友好:不依赖具体线程身份,在虚拟线程的载体线程切换中表现更好
- 性能优势:避免了ThreadLocal的哈希表查找和冲突处理开销
Specification依据:根据JEP 429和JEP 446规范,ScopedValue专为结构化并发和虚拟线程场景设计,解决了ThreadLocal在大规模并发下的根本性问题。
虚拟线程与传统线程池的选择
决策流程图
flowchart TD
A[新任务] --> B{任务类型?}
B -->|IO密集型| C{JDK版本?}
C -->|JDK 21+| D[使用虚拟线程]
C -->|JDK 21以下| E[使用传统IO线程池]
B -->|CPU密集型| F[使用平台线程池]
F --> G[线程数 = CPU核心数]
B -->|混合型| H{主要瓶颈?}
H -->|IO等待| D
H -->|CPU计算| F
D --> I[newVirtualThreadPerTaskExecutor]
E --> J[newCachedThreadPool 或 自定义线程池]
style D fill:#90EE90
style F fill:#87CEEB
style E fill:#FFE4B5场景对比
| 场景 | 推荐方案 | 原因 |
|---|---|---|
| Web 服务器处理 HTTP 请求 | 虚拟线程 | 大量 IO 等待(数据库、外部 API) |
| 批量数据处理/ETL | 虚拟线程 | 文件 IO、网络传输 |
| 图像/视频处理 | 平台线程池 | CPU 密集型计算 |
| 科学计算/机器学习 | 平台线程池 + ForkJoinPool | CPU 密集型,需要并行计算 |
| 实时交易系统 | 平台线程池 | 低延迟要求,避免 JVM 调度开销 |
| 微服务间调用 | 虚拟线程 | 大量网络 IO 等待 |
迁移示例
1 | |
虚拟线程的性能特征
吞吐量对比
1 | |
内存占用对比
| 线程类型 | 10,000 线程内存 | 100,000 线程内存 | 1,000,000 线程内存 |
|---|---|---|---|
| 平台线程 | ~10 GB | ~100 GB(不可行) | 不可能 |
| 虚拟线程 | ~20 MB | ~200 MB | ~2 GB |
响应式编程:RxJava 与 Reactor
RxJava
%%{init: {'theme': 'base', 'themeVariables': { 'primaryColor': '#E1D5E7', 'edgeLabelBackground':'#FFF', 'fontFamily': 'monospace'}}}%%
sequenceDiagram
participant Client as Client
participant Observable as Observable
participant Operator1 as map
participant Operator2 as filter
participant Subscriber as Subscriber
Note over Client,Subscriber: RxJava (响应式流)
Client->>Observable: create(emitter)
Observable-->>Operator1: 注册操作符
Operator1->>Observable: map(transform)
Observable-->>Operator2: 注册操作符
Operator2->>Observable: filter(predicate)
Observable-->>Subscriber: subscribe(Subscriber)
Note right of Client: 非阻塞订阅
par 数据流处理
Observable->>Operator1: onNext(item)
Operator1->>Operator2: onNext(mapped)
Operator2->>Subscriber: onNext(filtered)
end
Observable->>Subscriber: onComplete()
Note over Client: 响应式: map/filter/subscribe1 | |
Reactor
%%{init: {'theme': 'base', 'themeVariables': { 'primaryColor': '#9DC3E6', 'edgeLabelBackground':'#FFF', 'fontFamily': 'monospace'}}}%%
sequenceDiagram
participant Client as Client
participant Flux as Flux
participant Operator1 as map
participant Operator2 as flatMap
participant Subscriber as Subscriber
Note over Client,Subscriber: Reactor (响应式流)
Client->>Flux: create(sink)
Flux-->>Operator1: 注册操作符
Operator1->>Flux: map(transform)
Flux-->>Operator2: 注册操作符
Operator2->>Flux: flatMap(asyncOp)
Flux-->>Subscriber: subscribe(Subscriber)
Note right of Client: 非阻塞订阅
par 数据流处理
Flux->>Operator1: onNext(item)
Operator1->>Operator2: onNext(mapped)
Operator2->>Subscriber: onNext(result)
end
Flux->>Subscriber: onComplete()
Note over Client: 响应式: map/flatMap/subscribe1 | |
总结:线程池技术的演进
timeline
title Java 并发模型演进
section JDK 1.0-1.4
1996 : Thread 类
: 手动管理线程
section JDK 5
2004 : ExecutorService
: ThreadPoolExecutor
: 线程池标准化
section JDK 7
2011 : ForkJoinPool
: 工作窃取算法
: 分治并行
section JDK 8
2014 : CompletableFuture
: 异步编程
: 链式组合
section JDK 21
2023 : Virtual Threads
: 百万级并发
: 简化异步编程技术选型总结
| 技术 | 适用场景 | 核心优势 | 注意事项 |
|---|---|---|---|
| ThreadPoolExecutor | 通用任务执行 | 成熟稳定,参数可控 | 需要调优线程池参数 |
| ForkJoinPool | 分治/递归任务 | 工作窃取,高效并行 | 任务需可分解 |
| CompletableFuture | 异步编排 | 链式组合,声明式 | 注意线程池选择 |
| Virtual Threads | IO 密集型高并发 | 轻量级,简化编程 | JDK 21+,避免 Pinning |
要点:虚拟线程不是要取代线程池,而是为 IO 密集型场景提供更简单、更高效的解决方案。在 CPU 密集型场景,传统线程池仍然是最佳选择。理解每种技术的适用场景,才能做出正确的架构决策。
模式速查表
| 模式 | 核心要点 | 适用场景 |
|---|---|---|
| 线程池选型三板斧 | CPU 密集型:核心数+1;IO 密集型:核心数×2 或 核心数/(1-阻塞系数);混合型:拆分为独立池 | 所有需要线程池的场景 |
| 有界队列+明确拒绝策略 | 永远不用无界队列(Executors.newFixedThreadPool 的 LinkedBlockingQueue 是无界的),必须设置队列容量和拒绝策略 |
生产环境线程池配置 |
| 周期任务防御性编程 | 周期任务必须 try-catch(Throwable) 包裹全部逻辑,否则首次异常后静默终止 |
scheduleAtFixedRate / scheduleWithFixedDelay |
| cancel 后清理队列 | 高频 cancel 场景必须 setRemoveOnCancelPolicy(true),否则已取消任务堆积导致内存泄漏 |
超时控制、请求级定时任务 |
| shutdown 优雅关闭 | shutdown() → awaitTermination() → shutdownNow() 三步走,给足等待时间 |
应用关闭、线程池生命周期管理 |
| FutureTask 状态机 | 7 种状态单向流转(NEW→COMPLETING→NORMAL/EXCEPTIONAL/CANCELLED/INTERRUPTING/INTERRUPTED),CAS 保证线程安全 | 理解 Future 取消/异常行为 |
| execute vs submit | execute 异常由 UncaughtExceptionHandler 处理;submit 异常被 Future 吞掉,需 get() 才能感知 |
选择任务提交方式 |
| Rate vs Delay | scheduleAtFixedRate:基于理论时间轴,有追赶机制;scheduleWithFixedDelay:基于实际结束时间,无追赶 |
选择周期调度策略 |
| ThreadFactory 命名 | 自定义 ThreadFactory 设置有意义的线程名前缀 + UncaughtExceptionHandler |
所有自建线程池 |
| CompletableFuture 异步编排 | 优先用 thenCompose 替代 thenApply + join 嵌套;注意默认使用 ForkJoinPool.commonPool() 的风险 |
异步任务编排 |
| 池隔离原则 | 不同类型任务(CPU/IO/定时)使用独立线程池,避免相互影响 | 多类型任务并存的系统 |
| CAS + 锁分层 | 高频操作(线程计数)用 CAS 无锁化,低频操作(workers 集合修改)用 mainLock 互斥 | 高并发状态管理(ThreadPoolExecutor 的 ctl 设计) |
| Worker 不可重入锁 | Worker 继承 AQS 实现不可重入锁,tryLock() 失败说明线程正在执行任务,shutdown() 不应中断 |
区分空闲线程与工作线程 |
| CompletableFuture 完成保证 | 每个 CompletableFuture 必须最终被完成(normal/exceptional/cancel),否则下游永久阻塞 | 异步编排中的资源泄漏防护 |
| 虚拟线程使用原则 | 不池化(每次创建新实例)、避免 CPU 密集型任务、注意 synchronized 导致的 Pinning |
JDK 21+ IO 密集型高并发场景 |
| Spring @Scheduled 单线程陷阱 | Spring @Scheduled 默认使用单线程调度器,一个任务阻塞会影响所有定时任务,必须显式配置线程池 |
Spring 定时任务配置 |
关于 JVM 内存模型(JMM)、volatile 语义、happens-before 规则等内容,请参阅《JVM 的内存模型与线程》。